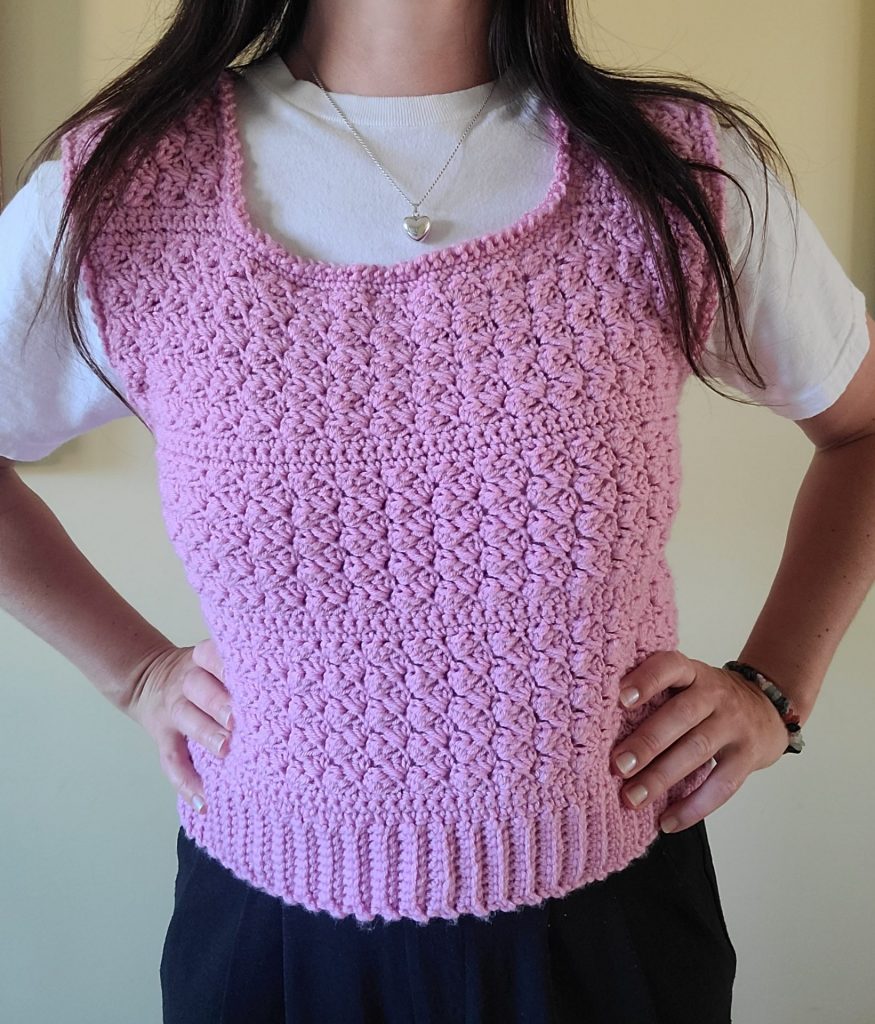
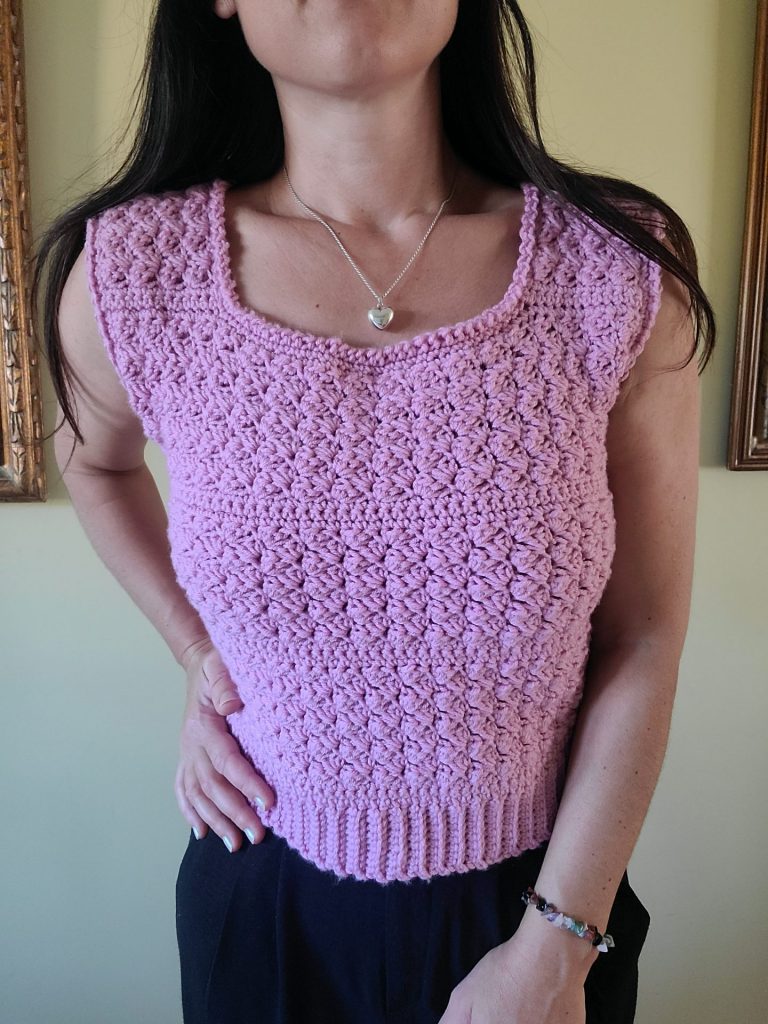
Looking for your next cozy project? The Aglaya Crochet Vest free pattern & video tutorial is a must-try for anyone who loves stylish handmade pieces with a modern twist. This crochet women vest is not only easy to make but also incredibly versatile—perfect for layering over long sleeves in the fall or pairing with a tank top in the warmer months.
This crochet vest free pattern was designed with comfort and wearability in mind, making it a great addition to your handmade wardrobe. Whether you’re crafting for yourself or creating a thoughtful gift, the Aglaya vest is sure to impress. The pattern includes step-by-step written instructions as well as a video tutorial, so you can confidently follow along, no matter your skill level.
If you’re searching for a crochet cozy vest free pattern that’s equal parts chic and functional, you’re in the right place. The Aglaya Vest combines texture, warmth, and effortless style—all in one satisfying project. Ready to get started? Grab your favorite yarn, hook, and let’s crochet something beautiful together!
If you’re interested in purchasing this crochet top pattern in a downloadable, printable PDF format, it is available for purchase on the shop linked bellow:
Click here to purchase the Aglaya Crochet Vest Pattern on Etsy
How to Style the Aglaya Crochet Vest
The Aglaya Crochet Vest isn’t just fun to make—it’s incredibly easy to style! Whether you’re going for a relaxed boho vibe or something more polished, this crochet women vest adds the perfect touch of texture and warmth to your outfit. Here are some styling ideas to get inspired:
1. Casual Everyday Look
Pair your vest with a simple tee or long-sleeve shirt, high-waisted jeans, and ankle boots for an effortless, cozy look. Add a slouchy beanie or a crossbody bag to complete the casual vibe.
2. Boho-Chic Vibes
Layer the vest over a flowy maxi dress or a floral blouse and pair it with wide-leg pants or a midi skirt. Add some chunky jewelry and suede boots for that laid-back bohemian feel.
3. Work-from-Home Comfort
Throw your crochet vest over a fitted turtleneck and leggings or joggers for a cozy, put-together look that’s Zoom-ready and couch-approved.
4. Layered for Fall
This crochet cozy vest free pattern is perfect for layering! Wear it under a denim jacket or over a plaid shirt with leggings and tall boots for a warm and stylish fall outfit.
5. Dress It Up
Believe it or not, you can dress up your crochet vest! Try it over a black dress or a blouse with tailored trousers. Add a belt at the waist to give your look some shape and structure.
Notes
– This pattern is written in US terms.
– Take measurements of your body so you can chain accurate amount of stitches.
– All measurements are for the blocked final garment, not actual body size.
– Ch 3 counts as 1st dc
– This pattern made as Sizes S (M, L, XL, XXL and 3XL ).
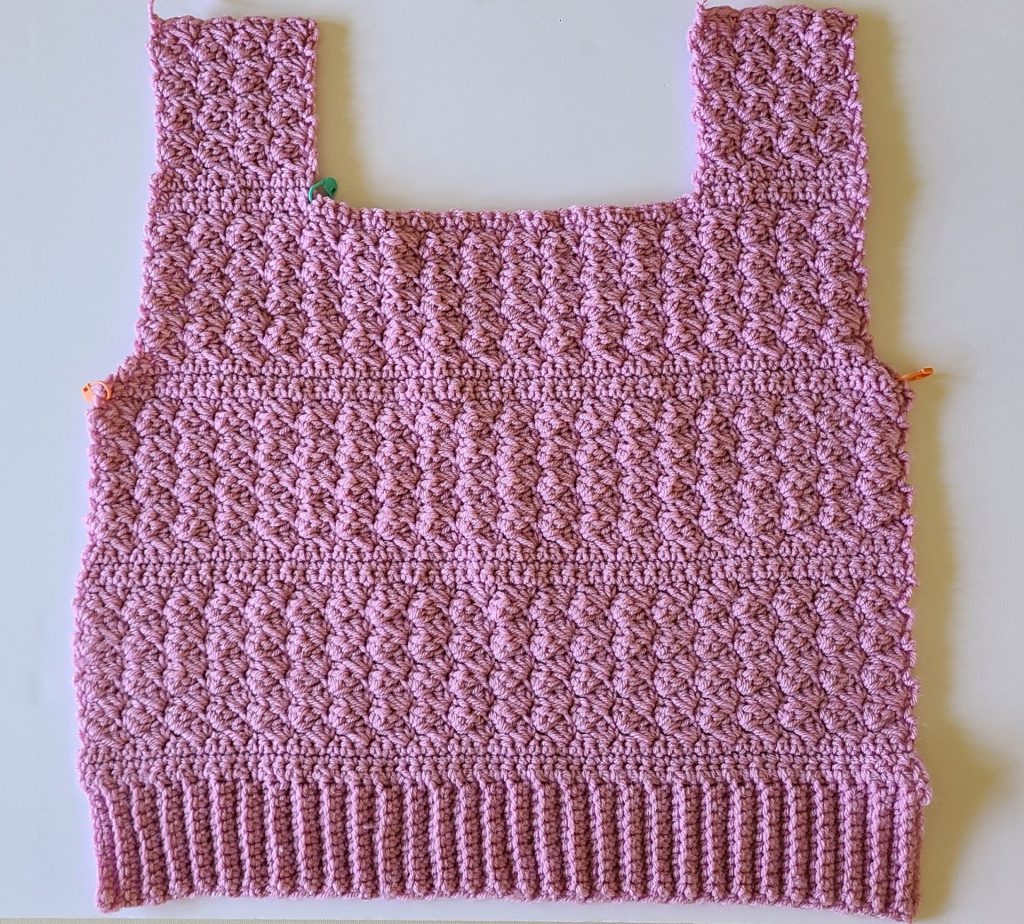
– In this picture I have demonstrated with size Medium.
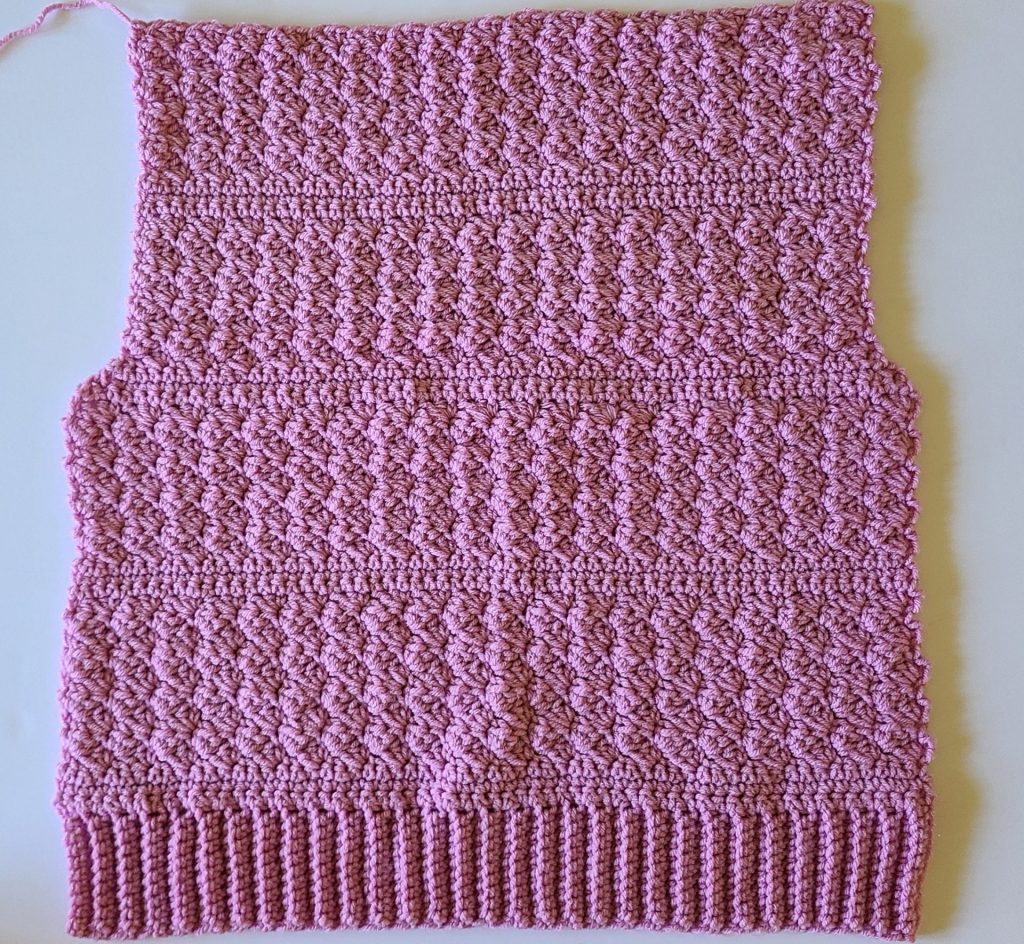
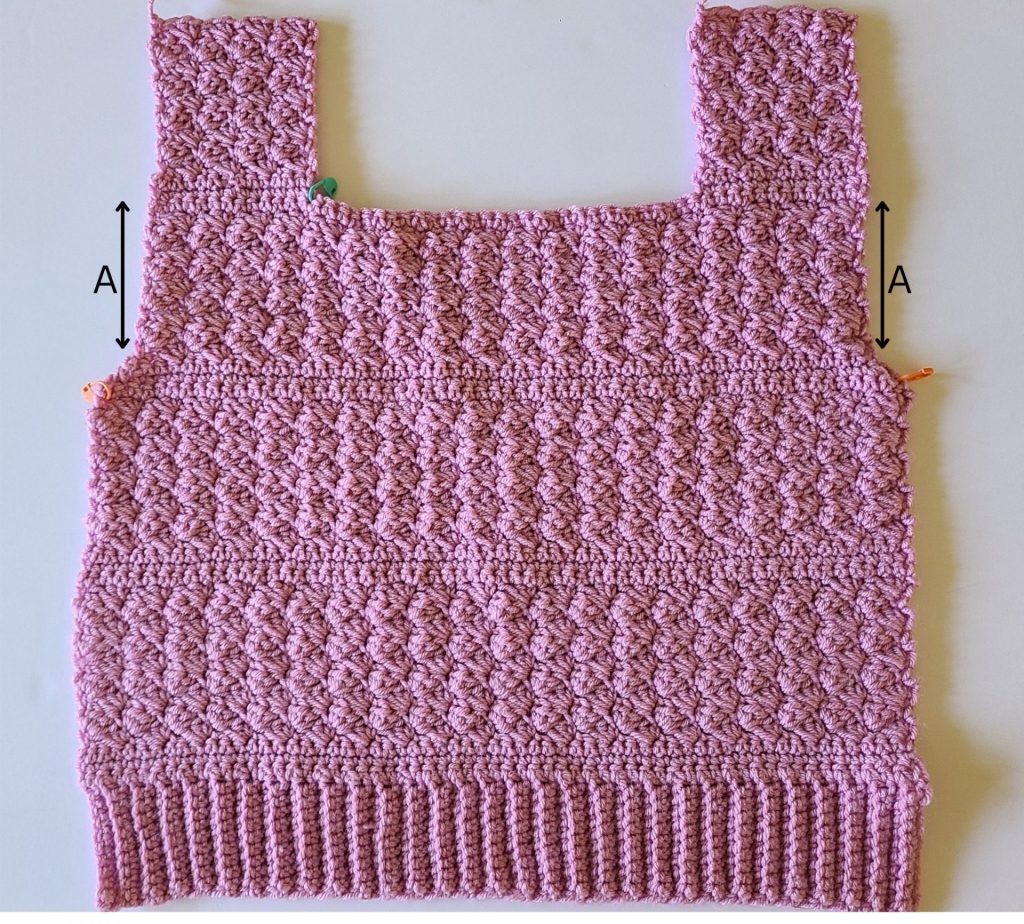
– This top is worked flat in two separate pieces from the bottom up and then sewn together.
– Video tutorial is available on my Youtube channel Yelena Style Crochet.
Construction
This vest is worked in 2 separate panels that are sewn together upon completion. The border for the armpits is worked after being sewn together. It is important that the armholes has the same number of stitches on both sides. This ensures your vest lines up correctly when sewn together and fits properly. When the vest is complete, it will be blocked using wet blocking. This pattern is written for a size medium, for alternative sizing, see the chart below.
Materials
– Yarn: 100 % Acrylic, 4 Medium / Worsted
– 5 mm hook
– Scissors
– Tapestry needle
– Optional: stitch marker
Abbreviations
| ** | Repeat instructions defined number of times |
| [ ] | Work these instructions in the same stitch |
| Eor | End of row |
| Ch | Chain |
| Sc | Single Crochet |
| Dc | Double crochet |
| Hdc | Half double crochet |
| Dec | Decrease |
| Sk | Skip |
| Rep | Repeat |
| Sl st | Slip stitch |
| Sp(s) | Space(s) |
| St(s) | Stitch(es) |
Yarn needed: 270 ( 290; 310; 340, 360; 380) g Acrylic 4 Medium / Worsted yarn
Gauge
4×4 in (10 cm x 10cm) = 14st x 11 rows (3 rows of Sc rows and 8 of sc, hdc, dc)

Crochet Stitch Description
For this stitch combination you should know the chains, single crochet, half double crochet and double crochet. It is a very easy stitch combination to make and it is suitable for beginners. It is a repeat of two different rows.
Aglaya Crochet Vest Video Tutorial
Measurements (not blocked)
| Size | Width (in) | Height (in) |
| S | 16.7 | 18 |
| M | 17 | 19 |
| L | 18.5 | 20 |
| XL | 20 | 20 |
| XXL | 21.5 | 21 |
| 3XL | 23 | 22 |
Start Chains (multiple of 3 + 1)
| Size | Back Panel | Front Panel |
| S | 57 + 1 | 57 + 1 |
| M | 60 + 1 | 60 + 1 |
| L | 66 + 1 | 66 + 1 |
| XL | 72 + 1 | 72 + 1 |
| XXL | 78 + 1 | 78 + 1 |
| 3XL | 84 + 1 | 84 + 1 |
The Aglaya Crochet Vest Pattern starts here
Ribbing
Chain 11
Row 1: Sc in the 2nd st, sc into the next 9 sts.
Row 2: Ch 1, turn, sc in BLO to eor
Row 3 to Row 61: Rep Row 2.
Size Adjustments:
| Size | Number of start chains |
| S, M and L | 11 |
| XL, XXL and 3XL | 12 |
Aglaya Crochet Vest – Back panel
Row 1: To start the back panel you will sc in each row around the edge of the ribbing. (Counts 61)
Row 2: Ch 1, turn, sc in each st until eor
Row 3: rep row 2
Row 4: Ch 2, ch (1sc, 1hdc, 1dc) into the same first st. *sk 2, ch (1sc, 1hdc, 1dc) into the same next st. Rep from * until eor. At the end sk 2, ch 1 sc into the last st.
Rows 5, 6, 7, 8, 9, 10, 11, and 12: rep row 4
Rows 13, 14 and 15: rep row 2
Rows 16, 17, 18, 19, 20, 21, 22, 23 and 24: rep row 4
Back Panel – decrease part on the sides
Row 25: Ch 1, turn, sc dec into the first same st and next st, sc in each st until the last 2 sts, sc dec into the last 2 sts
Rows 26 and 27: rep row 25
Continue
Rows 28, 29, 30, 31, 32, 33, 34, 35 and 36: rep row 4
Rows 37, 38 and 39: rep row 2
Rows 40, 41, 42, 43, 44, 45, 46, 47 and 48: rep row 4
The number of rows for the back panel for each size
| Size | Number of rows |
| S | by row 46 |
| M | by row 48 |
| L | by row 51 |
| XL | by row 51 |
| XXL | by row 54 |
| 3XL | by row 56 |
Aglaya Crochet Vest – Front panel
Ribbing
Chain 11
Row 1: Sc in the 2nd st, sc into the next 9 sts.
Row 2: Ch 1, turn, sc in BLO to eor
Row 3 to Row 61: Rep Row 2.
Size Adjustments:
| Size | Number of start chains |
| S, M and L | 11 |
| XL, XXL and 3XL | 12 |
Aglaya Crochet Vest – Front panel
Row 1: To start the back panel you will sc in each row around the edge of the ribbing. (Counts 61)
Row 2: Ch 1, turn, sc in each st until eor
Row 3: rep row 2
Row 4: Ch 2, ch (1sc, 1hdc, 1dc) into the same first st. *sk 2, ch (1sc, 1hdc, 1dc) into the same next st. Rep from * until eor. At the end sk 2, ch 1 sc into the last st.
Rows 5, 6, 7, 8, 9, 10, 11, and 12: rep row 4
Rows 13, 14 and 15: rep row 2
Rows 16, 17, 18, 19, 20, 21, 22, 23 and 24: rep row 4
Front Panel – decrease part on the sides
Row 25: Ch 1, turn, sc dec into the first same st and next st, sc in each st until the last 2 sts, sc dec into the last 2 sts
Rows 26 and 27: rep row 25
Continue
Rows 28, 29, 30, 31, 32, 33, 34, 35 and 36: rep row 4
Rows 37: rep row 2
After 37 there a difference for each size
The number of rows for the front panel for each size after decreasing part before straps (Arrow A)
| Size | Number of rows for part A |
| S | by row 37 |
| M | by row 37 |
| L | by row 39 |
| XL | by row 39 |
| XXL | by row 42 |
| 3XL | by row 44 |
Front Panel
Straps
Sizes S and M
Row 38: Sc in the 2nd st, sc into the next 12 sts.
Row 39: Sc in the 2nd st, sc into the next 12 sts.
Row 40: Ch 2, ch (1sc, 1hdc, 1dc) into the same first st. *sk 2, ch (1sc, 1hdc, 1dc) into the same next st. Rep from * until eor. At the end sk 2, ch 1 sc into the last st.
Rows 41, 42, 43, 44, 45, 46, 47 and 48: rep row 40
Sizes L and XL
Rows 38 and 39: rep row 2
Straps
Row 40: Ch 2, ch (1sc, 1hdc, 1dc) into the same first st. *sk 2, ch (1sc, 1hdc, 1dc) into the same next st. Rep from * 4 more times. At the end sk 2, ch 1 sc into the last st.
Row 41, 42, 43, 44, 45, 46, 47 and 48: rep row 40
Row 49: Ch 1, turn, sc in each st until eor
Rows 50 and 51: rep row 49
Size XXL
Rows 38 and 39: rep row 2
Row 40, 41 and 42: rep row 4
Straps
Row 43: Ch 2, ch (1sc, 1hdc, 1dc) into the same first st. *sk 2, ch (1sc, 1hdc, 1dc) into the same next st. Rep from * 5 more times. At the end sk 2, ch 1 sc into the last st.
Rows 44, 45, 46, 47 and 48: rep row 43
Rows 49, 50 and 51: rep row 2
Rows 52, 53 and 54: rep row 43
Size 3XL
Rows 38 and 39: rep row 2
Row 40, 41, 42 and 43: rep row 4
Straps
Row 44: Ch 2, ch (1sc, 1hdc, 1dc) into the same first st. *sk 2, ch (1sc, 1hdc, 1dc) into the same next st. Rep from * 5 more times. At the end sk 2, ch 1 sc into the last st.
Rows 45, 46, 47 and 48: rep row 44
Rows 49, 50 and 51: rep row 2
Rows 52, 53, 54, 55 and 56: rep row 44
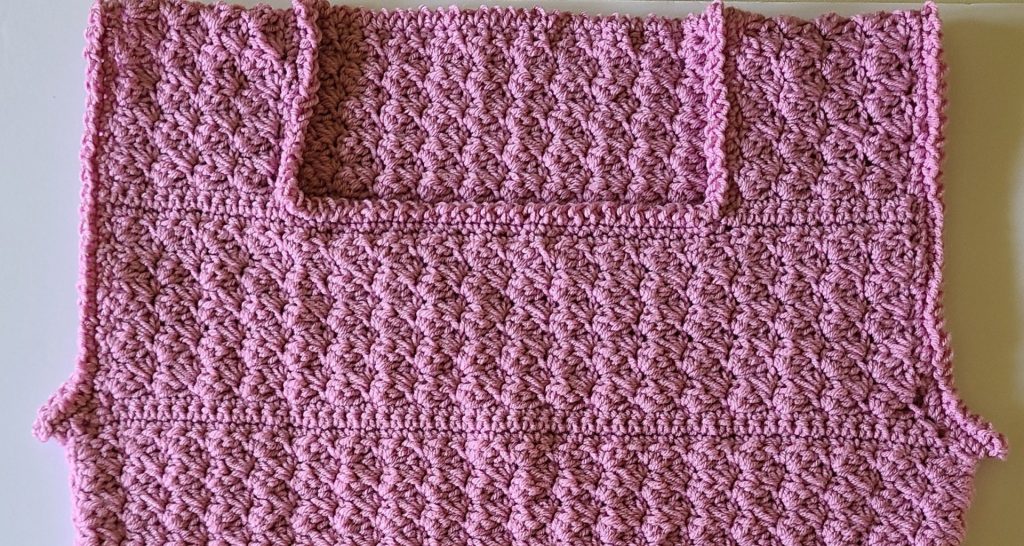
Aglaya Crochet Vest – Assembly
– Lay both pieces together with the wrong sides facing up.
– Start from shoulders and sew on both sides.
– We will sew it inside out then turn right side out when done.
– Start sewing from the bottom up to the under arm
Aglaya Crochet Vest – neck and armholes border
Attach yarn in any stitch.
Row 1: Ch 1, ch sc in each st across
Row 2: Ch 1, ch sl st into the the same first st. *ch 1, sl st into the next st. rep from * across
The Aglaya crochet vest is more than just a layering piece—it’s a statement of craftsmanship and style. Whether you’re pairing it with a flowy dress or your favorite pair of jeans, this crochet vest brings a touch of boho elegance to any outfit.
If you’re looking to add a unique, handmade vibe to your wardrobe, the Aglaya crochet vest is a timeless choice. Don’t forget to share your styling tips and creations—we’d love to see how you make it your own!
Thanks for stopping by, and happy crocheting!