
The Perfect Crochet Vest for Comfort and Style
If you’ve been searching for the ideal blend of comfort, creativity, and style crochet vest, the Carina Crochet Vest free pattern and video tutorial is exactly what you need! This beautiful project transforms simple stitches into a timeless wardrobe staple. With its relaxed fit and soft texture, this cozy and simple crochet vest free pattern is perfect for layering through every season.
Whether you’re new to crocheting garments or looking to add another handmade favorite to your collection, this women’s crochet vest free pattern offers clear instructions and a full video tutorial to guide you from start to finish. Grab your yarn and hook—it’s time to create a piece that’s as stylish as it is comfortable!
A Timeless Crochet Vest for Every Season
There’s nothing quite like wearing something you’ve made yourself — especially when it’s both practical and effortlessly stylish. The Carina Crochet Vest free pattern and video tutorial is the perfect project for crocheters who love modern designs with a cozy handmade touch. This vest blends comfort and elegance, making it the ideal addition to your wardrobe no matter the season.
Simple, Cozy, and Beginner-Friendly Crochet Vest
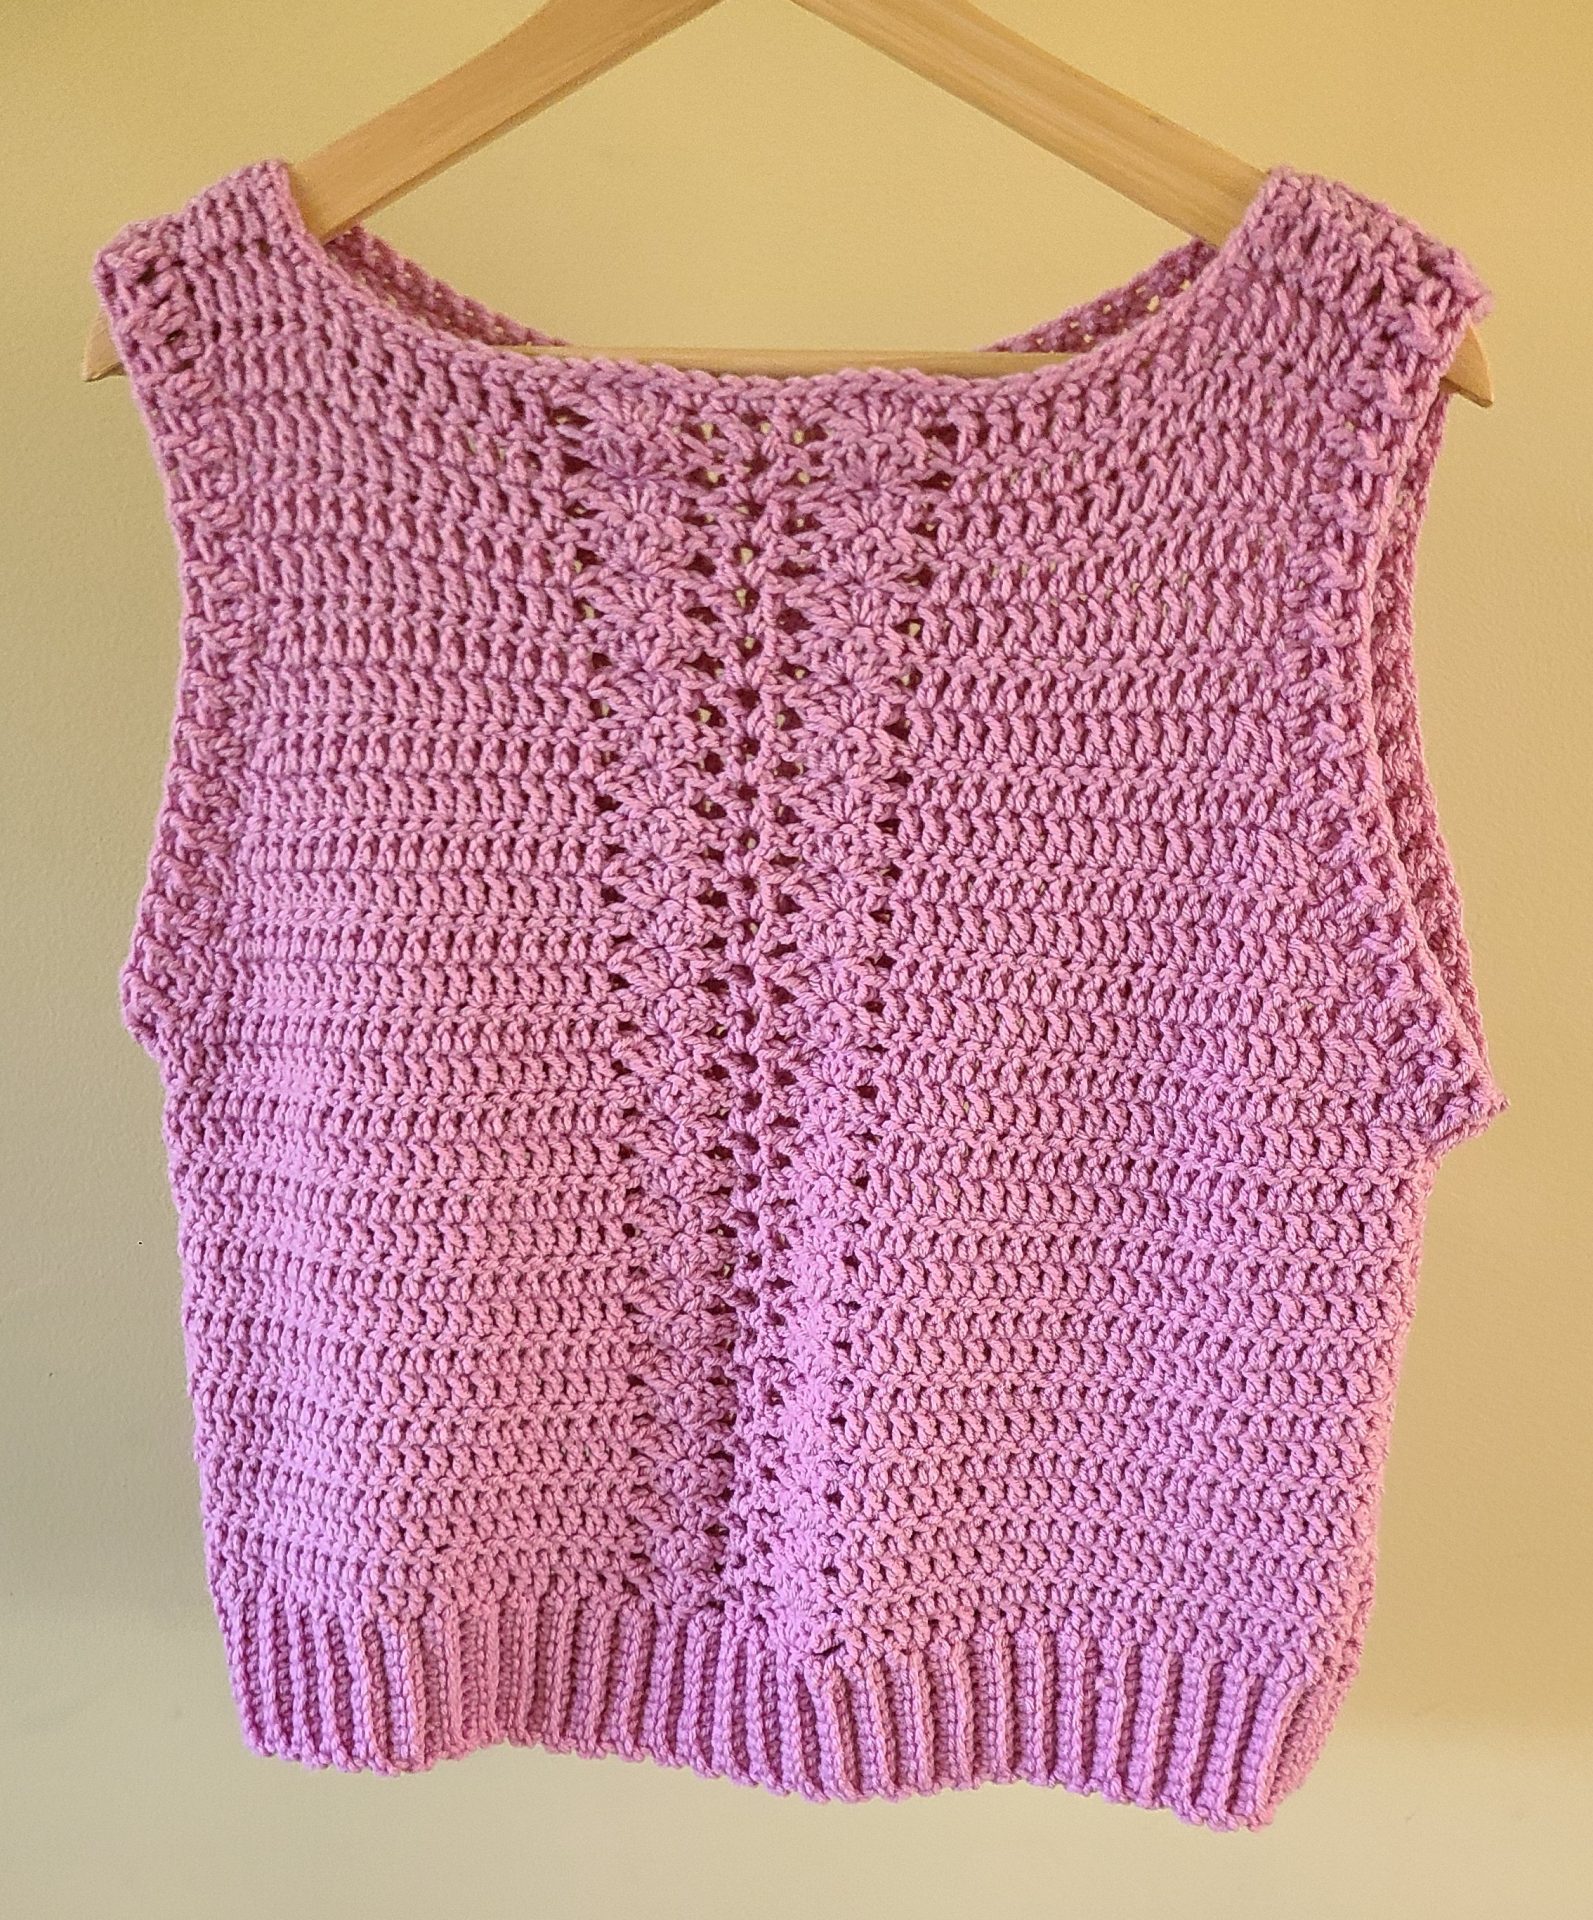
This crochet cozy simple vest free pattern is designed with simplicity in mind. Using basic stitches and easy shaping, you can create a beautiful layering piece that looks impressive but is incredibly beginner-friendly. Whether you want a lightweight summer vest or a snug winter layer, this pattern adapts beautifully to your yarn choice and personal style.
The Perfect Handmade Gift
Looking for a thoughtful handmade gift? This women’s crochet vest free pattern makes a wonderful present for friends, family, or even yourself. It’s quick to make, easy to customize, and comes with a full video tutorial to walk you through every step — making it perfect for visual learners or those who prefer to crochet along.
Get ready to wrap yourself in comfort and creativity. With the Carina Crochet Vest pattern, you’ll have a stylish, cozy piece that you’ll be proud to say you made with your own two hands.
Ready to Start Crocheting?
Now that you know what makes the Carina Crochet Vest so special, it’s time to dive in and start creating your own! In the next section, we’ll go over the materials you’ll need, including yarn suggestions, hook size, and gauge tips. Then, you can follow along with the free pattern and video tutorial to bring your cozy, stylish vest to life.
Grab your hook, pick your favorite yarn, and let’s get started!
Pattern Notes for Carina Crochet Vest
– This pattern is written in US terms.
– Take measurements of your body so you can chain accurate amount of stitches.
– All measurements are for the final garment, not actual body size.
– Ch 3 counts as 1st dc
– This pattern made as Sizes S (M, L, XL, XXL and 3XL ).
– In this picture I have demonstrated with size Medium.
– This top is worked flat in two separate pieces from the bottom up and then sewn together.
– Video tutorial is available on my Youtube channel Yelena Style Crochet.
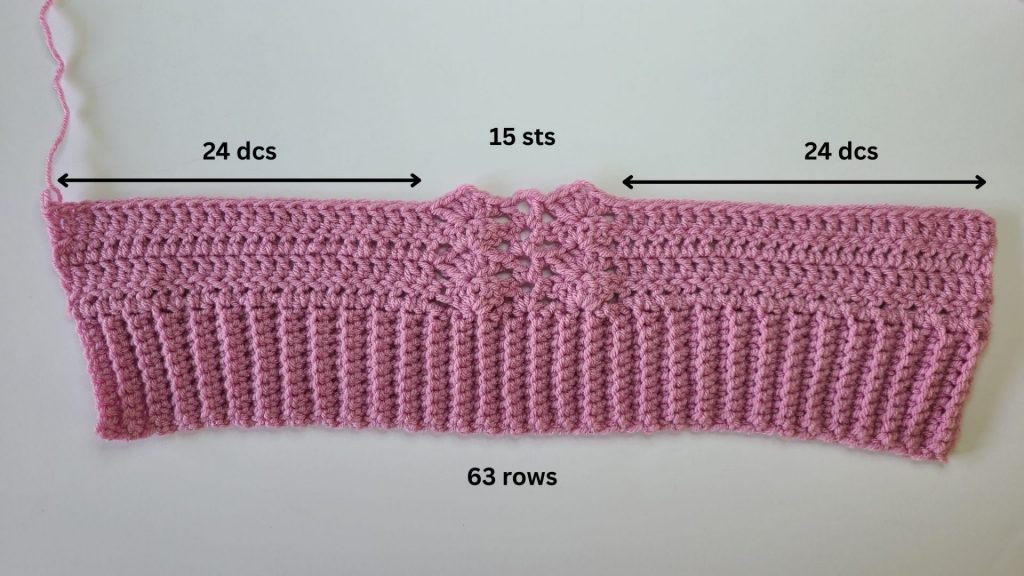
– For the Front Panel: There is a small difference between Row 1 and Row 2: At the beginning of Row 1, you have to skip 3 stitches before 5dc into next stitch, between [dc, ch 2, dc] and 5dc into next stitch. At the beginning of Row 2, you have to skip 2 stitches before the 5dc and after the second 5dc on the other side of the row.
These are the # of dc you should have in both sides for front panel for all sizes at the 1st row:
Size S: (22 dcs – 22 dcs)
Size M: (24 dcs – 24 dcs)
Size L: (27 dcs – 27 dcs)
Size XL: (30 dcs – 30 dcs)
Size XXL: (33 dcs – 33 dcs)
Size 3XL: (36 dc – 36 dcs)
Size 4XL: (39 dcs – 39 dc)
Size 5XL: (42 dcs – 42 dcs)
Carina Crochet Vest – Construction
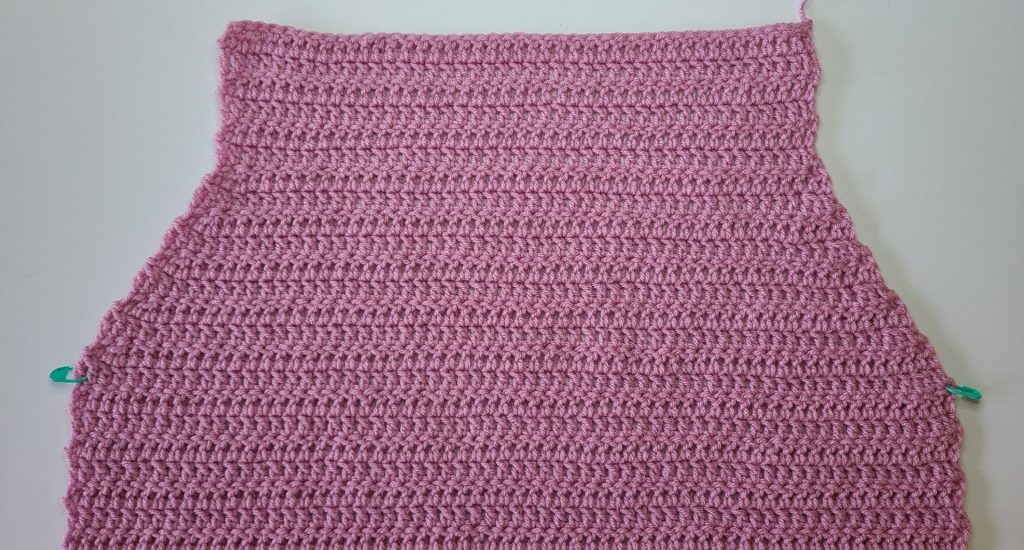
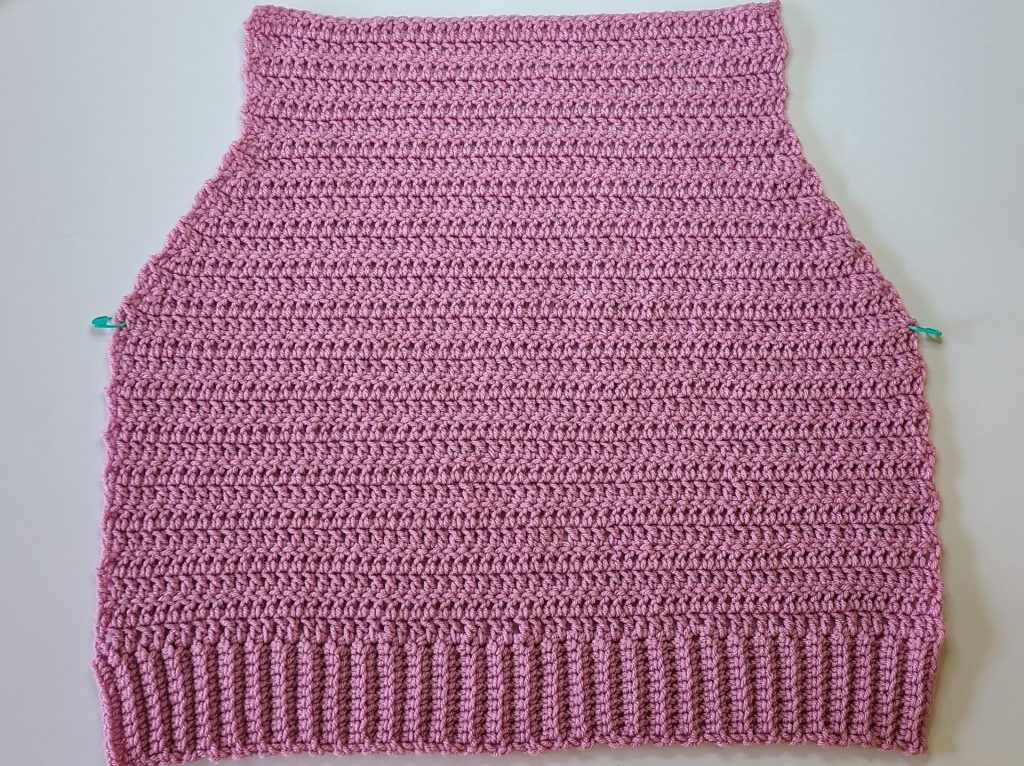
This vest is worked in 2 separate panels that are sewn together upon completion. The border for the armpits is worked after being sewn together. It is important that the armholes has the same number of stitches on both sides. This ensures your vest lines up correctly when sewn together and fits properly. When the vest is complete, it will be blocked using wet blocking. This pattern is written for a size medium, for alternative sizing, see the chart below.
Materials
– Yarn: 100 % Acrylic, 4 Medium / Worsted
– 5 mm hook
– Scissors
– Tapestry needle
– Optional: stitch marker
Abbreviations
US Terms
| ** | Repeat instructions in asterisks define number of times |
| [ ] | Work these instructions in same stitch |
| Ch | Chain |
| Dc | Double Crochet |
| Dec | Decrease |
| Rep | Repeat |
| Eor | End of the Row |
| Sk | Skip |
| Sl St | Slip Stitch |
| Sp | Space |
| St(s) | Stitch(es) |
Starting Chains & Sizes
| Size | Back Panel | Front Panel |
| S | 59 | 59 |
| M | 63 | 63 |
| L | 69 | 69 |
| XL | 75 | 75 |
| XXL | 81 | 81 |
| 3XL | 87 | 87 |
| 4XL | 93 | 93 |
| 5XL | 99 | 99 |
Yarn needed: 230 ( 251; 310; 350, 380; 420, 470, 520) g Acrylic 4 Medium / Worsted yarn
Gauge
4×4 in (10 cm x 10cm) = 12 dcs x 7 rows
Crochet Stitch Description
For this stitch combination you should know the chains and double crochet. It is a very easy stitch combination to make and it is suitable for beginners. It is a repeat of one row.
Carina Crochet Vest Video Tutorial
Measurements (not blocked)
| Size | Width (in) | Height (in) |
| S | 18,3 | 17,8 |
| M | 19,5 | 19 |
| L | 21,5 | 20,6 |
| XL | 23,5 | 22,2 |
| XXL | 25,5 | 23,4 |
| 3XL | 27,5 | 24,6 |
| 4XL | 29,5 | 24,6 |
| 5XL | 31,5 | 25,8 |
Carina Crochet Vest Pattern starts here
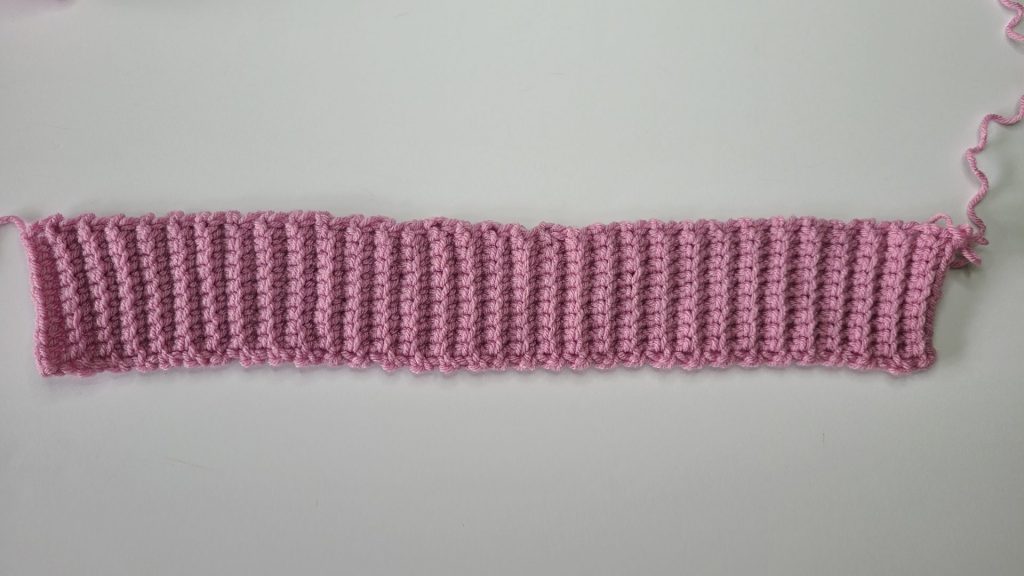
Ribbing
Chain 11
Row 1: Sc in the 2nd st, sc into the next 9 sts.
Row 2: Ch 1, turn, sc in BLO to eor
Row 3 to Row 63: Rep Row 2.
Size Adjustments:
| Size | Number of start chains |
| S, M and L | 11 |
| XL, XXL, 3XL | 12 |
| 4XL and 5XL | 13 |
Carina Crochet Vest – Back panel
Row 1: To start the back panel you will place a dc in each row across the edge of the ribbing. (Counts 63)
Row 2: Ch 3, turn, dc in each st until eor
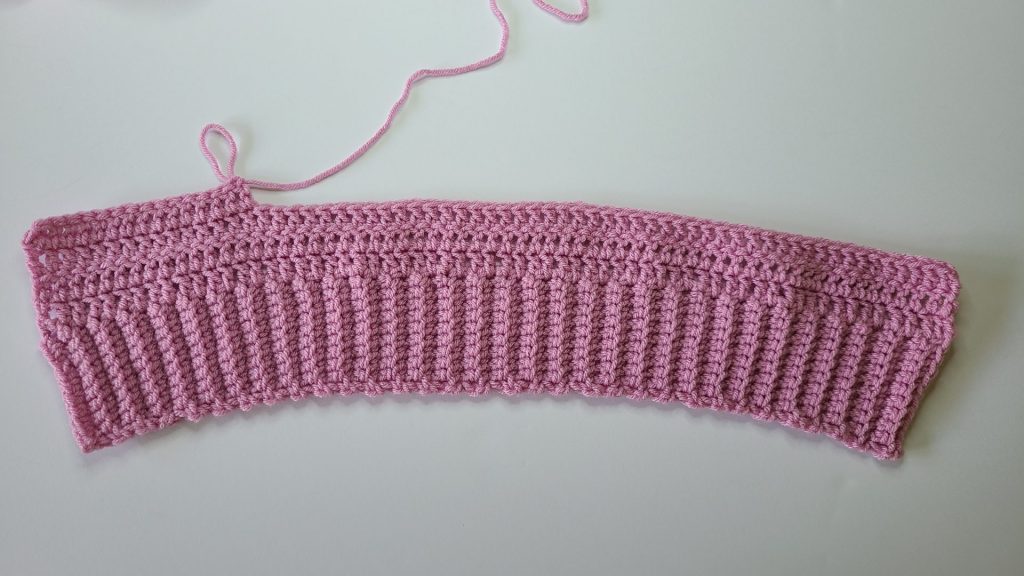
Row 3 to Row 14: rep row 2 – Size M
Rep Row 3 to row 13: rep row 2 – Size S
Rep Row 3 to row 17: rep row 2 – Size L
Rep Row 3 to row 18: rep row 2 – Size XL
Rep Row 3 to row 20: rep row 2 – Size XXL
Rep Row 3 to row 21: rep row 2 – Size 3XL
Rep Row 3 to row 21: rep row 2 – Size 4XL
Rep Row 3 to row 22: rep row 2 – Size 5XL
Back Panel – decrease part on the sides
Row 14( 15, 18, 19, 21, 22, 22, 23) – Sizes S( M, L, XL, XXL, 3XL, 4XL and 5XL): Ch 3, turn, dc dec into the next 2 sts, dc in each st until the last 2 sts, dc dec into the last 2 sts
Size S: Row 15 to Row 23 rep row 14
Size M: Row 16 to Row 24 rep row 15
Size L: Row 19 to Row 27 rep row 18
Size XL: Row 20 to Row 29 rep row 19
Size XXL: Row 22 to Row 31 rep row 21
Size 3XL: Row 23 to Row 33 rep row 22
Size 4XL: Row 23 to Row 33 rep row 22
Size 5XL: Row 24 to Row 34 rep row 23
Row 24( 25, 28, 30, 32, 34, 34, 35) – Sizes S( M, L, XL, XXL, 3XL, 4XL and 5XL): Ch 3, turn, dc in each st until eor
Size S – Row 25 to Row 28: rep row 24
Size M – Row 26 to Row 30: rep row 25
Size L – Row 29 to Row 33: rep row 28
Size XL – Row 31 to Row 36: rep row 30
Size XXL – Row 33 to Row 38: rep row 32
Size 3XL – Row 35 to Row 40: rep row 34
Size 4XL – Row 35 to Row 40: rep row 34
Size 5XL – Row 36 to Row 42: rep row 35
Carina Crochet Vest – Front panel
Ribbing
Chain 11
Row 1: Sc in the 2nd st, sc into the next 9 sts.
Row 2: Ch 1, turn, sc in BLO to eor
Row 3 to Row 63: Rep Row 2.
Size Adjustments:
| Size | Number of start chains |
| S, M and L | 11 |
| XL, XXL, 3XL | 12 |
| 4XL and 5XL | 13 |
Carina Crochet Vest – Front panel
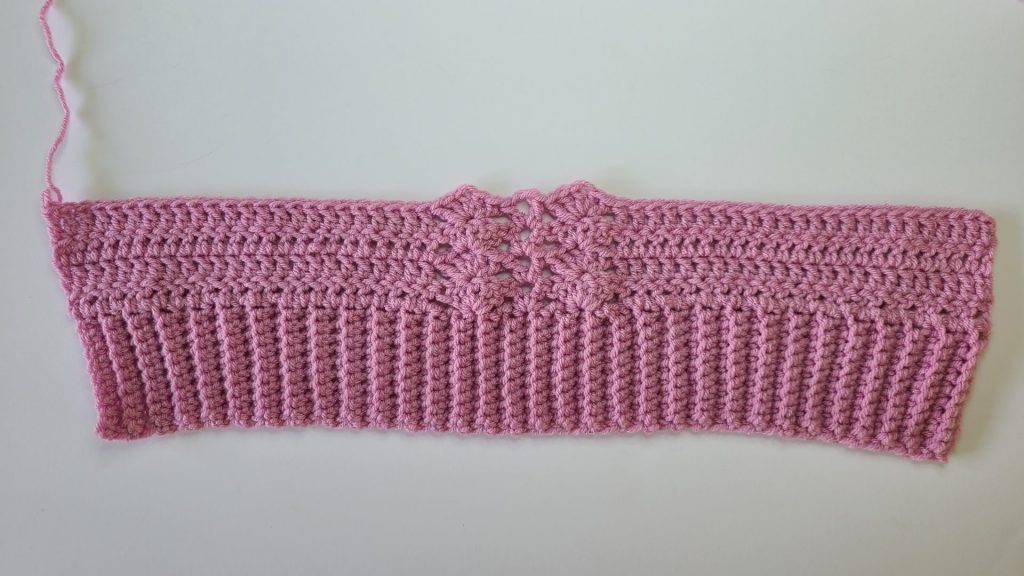
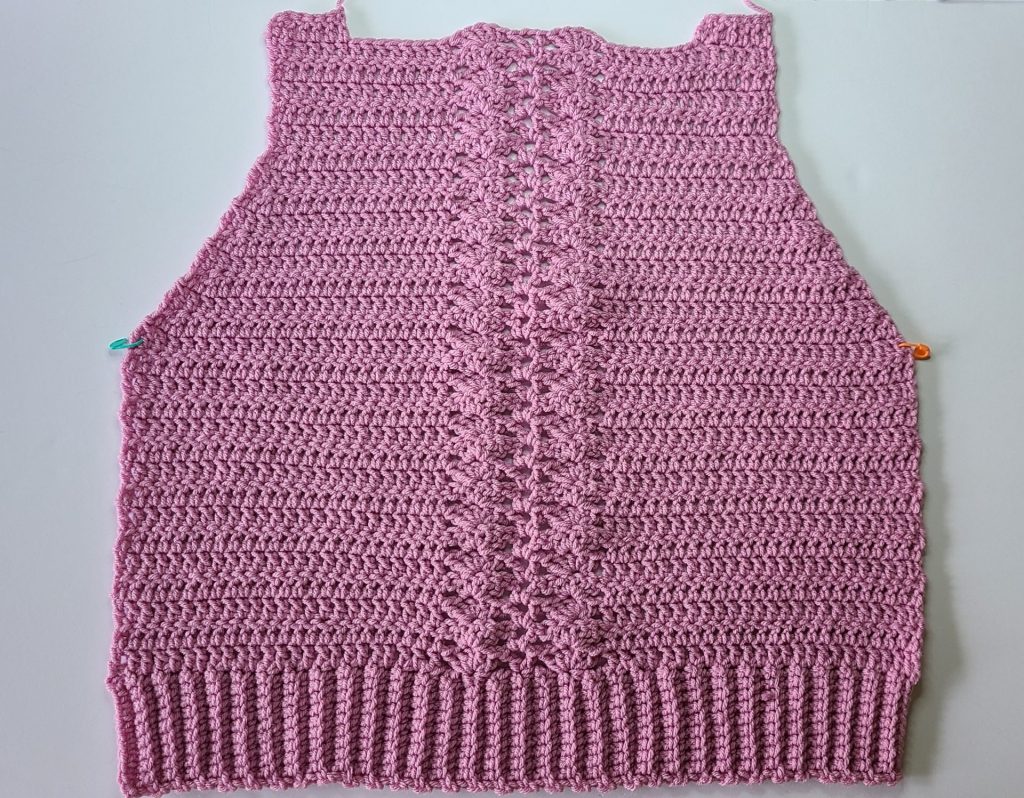
The size shown in the pictures is M
Row 1: Ch 3, turn, dc in the next 23 sts, sk 3, 5dc in the next st, sk 3, [dc, ch 2, dc] into the same st, sk 3, 5dc into the next st, sk 3, dc in the next 24 sts. ( every row from the ribbing counts as a stitch)
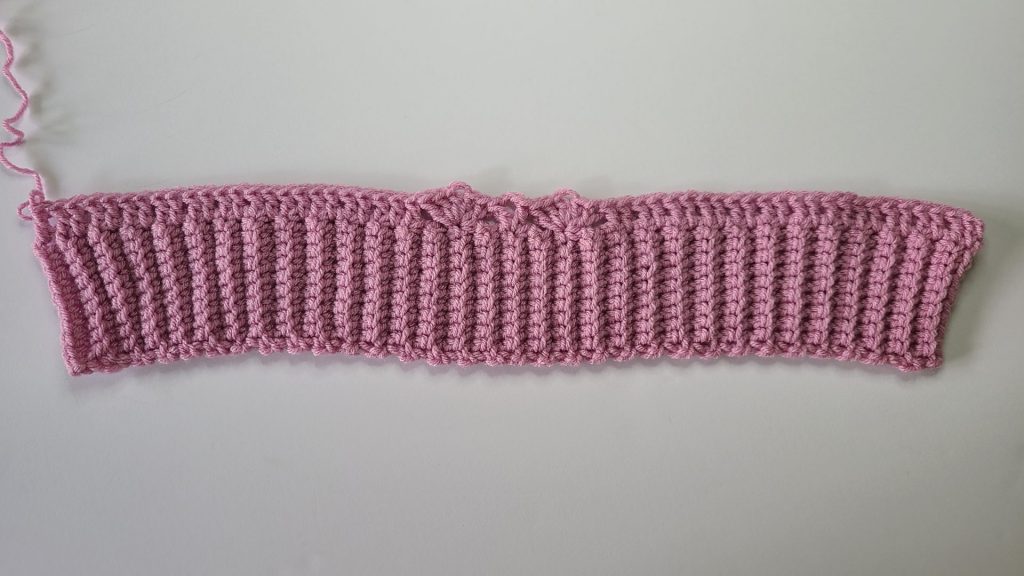
Row 2: ch 3, turn, dc in the next 23 st, sk 2, 5dc into the next st (that is the middle of the 5dc from previous row), sk 3, [dc, ch 2, dc] into the next ch2sp from previous row, sk3, 5dc into the next st, sk2, dc in the next 24 sts.
Row 3 to Row 14: rep row 2 – Size M
Rep Row 3 to row 13: rep row 2 – Size S
Rep Row 3 to row 17: rep row 2 – Size L
Rep Row 3 to row 18: rep row 2 – Size XL
Rep Row 3 to row 20: rep row 2 – Size XXL
Rep Row 3 to row 21: rep row 2 – Size 3XL
Rep Row 3 to row 21: rep row 2 – Size 4XL
Rep Row 3 to row 22: rep row 2 – Size 5XL
Front Panel – decrease part on the sides
Size S
– Row 14: Ch 3, turn, dc dec into the next 2 sts, dc in the next 19 sts, sk 2, 5dc into the next st (that is the middle of the 5dc from previous row), sk 3, [dc, ch 2, dc] into the next ch2sp from previous row, sk3, 5dc into the next st, sk2, dc in the next 20 sts, dc dec into the last 2 sts
Row 15 to Row 23 rep row 14 ( the number of dcs will get less with each row)
Size M
– Row 15: Ch 3, turn, dc dec into the next 2 sts, dc in the next 21 sts, sk 2, 5dc into the next st (that is the middle of the 5dc from previous row), sk 3, [dc, ch 2, dc] into the next ch2sp from previous row, sk3, 5dc into the next st, sk2, dc in the next 22 sts, dc dec into the last 2 sts
Row 16 to Row 24 rep row 15 ( the number of dcs will get less with each row)
Size L
– Row 18: Ch 3, turn, dc dec into the next 2 sts, dc in the next 24 sts, sk 2, 5dc into the next st (that is the middle of the 5dc from previous row), sk 3, [dc, ch 2, dc] into the next ch2sp from previous row, sk3, 5dc into the next st, sk2, dc in the next 25 sts, dc dec into the last 2 sts
Row 19 to Row 27 rep row 18 ( the number of dcs will get less with each row)
Size XL
– Row 19: Ch 3, turn, dc dec into the next 2 sts, dc in the next 27 sts, sk 2, 5dc into the next st (that is the middle of the 5dc from previous row), sk 3, [dc, ch 2, dc] into the next ch2sp from previous row, sk3, 5dc into the next st, sk2, dc in the next 28 sts, dc dec into the last 2 sts
Row 20 to Row 29 rep row 19 ( the number of dcs will get less with each row)
Size XXL
– Row 21: Ch 3, turn, dc dec into the next 2 sts, dc in the next 30 sts, sk 2, 5dc into the next st (that is the middle of the 5dc from previous row), sk 3, [dc, ch 2, dc] into the next ch2sp from previous row, sk3, 5dc into the next st, sk2, dc in the next 31 sts, dc dec into the last 2 sts
Row 22 to Row 31 rep row 21 ( the number of dcs will get less with each row)
Size 3XL
– Row 22: Ch 3, turn, dc dec into the next 2 sts, dc in the next 33 sts, sk 2, 5dc into the next st (that is the middle of the 5dc from previous row), sk 3, [dc, ch 2, dc] into the next ch2sp from previous row, sk3, 5dc into the next st, sk2, dc in the next 34 sts, dc dec into the last 2 sts
Row 23 to Row 33 rep row 22 ( the number of dcs will get less with each row)
Size 4XL
– Row 22: Ch 3, turn, dc dec into the next 2 sts, dc in the next 36 sts, sk 2, 5dc into the next st (that is the middle of the 5dc from previous row), sk 3, [dc, ch 2, dc] into the next ch2sp from previous row, sk3, 5dc into the next st, sk2, dc in the next 37 sts, dc dec into the last 2 sts
Row 23 to Row 33 rep row 22 ( the number of dcs will get less with each row)
Size 5XL
– Row 23: Ch 3, turn, dc dec into the next 2 sts, dc in the next 39 sts, sk 2, 5dc into the next st (that is the middle of the 5dc from previous row), sk 3, [dc, ch 2, dc] into the next ch2sp from previous row, sk3, 5dc into the next st, sk2, dc in the next 40 sts, dc dec into the last 2 sts
Row 24 to Row 34 rep row 23 ( the number of dcs will get less with each row)
Continue
Row 24( 25, 28, 30, 32, 34, 34, 35) – Sizes S( M, L, XL, XXL, 3XL, 4XL and 5XL): This row will be the same as size M, just the number of dcs will be different.
Size M: ch 3, turn, dc in the next 13sts, sk 2, 5dc into the next st (that is the middle of the 5dc from previous row), sk 3, [dc, ch 2, dc] into the next ch2sp from previous row, sk3, 5dc into the next st, sk2, dc in the next 14 sts.
Size S – Row 25 to Row 27: rep row 24
Size M – Row 26 to Row 29: rep row 25
Size L – Row 29 to Row 32: rep row 28
Size XL – Row 31 to Row 35: rep row 30
Size XXL – Row 33 to Row 37: rep row 32
Size 3XL – Row 35 to Row 39: rep row 34
Size 4XL – Row 35 to Row 39: rep row 34
Size 5XL – Row 36 to Row 41: rep row 35
Front Panel – Straps
Size S – Row 28: Ch 3 (counts as a first dc) , turn, dc in the next 4 sts.
On the other side of the same row, count from the corner 5 sts. attach yarn, ch 3, ch dc in the next 4 sts.
Size M – Row 30: Ch 3 (counts as a first dc) , turn, dc in the next 5 sts.
On the other side of the same row, count from the corner 6 sts. attach yarn, ch 3, ch dc in the next 5 sts.
Size L – Row 33: Ch 3 (counts as a first dc) , turn, dc in the next 6 sts.
On the other side of the same row, count from the corner 7 sts. attach yarn, ch 3, ch dc in the next 6 sts.
Size XL – Row 36: Ch 3 (counts as a first dc) , turn, dc in the next 6 sts.
On the other side of the same row, count from the corner 7 sts. attach yarn, ch 3, ch dc in the next 6 sts.
Size XXL – Row 38: Ch 3 (counts as a first dc) , turn, dc in the next 7 sts.
On the other side of the same row, count from the corner 8 sts. attach yarn, ch 3, ch dc in the next 7 sts.
Size 3XL – Row 40: Ch 3 (counts as a first dc) , turn, dc in the next 7 sts.
On the other side of the same row, count from the corner 8 sts. attach yarn, ch 3, ch dc in the next 7 sts.
Size 4XL – Row 40: Ch 3 (counts as a first dc) , turn, dc in the next 8 sts.
On the other side of the same row, count from the corner 9 sts. attach yarn, ch 3, ch dc in the next 8 sts.
Size 5XL – Row 42: Ch 3 (counts as a first dc) , turn, dc in the next 8 sts.
On the other side of the same row, count from the corner 9 sts. attach yarn, ch 3, ch dc in the next 8 sts.
Carina Crochet Vest – Assembly
– Lay both pieces together with the wrong sides facing up.
– Start from shoulders and sew on both sides.
– We will sew it inside out then turn right side out when done.
– Start sewing from the bottom up to the under arm

Carina Crochet Vest – armholes ribbing
Row 1: Ch 3, dc in 2nd st, dc around, sl st to join.
Row 2: Ch 3, FPDC around next st , BPDC around next st, *alternate FPDC, BPDC across*, rep * *, sl st to join.
Tie off, weave in ends
Carina Crochet Vest – Neck Border
Attach yarn in any stitch.
Row 1: Ch 1, sc around, sl st to join.
Tie off, weave in ends
