There’s something timeless about a classic granny square—and this Granny Square Scarf brings that charm to a cozy, wearable accessory you’ll want to use all year long. This project is beginner-friendly, relaxing to make, and perfect for using up colorful yarn scraps while creating a stylish scarf with personality.
In this tutorial, I’ll guide you through each step with a clear written pattern and a full video walkthrough, so you can follow along no matter your skill level. Whether you’re making it for yourself or as a thoughtful handmade gift, this scarf is the kind of project that always turns heads.
If you enjoy granny square designs like this one, you might also love my Granny Square Sweater Free Pattern, which pairs beautifully with this scarf for a coordinated, cozy look.
Granny square scarves are incredibly versatile: drape one over a neutral sweater to add a pop of color, layer it with your favorite fall jacket for a cozy vibe, or style it loosely around the neck for a chic, effortless look. Whether you’re heading out for a casual coffee date or want to add handmade flair to your everyday outfits, this scarf will quickly become your go-to accessory. And with the included video tutorial, you can follow along step by step to create your own wearable piece of art.
If you’re a fan of classic motifs like this, you might also enjoy my Lovare Granny Square Sweater Pattern, where I use the same traditional technique to create a stylish and modern wearable. It’s a great companion project—and the perfect next step once you fall in love with these squares!
How to Style Your Crochet Granny Square Scarf
– Classic Wrap – Loop the scarf once around your neck and let the ends drape down for a cozy, everyday look.
– Over the Shoulder – Toss one end over your shoulder to instantly add a touch of vintage flair.
– Belted Layer – Drape the scarf around your neck and cinch it at the waist with a belt for a chic, fashion-forward outfit.
– Cozy Collar – Wrap it snugly around your neck for extra warmth on chilly days—perfect with a winter coat.
– Boho Drape – Let the scarf hang long and loose over a simple top or dress to show off the granny squares as the star of your outfit.

Level: Easy +
Notes:
– This pattern is written in US terms
– Magic Ring or Ch 5 and join.
– Ch 3 at beginning of row counts as first dc.
– The pattern is coming with a video tutorial available on my youtube channel YelenaStyleCrochet.
– Yarn Choice: This pattern works beautifully with leftover yarns—mix and match colors for a vibrant boho look, or stick with neutrals for a timeless style.
– Gauge: Gauge isn’t critical for this scarf, but keep your stitches consistent so all granny squares are the same size.
– Joining Squares: You can seam the squares together with a whip stitch, slip stitch, or even join-as-you-go for a seamless look.
– Length & Width: Add more squares to make the scarf longer or wider, depending on your personal style and how cozy you want it.
– Blocking: Lightly block your finished scarf to smooth out edges and help the squares lay flat.
– Skill Level: This is a beginner-friendly project—perfect if you’re new to granny squares or want an easy, relaxing make.
– Styling: Wear it long and loose, double-wrapped for extra warmth, or belted as a chic accessory.
Materials:
– Yarn: Acrylic 100 % yarn. You can substitute any other weight 4 yarn
– 5 mm / H-8 hook
– Tapestry needle
– Scissors
– Yarn needle

Abbreviations:
* *: repeat instructions within asterisks defined number of times
[ ] These instructions go in same stitch
Ch: chain
Dc: double crochet
Eor: end of row
Rep: repeat
Mr: magic ring
Sk: Skip
Sl St: Slip Stitch
St: stitch(es)
Sp: Space
Crochet Granny Square Scarf Video Tutorial
Gauge
14 dc * 6 rows = 4in*4in
Finished Measurements
7 in x 5.5 in – Square size
6 in W * 90 in H
Crochet Granny Square Scarf Pattern
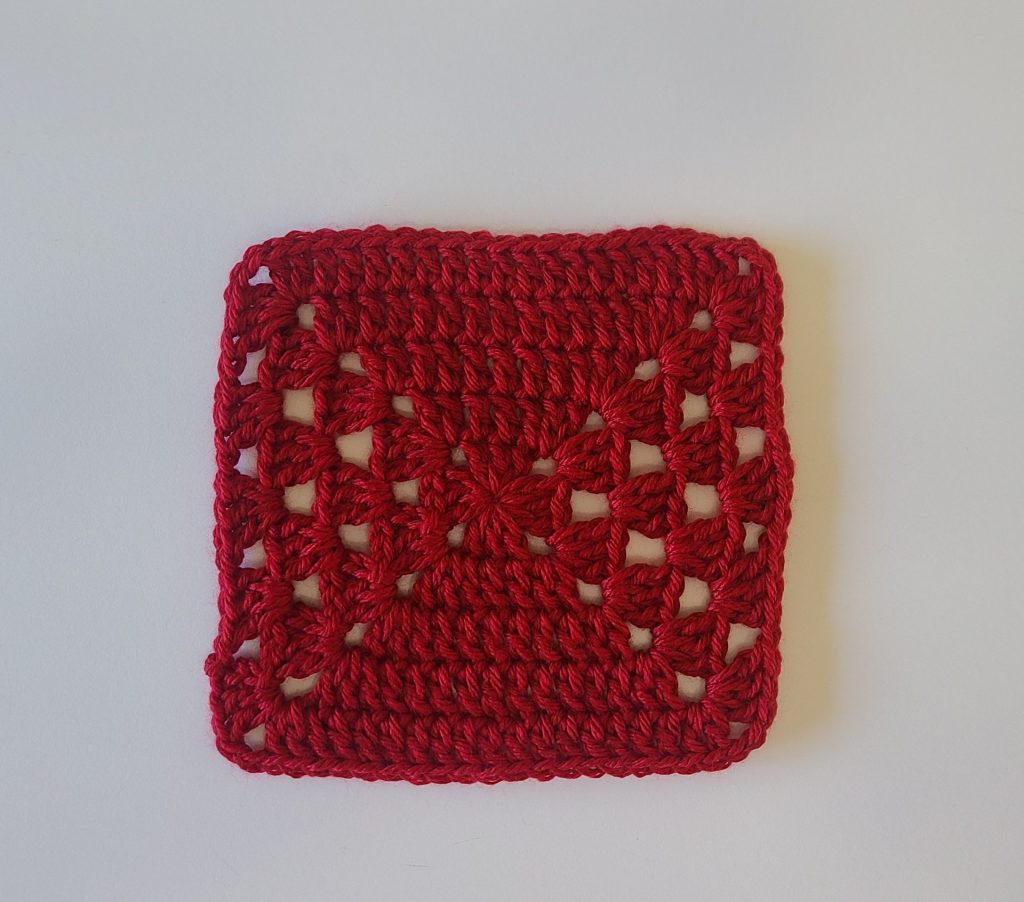
Basic granny square
Make 11
MR (or ch 5, sl st to make a ring)
Row 1: Ch 3, 2 dc, ch 2, 3 dc, *ch 2, 3 dc* rep 3 times, sl st to top of ch 3 to join.
Row 2: Sl st 3x (to corner), ch 3 (counts as 1st dc), in corner space: [2dc, ch 2, 2dc], dc into next 3 stitches, in corner sp: [2dc, ch 2, 3dc], ch 1, in corner sp, [3dc, ch 2, 2dc], dc into next 3 stitches, in corner sp: [2dc, ch 2, 3dc], ch 1, sl st to join.
Row 3: Sl st 3x (to corner), ch 3 (counts as 1st dc), in corner space: [2dc, ch 2, 2dc], dc into next 7 stitches, in corner sp: [2dc, ch 2, 3dc], ch 1, in corner sp, [3dc, ch 2, 2dc], dc into next 7 stitches, in corner sp: [2dc, ch 2, 3dc], ch 1, sl st to join.
Row 4: Sl st 3x (to corner), ch 3 (counts as 1st dc), in corner space: [2dc, ch 2, 2dc], dc into next 11 stitches, in corner sp: [2dc, ch 2, 3dc], ch 1, in corner sp, [3dc, ch 2, 2dc], dc into next 11 stitches, in corner sp: [2dc, ch 2, 3dc], ch 1, sl st to join.
Row 5: Sl st 3x (to corner), ch 3 (counts as 1st dc), in corner space: [2dc, ch 2, 2dc], dc into next 15 stitches, in corner sp: [2dc, ch 2, 3dc], ch 1, in corner sp, [3dc, ch 2, 2dc], dc into next 15 stitches, in corner sp: [2dc, ch 2, 3dc], ch 1, sl st to join.