
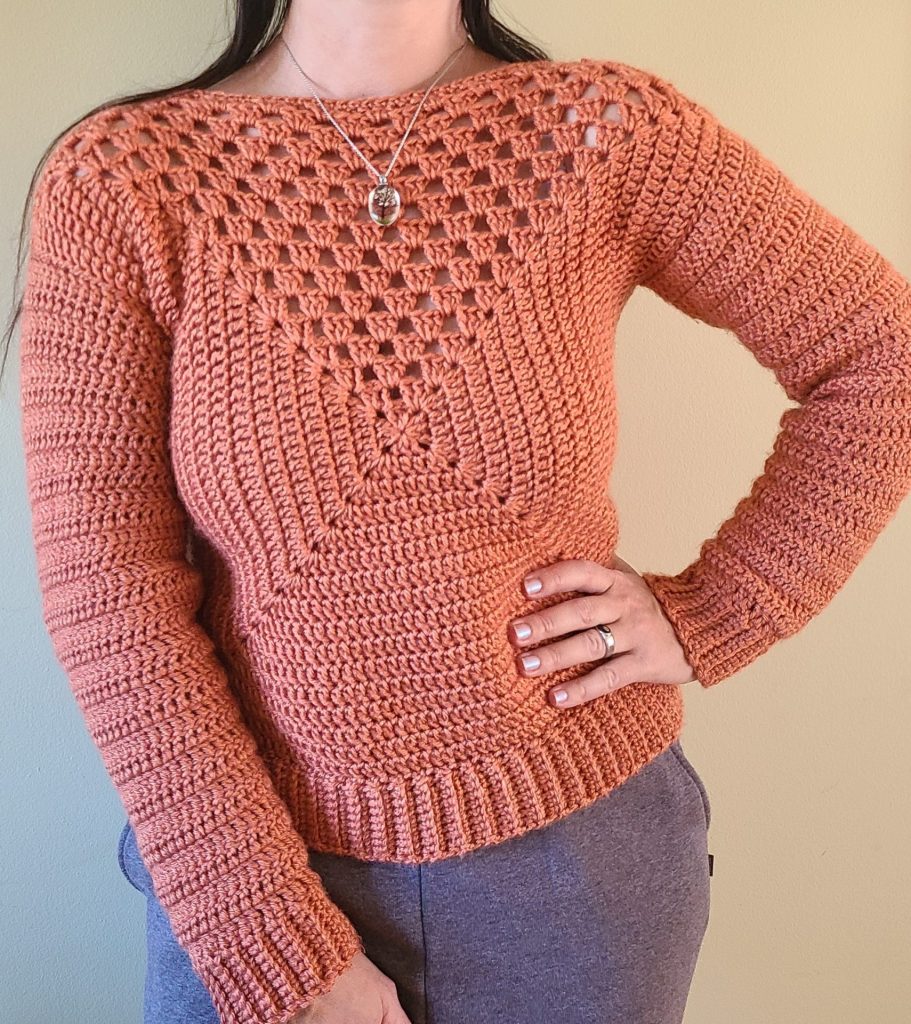
Ready to make your own cozy crochet sweater? Check out this Crochet Granny Square Sweater Pattern—an easy and stylish way to create your perfect sweater! This crochet sweater pattern is beginner-friendly to guide you through every step. Whether you’re new to crochet or an experienced maker, this easy crochet sweater pattern is perfect for adding a handmade touch to your wardrobe.
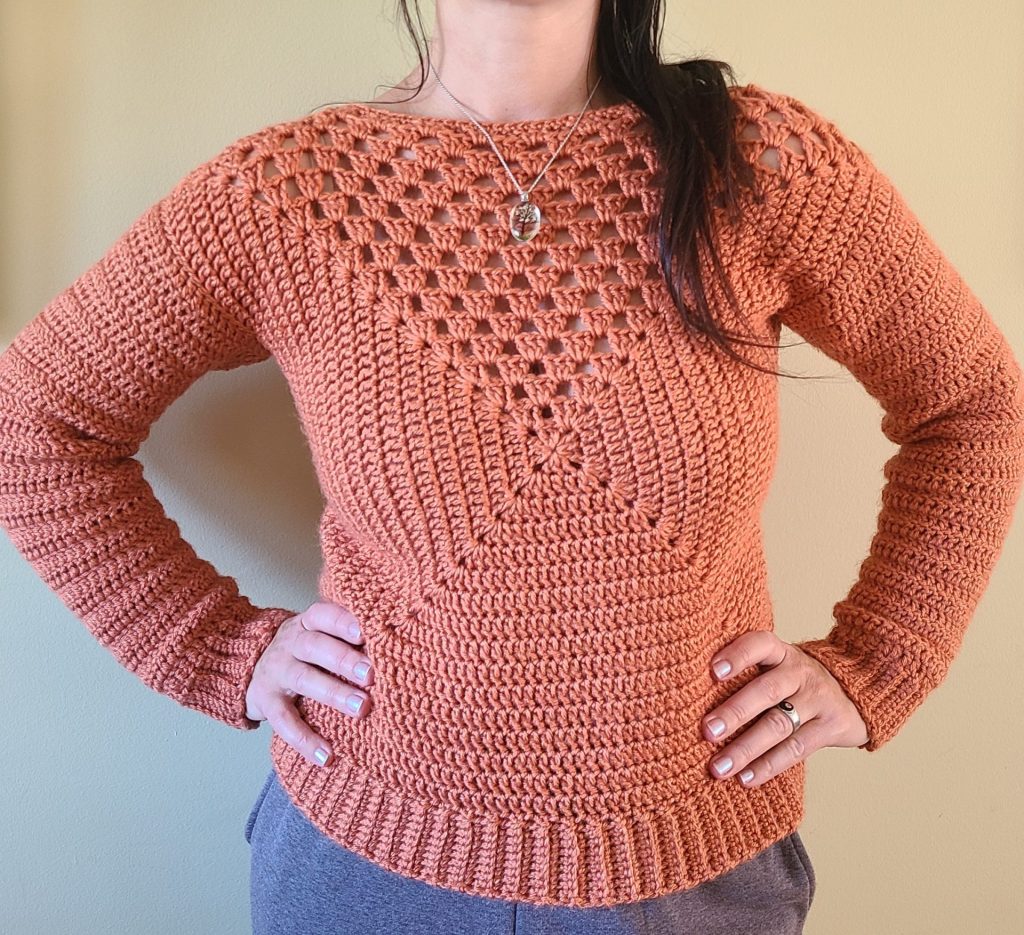
Lovare Granny Square Sweater – Styling
This cozy sweater pattern is perfect for creating a warm and stylish women’s sweater that you’ll love to wear all season long. With this crochet sweater pattern, you can easily make a beautiful, comfy sweater that’s perfect for layering. I have included a comprehensive video tutorial for those who prefer more visuals.
There’s something magical about wrapping yourself in a cozy handmade sweater when the air turns crisp and the leaves start to fall. 🍂 This season, why not create your own with this beautiful Crochet Granny Square Sweater? It’s colorful, cozy, and full of vintage charm — the perfect project for anyone looking to add a touch of handmade warmth to their wardrobe.
This free crochet pattern and step-by-step crochet tutorial will guide you through every stitch, making it a great beginner crochet pattern for those new to garment making. If you’ve ever wanted to dive into crochet clothing patterns but felt intimidated, this is the perfect place to start. You’ll learn how to create classic granny squares, join them together, and shape them into a stunning DIY crochet sweater you’ll be proud to wear.
Whether you’re crafting for cozy fall crochet projects or layering up for chilly winter crochet patterns, this sweater combines comfort, creativity, and timeless crochet fashion. Plus, the customizable colors let you design a look that’s totally your own — from soft neutrals to bold retro hues.
So grab your favorite yarn, settle into your comfiest chair, and let’s crochet a sweater that’s as unique as you are. 🧶✨ Your new favorite handmade piece is just a few stitches away!
Lovare Granny Square Sweater Tutorial
Level: Easy +
Notes:
– This pattern is written in US terms
– Magic Ring or Ch 5 and join.
– Ch 3 at beginning of row counts as first dc.
– You can substitute any other weight 4 yarn
– The basic square should not go beyond your shoulder line.
– The sweater is designed to be on the body, not lose. It’s important that the top part of the sweater, the angle that is more open (the granny squares part with the holes) do not go lower than your bra.
– Sleeves are designed to be not baggy.
– The pattern is coming with a video tutorial available on my youtube channel YelenaStyleCrochet.
– Double crochet from the beginning of the increasing rows from the sleeves are made with the technique to have a straight edge with no holes. See the video tutorial and the written instructions
Materials:
– Yarn: 4 skeins of %Acrylic Heartland Premium Lionbrand yarn.
– 5 mm / H-8 hook
– Tapestry needle
– Scissors
Abbreviations:
– * *: repeat instructions within asterisks defined number of times
– [ ] These instructions go in same stitch
– Ch: chain
– Dc: double crochet
– Eor: end of row
– Rep: repeat
– Mr: magic ring
– Sk: Skip
– Sl St: Slip Stitch
– St: stitch(es)
– Sp: Space
If you’re interested in purchasing this crochet top pattern in a downloadable, printable PDF format, it is available for purchase on the shop linked bellow:
CLICK HERE TO PURCHASE THE LOVARE GRANNY SQUARE SWEATER PATTERN ON ETSY
Gauge
14 dc * 7.5rows = 4in*4in
Finished Measurements
The size shown is Medium: 18 in W * 21 in H
The measurements are made before blocking.
I used 4 skeines of Lion Brand Yarns Heartland 100 %Acrylic 543g [900m] / 984 yds [19 oz] – for size M.
| Size | Width ( inches ) | Height ( inches ) |
| S | 17 | 20 |
| M | 18 | 21 |
| L | 20 | 22 |
| XL | 21 | 23 |
| XXL | 23 | 25 |
| 3XL | 24 | 27 |
Pattern
Basic granny square
Make 2
MR (or ch 5, sl st to make a ring)
Row 1: Ch 3, 2 dc, ch 1, 3 dc, ch 1, 3 times, sl st to top of ch 3 to join.
Row 2: Sl st 3x (to corner), ch 3 (counts as 1st dc), in corner space: [2dc, ch 1, 2dc], dc 3 into next stitches, in corner sp: [2dc, ch 1, 2dc], 3dc, in corner sp, [2dc,ch 1, 2dc], 3dc, in corner sp: [2dc, ch 1, 3dc], ch 1, sl st to join.
Row 3: Sl st 3x (to corner), ch 3 (counts as 1st dc), in corner space: [2dc, ch 1, 2dc], dc 7 into next stitches, in corner sp: [2dc, ch 1, 2dc], dc 7, in corner sp, [2dc,ch 1, 2dc], dc 7, in corner sp: [2dc, ch 1, 3dc], 3dc inch 1 sp, ch 1, sl st to join.
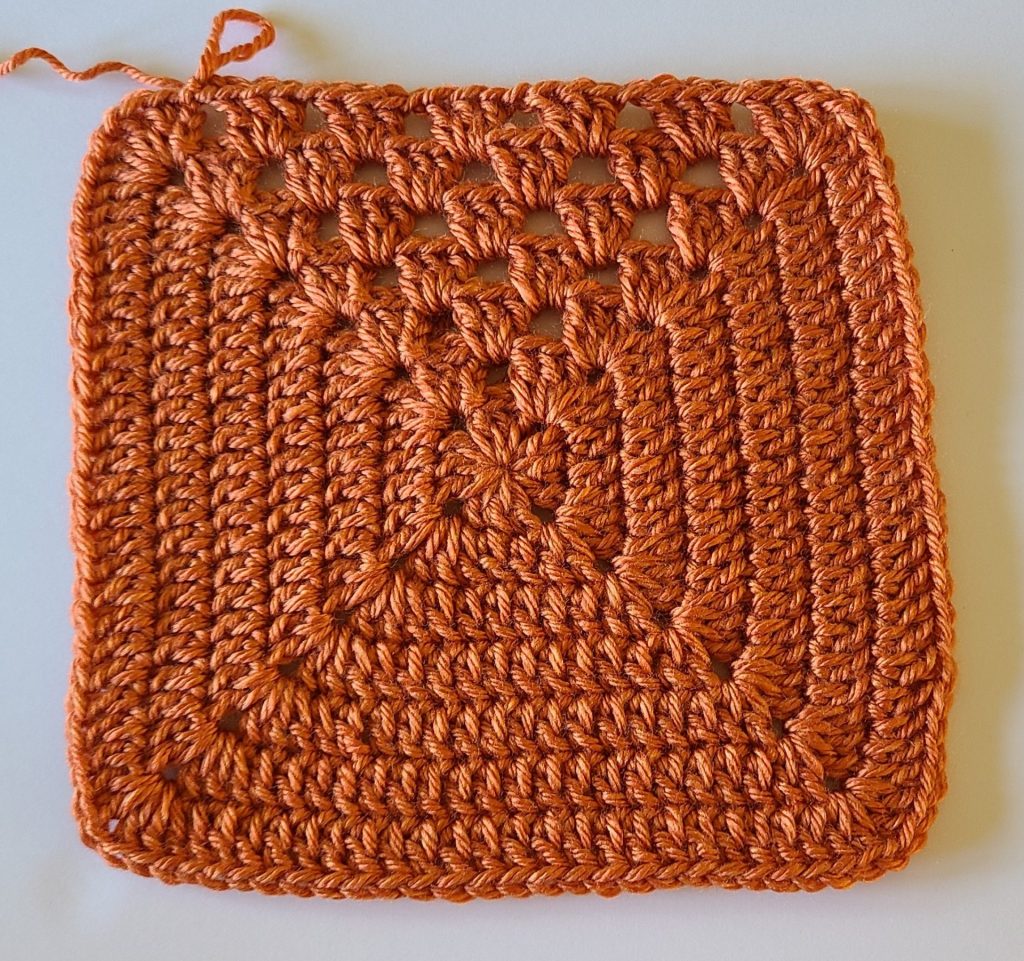
To work additional rounds, sl st to next space. In corners work [3dc, ch 2, 2dc] or [2dc, ch2, 3dc]. In spaces on sides work 3dc. Work a ch1 in between the dc clusters on the sides.
From row 4 to row 15 for Size S
From row 4 to Row 16 for Size M
From row 4 to row 17 for size L
From row 4 to Row 18 for size XL
From row 4 to Row 20 for size XXL
From row 4 to Row 21 for size 3XL
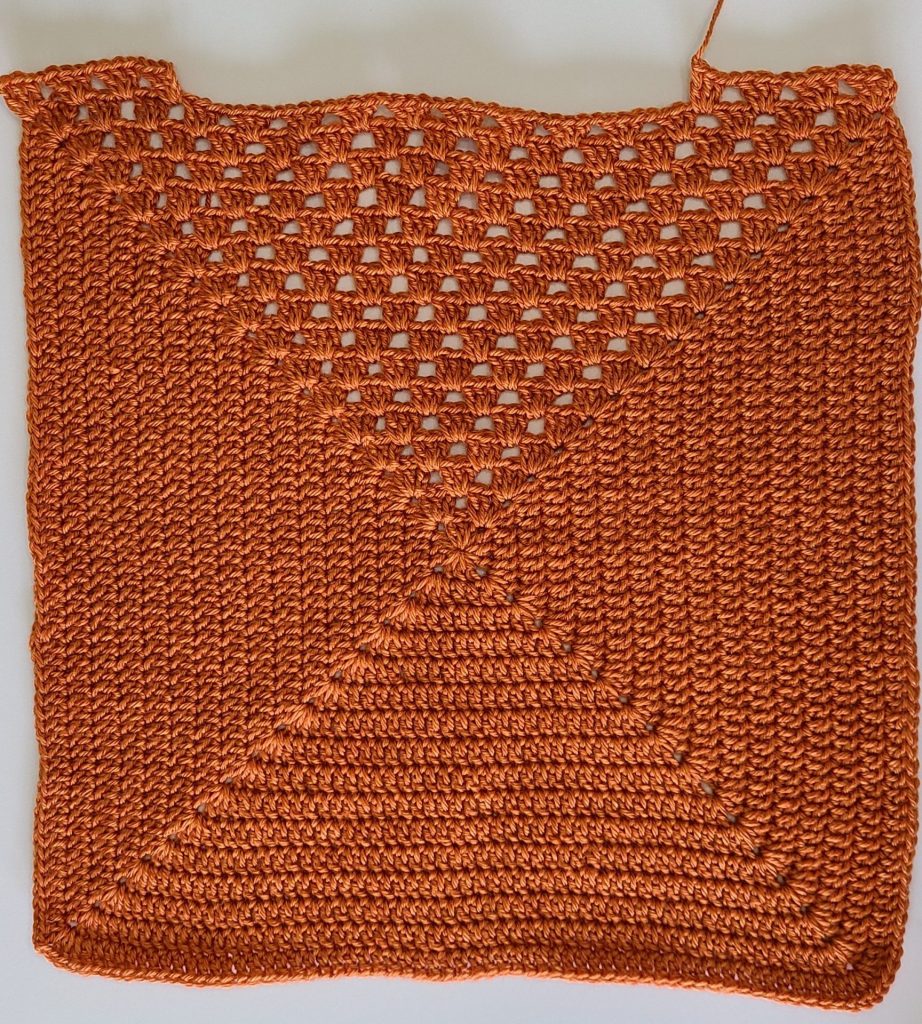
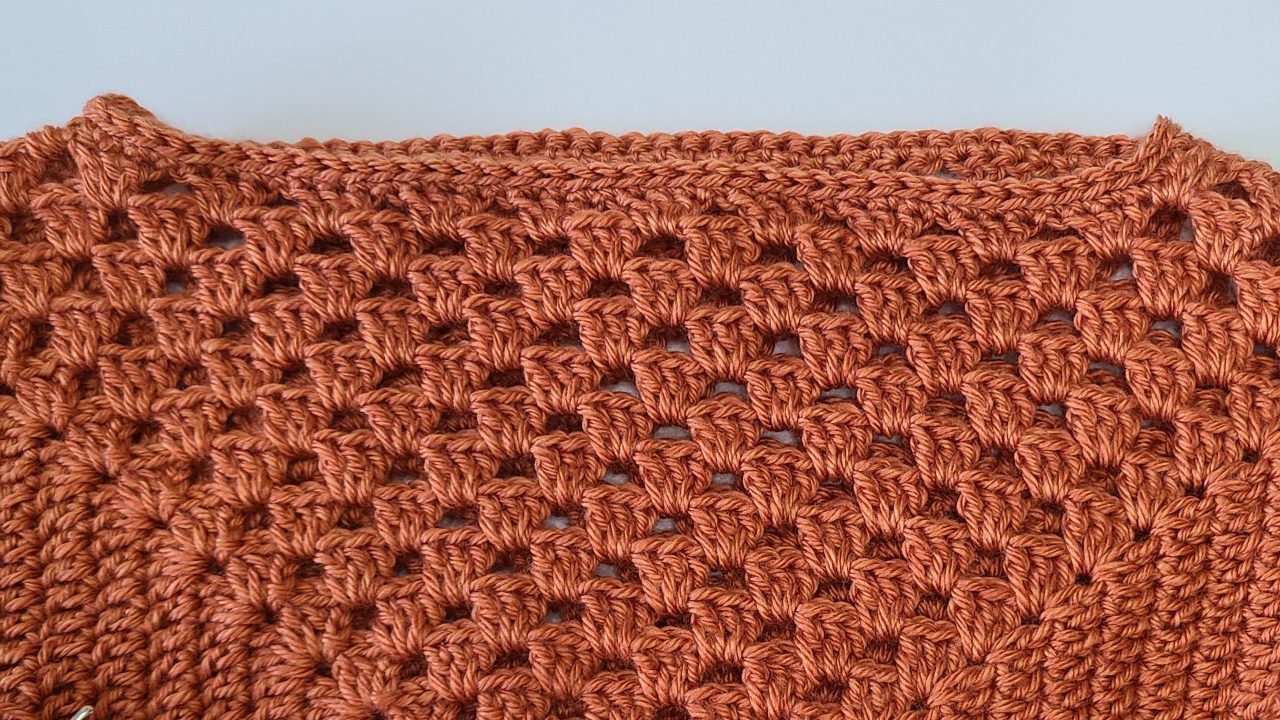
Front Panel
The size shown is Medium
Row 17: (The last Row) Attach yarn on the right topside corner, into the ch3 space. Ch3 (counts as 1stdc), dc 2, ch1, 3dc into the next ch1 space from previous row. * ch1, 3dc into ch1 space. Rep from * to the left side corner 3 more times. Cut the yarn. Fasten off.
Continue the Row 17: Skip 36 dcs attach yarn into the next ch 1 space, ch 3, 2dc, *ch 1, 3dc into next ch 1 space. Rep from * 2 more times. Cut the yarn, fasten off.
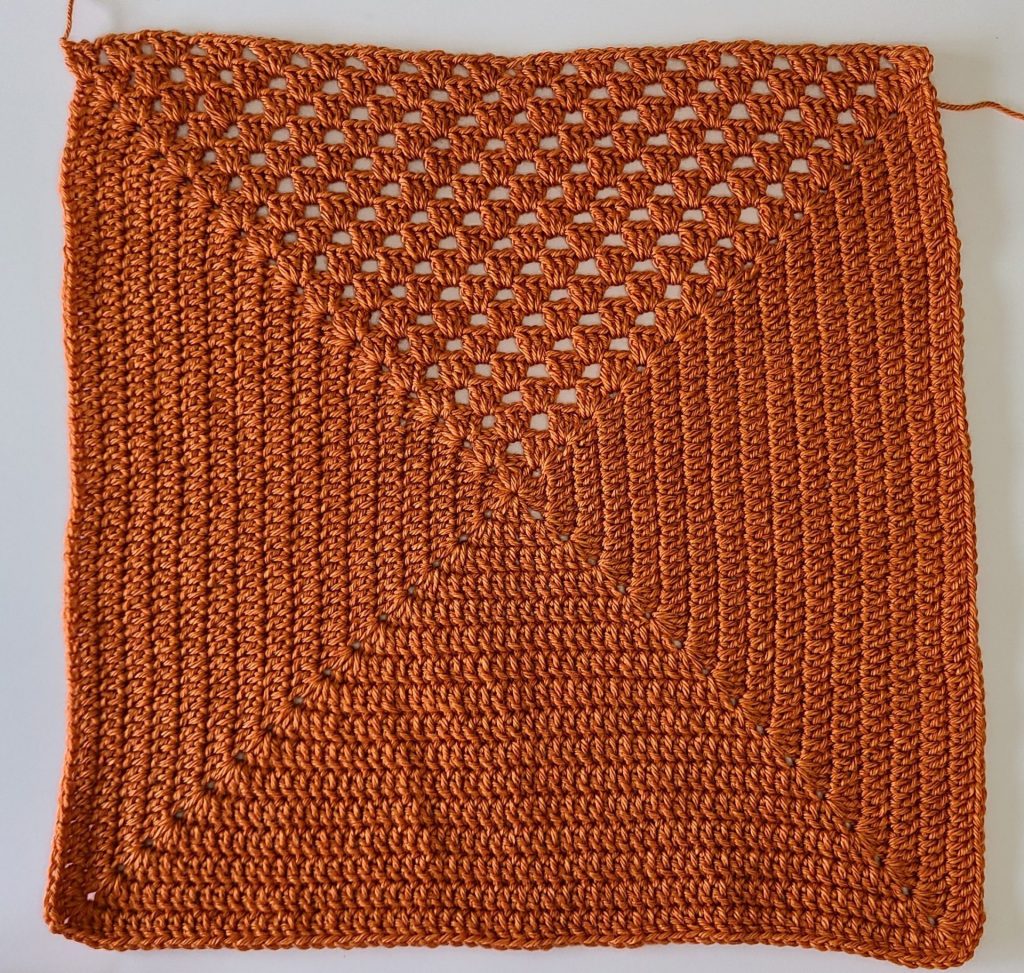
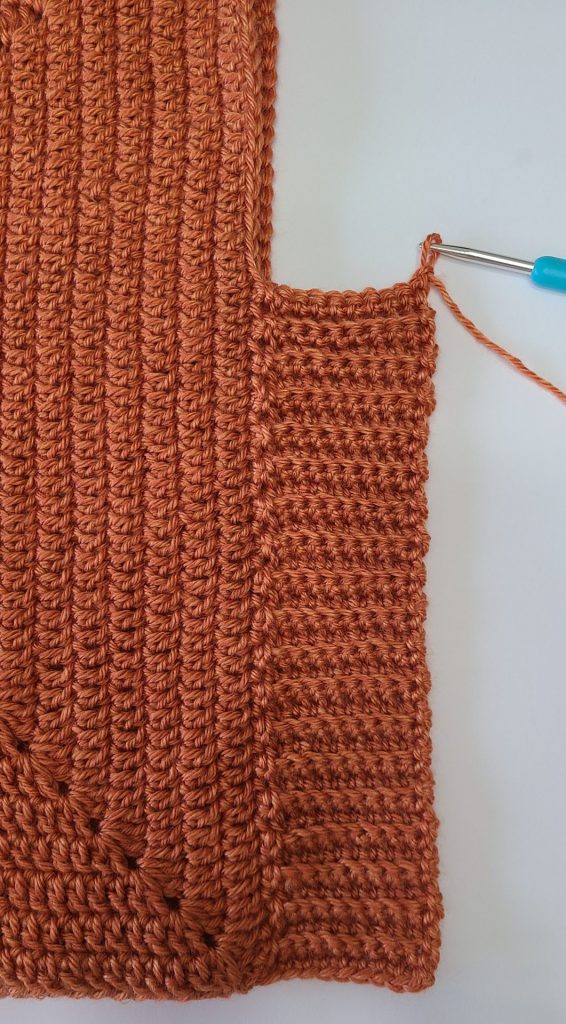
Lovare Granny Square Sweater – Back Panel
The size shown is Medium
Row 17: (The last Row) for each size. Attach yarn on the right top side corner, into the ch3 space. Ch3 (counts as 1st dc), dc 2, ch 1, 3dc into the next ch 1 space from previous row. * ch 1,3dc into ch1 space. Rep from * to the left side corner, finishing with 3dc into the last corner. Cut the yarn. Fasten off.
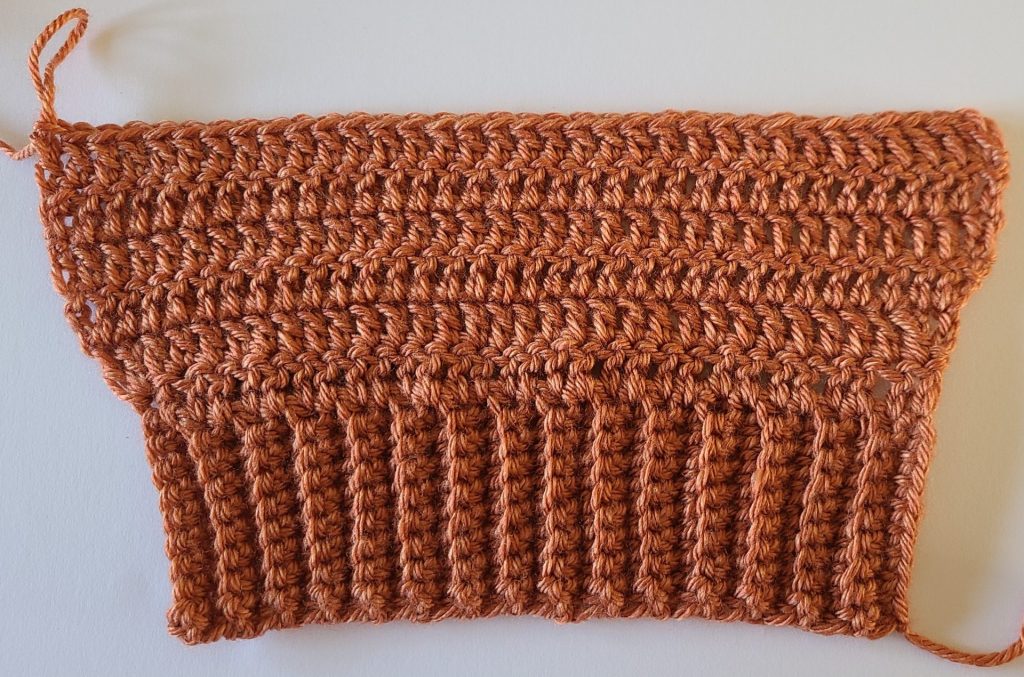
Lovare Granny Square Sweater – Sleeves
Make 2
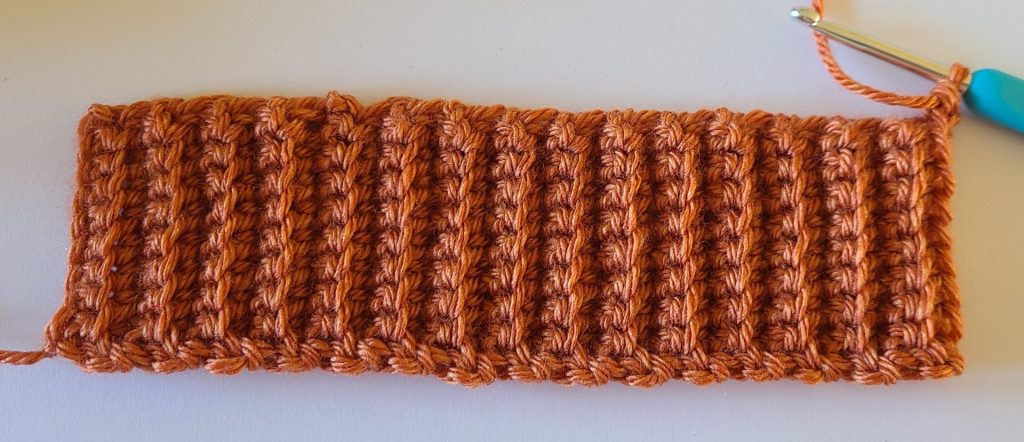
Ribbing
CH 9, 10, 11, 13, 14, 15 (size S, M, L, XL, XXL, 3XL)
Ch 10 (Size M)
Row 1: SC in second st from hook Sc in each stitch across (total 9)
Row 2: CH 1 & Turn SC in each stitch across into back loop (9)
Row 3 to Row 30: Rep Row 2
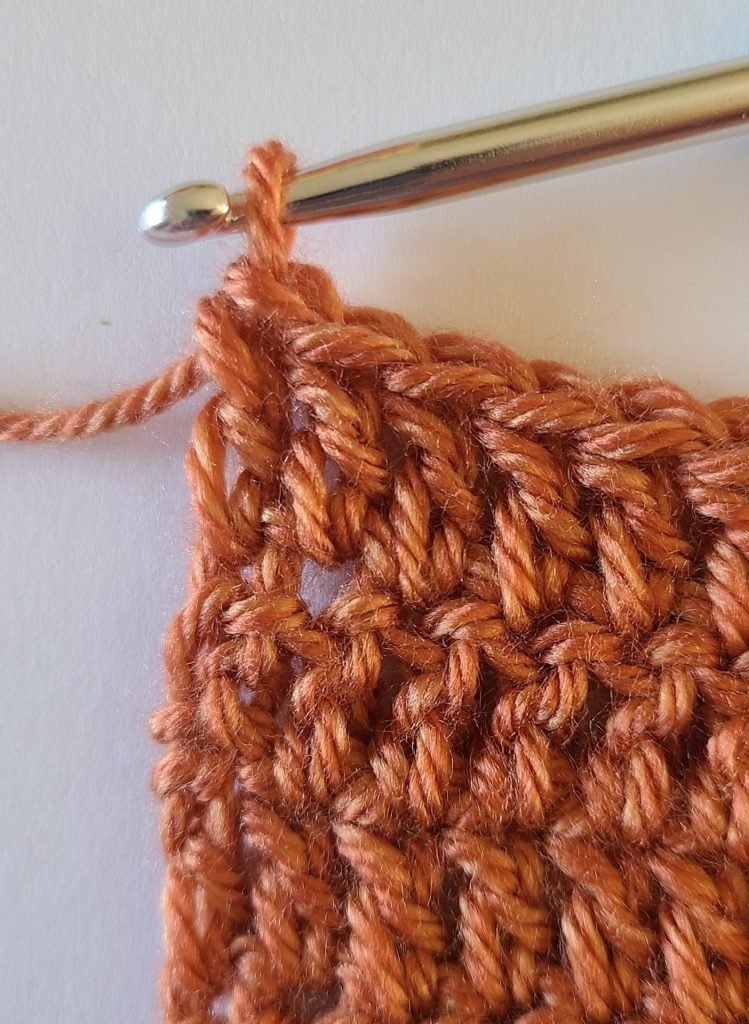
Row 1: Dc into each row from the ribbing (counts30)
Row 2: Increase row. Ch 3, turn, ch dc into the same first st. ch dc in each st to Eor. Into the last st ch 2dc in the same st.
Row 3: Increase row. Rep Row 2
Row 4 to Row 10: Ch 3, turn, ch dc in each st to Eor.
Row 11, 13, 15, 17, 27, 29, 31, 33: Rep Row 2. Increase rows.
Row 12, 14, 16, 18, 19, 20, 21, 22, 23, 24, 25, 26, 28, 30,32: Rep Row 4.

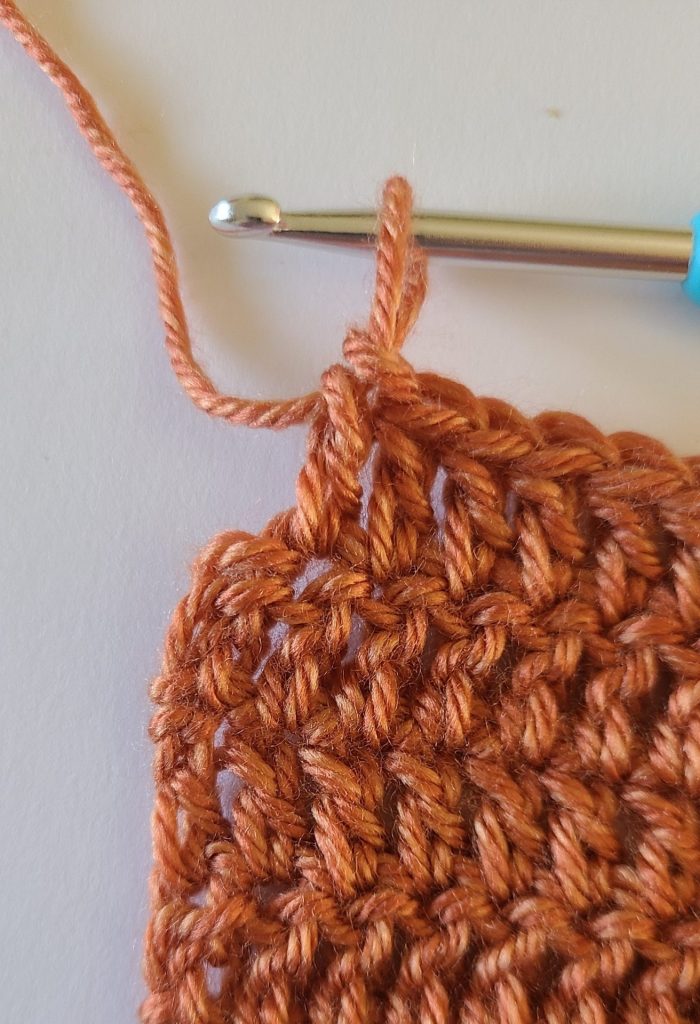
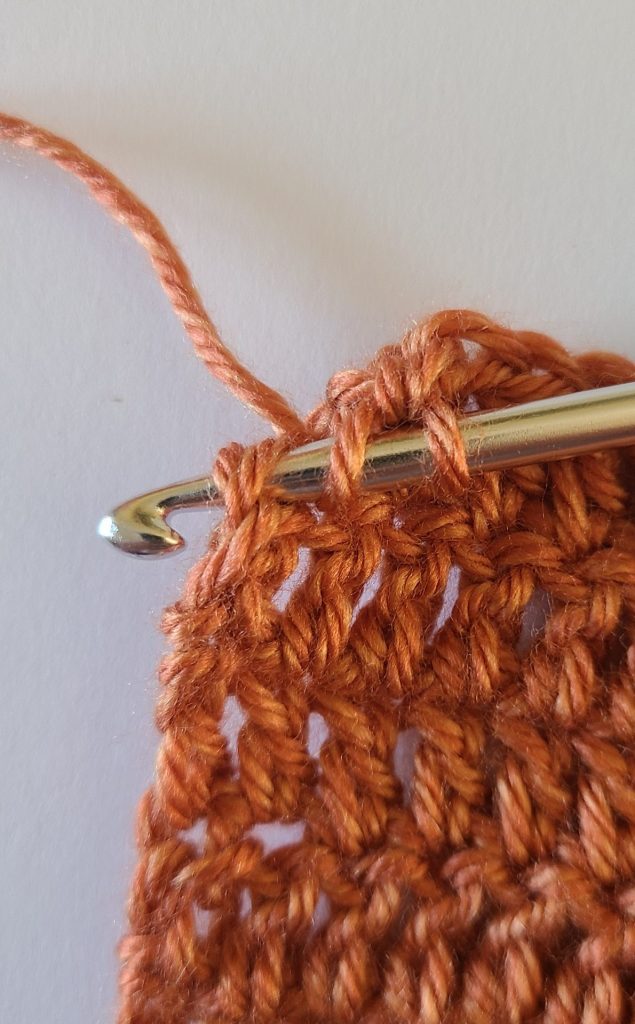
Straight edge for sleeves at the beginning and end of the rows
Turn your work
Ch sc
Ch another sc into the first loop from the first sc you made.
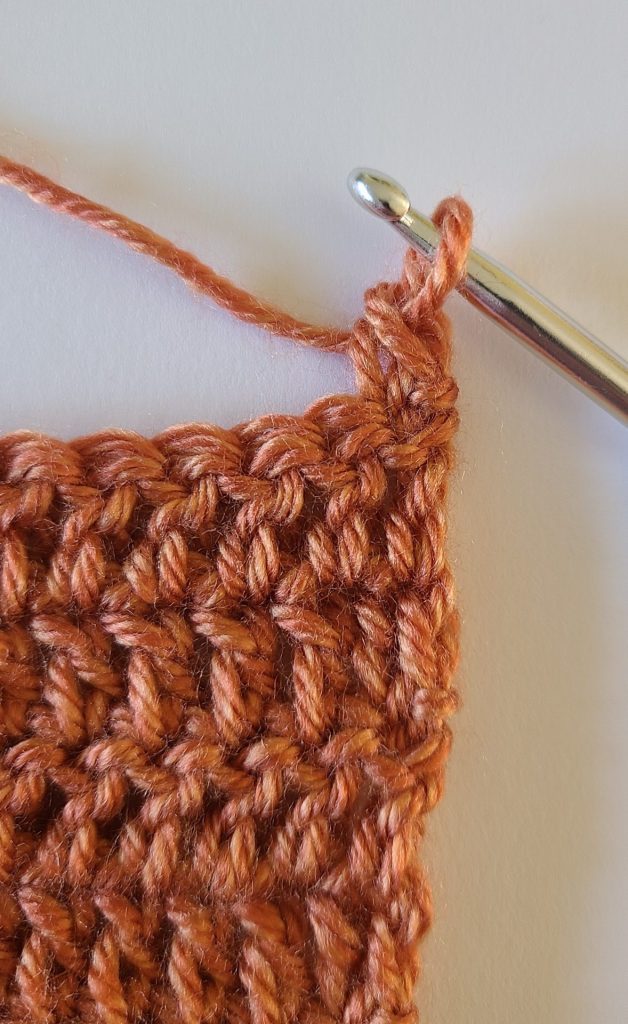
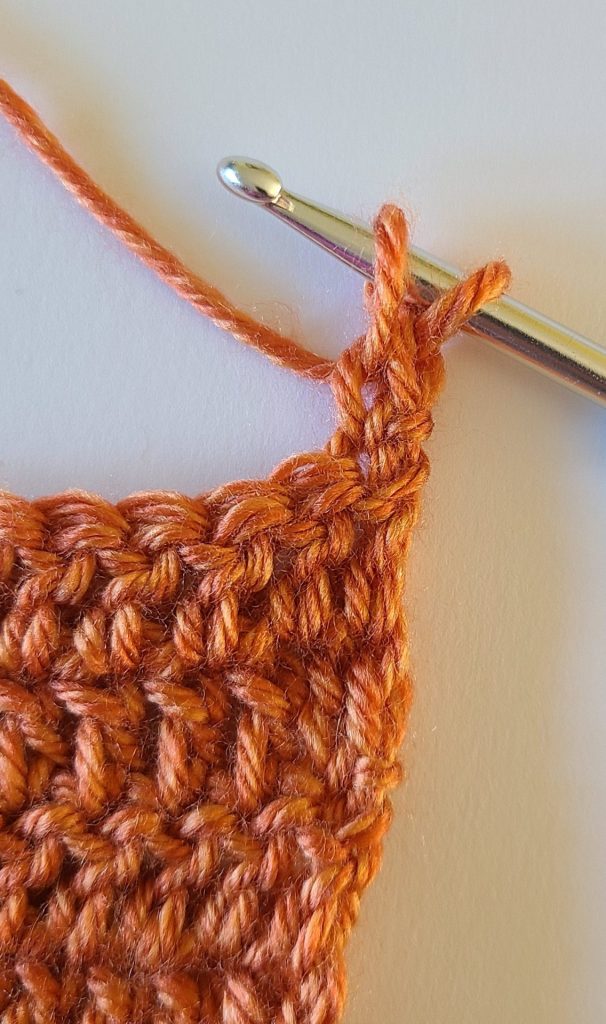
When you finish the row ch dc into the 2end sc from the top of the previous row was made the straight dc.
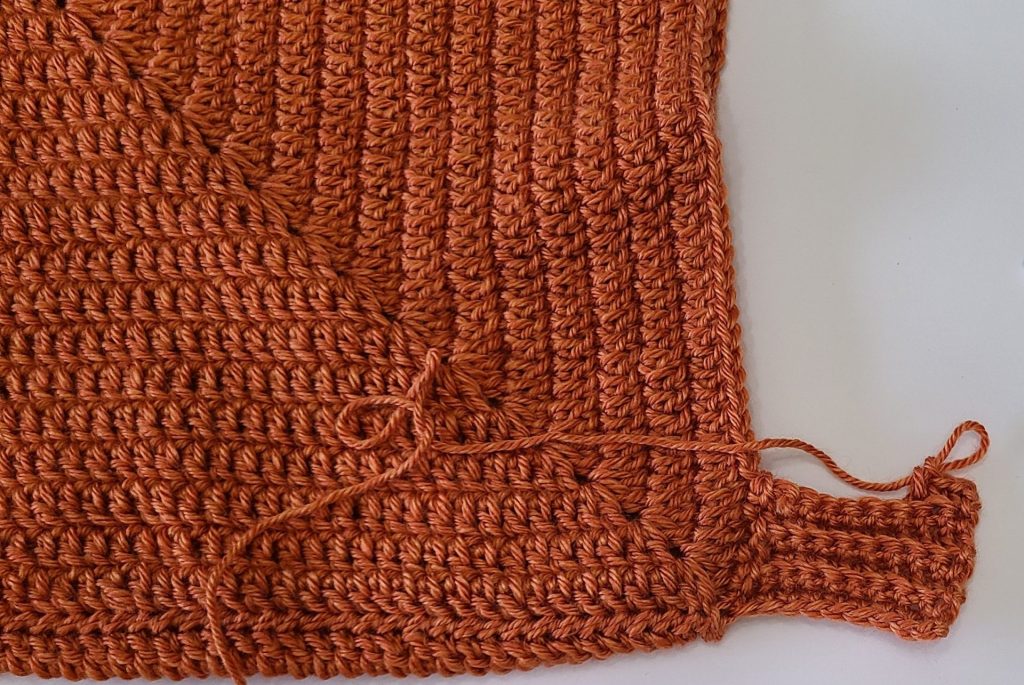
Lovare Granny Square Sweater – Assembly
– Lay all the pieces together with the wrong sides facing up.
– Start from shoulders and sew.
– Sew the sleeves.
– Sew from bottom of the side and sew up along until armpit and continue under sleeves and finish.
Lovare Granny Square Sweater – Bottom ribbing
Attach yarn at the left side where is the sewing line.
CH 9, 10, 11, 13, 14, 15 (size S, M, L, XL, XXL, 3XL)
Ch 10 (Size M)
Row 1: SC in second st from hook Sc in each stitch across (total 9), sl st to the up next row.
Row 2: Sl st to the next up st & Turn SC in each stitch across into back loop (9)
Next following rows make across: Repeat Row 2
Turn on the wrong facing up and Sl st to the first row.
Lovare Granny Square Sweater – Neck edging
Attach yarn in any stitch.
Row 1: Sc in each st around the neck.
Row 2: Ch 1, Sl st around.
Fasten off, weave in all ends.
Creating your own Crochet Granny Square Sweater is more than just a fun DIY crochet project — it’s a chance to express your creativity, stay cozy, and wear something made with love. Whether you followed this free crochet pattern as a beginner or a seasoned maker, you’ve now crafted a timeless handmade sweater that’s perfect for chilly fall and winter days.
I hope this crochet tutorial inspired you to explore more crochet clothing patterns and continue your journey in crochet fashion. There’s truly nothing more satisfying than seeing your hard work come to life, one stitch at a time.
If you enjoyed this beginner crochet pattern, don’t forget to share your finished sweater on social media and tag me — I’d love to see your color combinations and creative spins! 💕
Looking for your next fall crochet project or cozy winter crochet pattern? Check out my other free designs for more handmade inspiration. Happy crocheting, and stay warm! ❄️🧵
3 thoughts on “Lovare Granny Square Sweater – Free Pattern & Video Tutorial”