
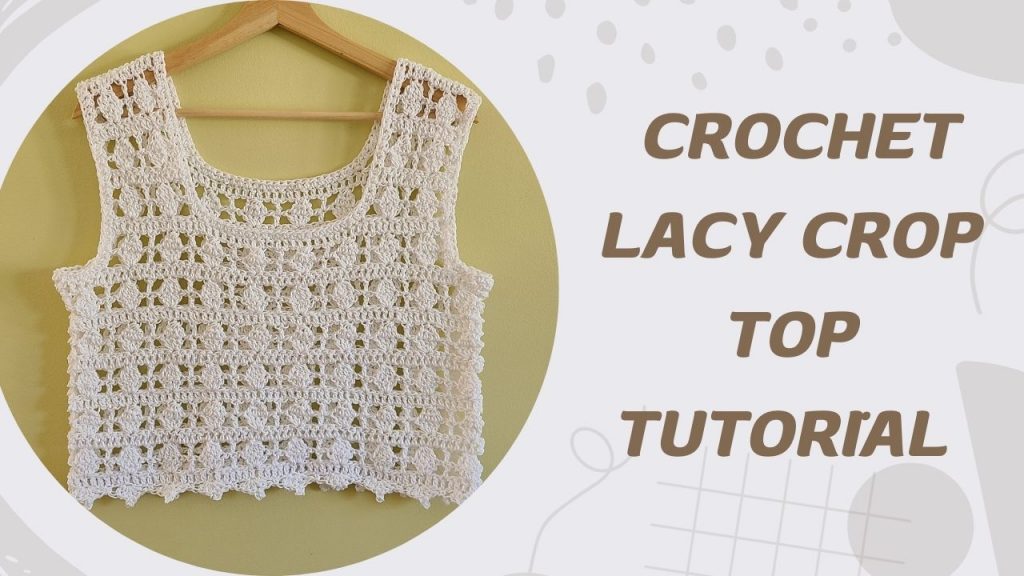
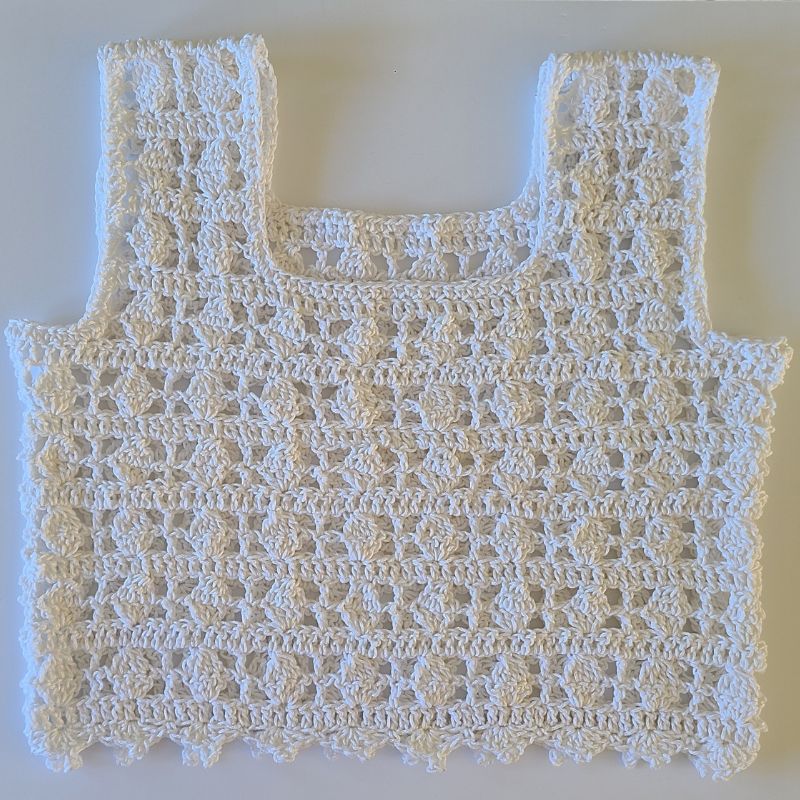
the Ilsa Lacy Crop To
The Ilsa Crochet Lacy Crop Top is a beginner-friendly crochet garment pattern designed to help you create a stylish, lightweight crochet lacy crop top with simple stitches. This crochet lacy crop top features an easy lace stitch pattern that creates a breathable, delicate texture while keeping the construction straightforward for beginners. Perfect for festivals, beach days, or casual outfits, this handmade crop top works beautifully with cotton yarn and can be customized for any size or length. Follow this free crochet crop top pattern and step-by-step tutorial to make your own trendy wardrobe staple.
About This Pattern
This crochet lacy crop top is lightweight, breathable, and perfect for summer layering. The open lace stitch creates a delicate texture while the cropped fit makes it stylish for festivals, beach days, or casual outfits.
Ilsa Crochet Lacy Crop Top: Materials
Use lightweight cotton or bamboo yarn for a breathable summer top. Choose a hook size that matches your yarn label and meets gauge.
- Lion Brand Yarn 24/7 Cotton Yarn White 4 Medium / Worsted
- You will need approximately 350 (360, 381, 420, 460, 500, 540) yards of yarn for sizes XS (S, M, L, XL, XXL, 3XL).
- Crochet hook: 5.0 mm or size needed to obtain gauge
- Scissors
- Stitch markers (optional)
- Yarn needle
Skill Level: Intermediate beginner
Crochet Gauge and Sizing Tips
Gauge is important for a good fit. If your top is too tight, use a larger hook; if too loose, use a smaller hook. You can also adjust the width by adding or removing chain multiples.
4” x 4” square = 14 dcs x 7 rows in lace stitch pattern
Ilsa Crochet Lacy Crop Top: Stitch Abbreviations (US Terms)
- ch = chain
- sl st = slip stitch
- hdc = half double crochet
- dc = double crochet
- sp = space
- rep = repeat
- st: stitch(es)
- 4dctog: 4 double crochets together
- **: repeat instructions between asterisks as described
- ard: around
- eor: end of row
You should be comfortable with:
– Chains
– Double crochet
– Working in rows
– Simple shaping
– How to Crochet 4 dc tog Across 4 Stitches
The 4 dc tog stitch creates a cluster by combining four double crochets from four consecutive stitches into one stitch at the top.
Step-by-Step Instructions
– Yarn over (YO) and insert your hook into the first stitch.
– YO and pull through, leaving 3 loops on the hook.
– YO and pull through 2 loops, leaving 2 loops on the hook. (first dc started)
– Repeat steps 1–3 in the next three stitches — after the fourth stitch, you should have 5 loops on your hook.
– YO and pull through all 5 loops — this completes the 4 dc tog cluster.
Tips for Beginners
– Always leave the last loop of each dc on the hook until you finish the cluster.
– The top of the cluster will count as one stitch, so adjust your stitch count accordingly.
– “4dctog, ch 1 to close the cluster. This ch-1 counts as a stitch.”
Ilsa Crochet Lacy Crop Top: Notes
– This pattern is written in US terms
– Take your body measurements to determine the correct number of starting chains
– Ch 3 counts as the first dc throughout
– Multiple of 6 + 3 (see size chart for adjustments)
– After each 4dctog cluster, ch 1 to close the cluster — this ch-1 counts as a stitch
“Prefer an ad-free version? Click here to purchase the printable PDF pattern on Etsy.”
Ilsa Crochet Lacy Crop Top: Finished Measurements
| Size | Width ( inches) | Length (inches) |
|---|---|---|
| XS | 14.9 | 16.2 |
| S | 16.7 | 16.2 |
| M | 18.5 | 18 |
| L | 20.3 | 18 |
| XL | 22.1 | 19.8 |
| XXL | 23.9 | 19.8 |
| 3XL | 25.7 | 21.6 |
Ilsa Crochet Lacy Top: Starting Chain Sizes
| Size Chest (in) | Start chain for Back and Front Panel |
| XS (28–30) | 48+3 |
| S (32–34) | 54+3 |
| M (36–38) | 60+3 |
| L (40–42) | 66+3 |
| XL (44–46) | 72+3 |
| XXL (48-50) | 78+3 |
| 3XL (52–54) | 84+3 |
Ilsa Crochet Lacy Crop Top: Stitch Pattern
This beginner-friendly lace stitch uses double crochet to create an open, airy fabric that works well for summer garments.
Underarm:
“When shaping the underarm, skip 3 stitches instead of 2 on the outside edges to smoothly shape the armhole.”
Straps:
“In the first row of the straps, skip 3 stitches instead of 2 on the inside edge to smoothly shape the neckline.”
If you love the airy texture of the 3-row repeat stitch used in the Ilsa Crochet Lacy Crop Top, you can bring the pattern to life by following along with our video tutorial. This step-by-step guide shows each stitch and assembly technique, making it easy to create your own stylish, lightweight crop top. Whether you’re new to this lacy stitch or just prefer visual instructions, the Ilsa Crochet Lacy Crop Top video tutorial is a great way to see the pattern in action from start to finish.
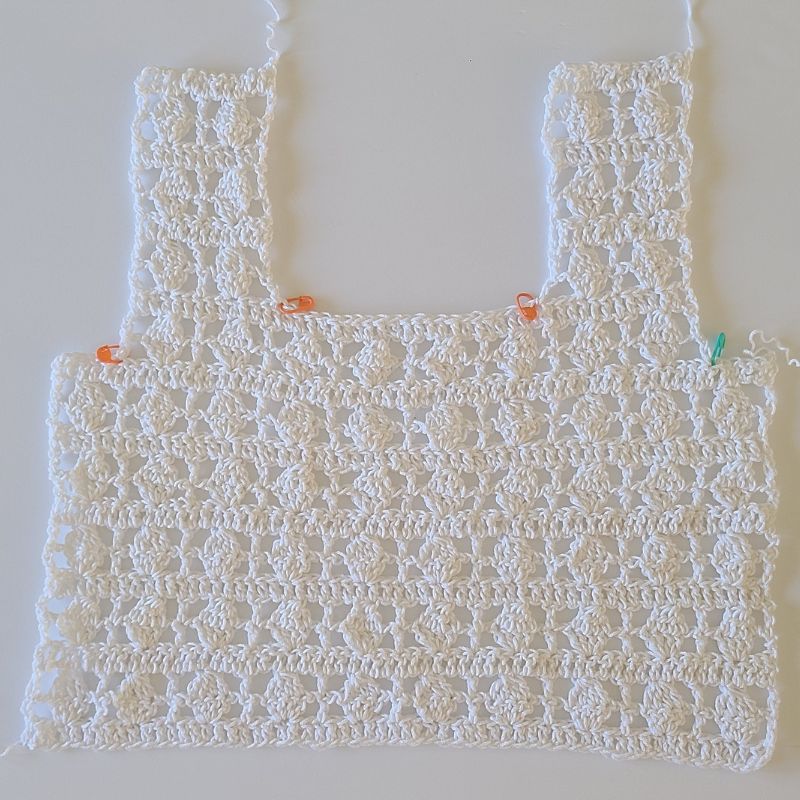
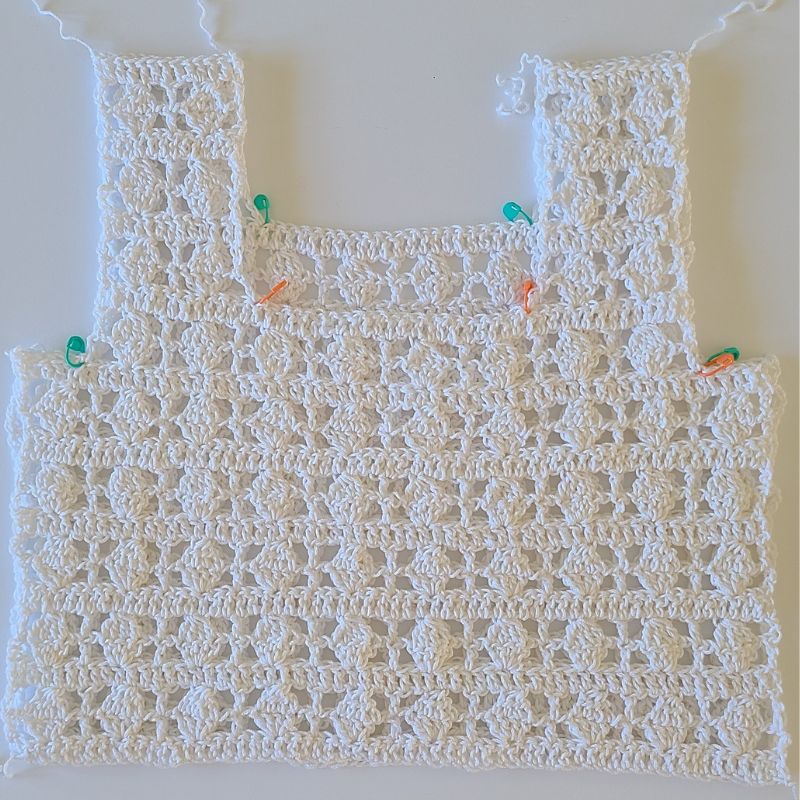
Ilsa Crochet Lacy Crop Top Pattern Instructions
Follow the front panel, back panel, straps, and assembly instructions below to complete your handmade top.
Ilsa Crochet Lacy Crop Top: Front Panel
Ch 51 (XS) ,57 (S), 63 (M), 69 (L), 75 (XL), 81 (XXL), 87 (3XL) or any multiple of 6+3.
Row 1:
Dc into 4th ch from hook, dc across.
Row 2:
Ch 4 (counts as a first dc + ch 1), turn, sk2, ch 4dcs into the next same st, ch1, sk2, ch dc into the next st, *[ch1, sk 2, ch 4dcs into the next same st, ch1, sk2, ch dc into the next st ]* rep to eor. At the end sk 2, ch dc into the 3rd ch from ch3 from the previous row.
Rows 3:
Ch 5 (counts as a first dc + ch 2), turn, sk1, ch 4dctog into the next 4 sts, ch 1 to close cluster—(count ch-1 as stitch), ch1, sk1, ch dc into the next st, *[ch2, sk1, ch 4dctog into the next 4 sts, ch 1 to close cluster—(count ch-1 as stitch), ch1, sk1, ch dc into the next st]* rep to eor. At the end ch1, sk 1, ch dc into the 3rd ch from the ch4 from previous row.
Rows 4:
Ch 3, turn, dc in each st.
Rows 5–16 (or until desired length):
Rep this combination of 3 Rows until you have 13 rows for Size XS and S
Rep this combination of 3 Rows until you have 16 rows for Size M and L.
Rep this combination of 3 Rows until you have 19 rows for Size XL and XXL
Rep this combination of 3 Rows until you have 22 rows for Size 3XL
Begin shaping the armhole from this point
Row 14 (XS), 14 (S), 17 (M), 17 (L), 20 (XL):
Turn, cut the yarn, sk 5 sts, attach the yarn into the 6th st. Ch 4 (counts as a first dc + ch 1), sk3, ch 4dcs into the next same st, ch1, sk2, ch dc into the next st, *[ch1, sk 2, ch 4dcs into the next same st, ch1, sk2, ch dc into the next st ]* rep to eor. At the end sk3, ch dc into the 6th st from the corner.
Row 20 (XXL), 23 (3XL):
Turn, cut the yarn, sk 5 sts, attach the yarn into the 12th st. Ch 4 (counts as a first dc + ch 1), sk3, ch 4dcs into the next same st, ch1, sk2, ch dc into the next st, *[ch1, sk 2, ch 4dcs into the next same st, ch1, sk2, ch dc into the next st ]* rep to eor. At the end sk3, ch dc into the 12th st from the corner.
Row 15 (XS), 15 (S), 18 (M), 18 (L), 21 (XL), 21 (XXL), 24 (3XL):
Ch 5 (counts as a first dc + ch 2), turn, sk1, ch 4dctog into the next 4 sts, ch 1 to close cluster—(count ch-1 as stitch), ch1, sk1, ch dc into the next st, *[ch2, sk1, ch 4dctog into the next 4 sts, ch 1 to close cluster—(count ch-1 as stitch), ch1, sk1, ch dc into the next st]* rep to eor. At the end ch1, sk 1, ch dc into the 3rd ch from the ch4 from previous row.
Row 16 (XS), 16 (S), 19 (M), 19 (L), 22 (XL), 22 (XXL), 25 (3XL):
Ch 3, turn, dc in each st.
Straps (right side when wearing it) Row 17 (XS), 17 (S), 20 (M), 20 (L), 23 (XL):
Ch 4, (counts as a first dc + ch 1), turn, sk2, ch 4dcs into the next same st, ch1, sk2, ch dc into the next st, ch1, sk 2, ch 4dcs into the next same st, ch1, sk3, ch dc into the next st.
Straps (right side when wearing it) Row 23 (XXL), 26 (3XL):
Ch 4, (counts as a first dc + ch 1), turn, sk2, ch 4dcs into the next same st, ch1, sk2, ch dc into the next st, *[ch1, sk 2, ch 4dcs into the next same st, ch1, sk2, ch dc into the next st ]* rep one more time. At the end sk3, ch dc into the next st.
Straps (right side when wearing it) Row 18 (XS), 18 (S), 21 (M), 21 (L), 24 (XL):
Ch 5 (counts as a first dc + ch 2), turn, sk1, ch 4dctog into the next 4 sts, ch 1 to close cluster—(count ch-1 as stitch), ch1, sk1, ch dc into the next st, ch2, sk1, ch 4dctog into the next 4 sts, ch 1 to close cluster—(count ch-1 as stitch), ch1, sk 1, ch dc into the 3rd ch from the ch4 from previous row.
Straps (right side when wearing it) Row 24 (XXL), 27 (3XL):
Ch 5 (counts as a first dc + ch 2), turn, sk1, ch 4dctog into the next 4 sts, ch 1 to close cluster—(count ch-1 as stitch), ch1, sk1, ch dc into the next st, *[ch2, sk1, ch 4dctog into the next 4 sts, ch 1 to close cluster—(count ch-1 as stitch), ch1, sk1, ch dc into the next st]* rep one more time. At the end ch1, sk 1, ch dc into the 3rd ch from the ch4 from previous row.
Straps (right side when wearing it) Row 19 (XS), 19 (S), 22 (M), 22 (L), 25 (XL):
Ch 3, turn, dc in each st.
Straps (right side when wearing it) Row 25 (XXL), 28 (3XL):
Ch 3, turn, dc in each st.
Continue the strap length with the basic pattern stitch
Work the pattern stitch by row 25 for Size XS and S
Work the pattern stitch by row 28 for Size M and L.
Work the pattern stitch by row 31 for Size XL and XXL
Work the pattern stitch by row 34 for Size 3XL
Straps (left side when wearing it) Row 17 (XS), 17 (S), 20 (M), 20 (L), 23 (XL):
Attach yarn into the 14th st, count from the corner, ch 4, (counts as a first dc + ch 1), sk3, ch 4dcs into the next same st, ch1, sk2, ch dc into the next st, ch1, sk 2, ch 4dcs into the next same st, ch1, sk2, ch dc into the last st.
Straps (left side when wearing it) Row 23 (XXL), 26 (3XL):
Attach yarn into the 20th st count from the corner, ch 4, (counts as a first dc + ch 1), sk3, ch 4dcs into the next same st, ch1, sk2, ch dc into the next st, *[ch1, sk 2, ch 4dcs into the next same st, ch1, sk2, ch dc into the next st ]* rep one more time. At the end sk2, ch dc into the last st.
Straps (left side when wearing it) Row 18 (XS), 18 (S), 21 (M), 21 (L), 24 (XL):
Ch 5 (counts as a first dc + ch 2), turn, sk1, ch 4dctog into the next 4 sts, ch 1 to close cluster—(count ch-1 as stitch), ch1, sk1, ch dc into the next st, ch2, sk1, ch 4dctog into the next 4 sts, ch 1 to close cluster—(count ch-1 as stitch), ch1, sk 1, ch dc into the 3rd ch from the ch4 from previous row.
Straps (left side when wearing it) Row 24 (XXL), 27 (3XL):
Ch 5 (counts as a first dc + ch 2), turn, sk1, ch 4dctog into the next 4 sts, ch 1 to close cluster—(count ch-1 as stitch), ch1, sk1, ch dc into the next st, *[ch2, sk1, ch 4dctog into the next 4 sts, ch 1 to close cluster—(count ch-1 as stitch), ch1, sk1, ch dc into the next st]* rep one more time. At the end ch1, sk 1, ch dc into the 3rd ch from the ch4 from previous row.
Straps (left side when wearing it) Row 19 (XS), 19 (S), 22 (M), 22 (L), 25 (XL):
Ch 3, turn, dc in each st.
Straps (left side when wearing it) Row 25 (XXL), 28 (3XL):
Ch 3, turn, dc in each st.
Continue the strap length with the basic pattern stitch
Work the pattern stitch by row 25 for Size XS and S
Work the pattern stitch by row 28 for Size M and L.
Work the pattern stitch by row 31 for Size XL and XXL
Work the pattern stitch by row 34 for Size 3XL
Ilsa Crochet Lacy Crop Top: Back Panel
Ch 51 (XS) ,57 (S), 63 (M), 69 (L), 75 (XL), 81 (XXL), 87 (3XL) or any multiple of 6+3.
Row 1:
Dc into 4th ch from hook, dc across.
Row 2:
Ch 4 (counts as a first dc + ch 1), turn, sk2, ch 4dcs into the next same st, ch1, sk2, ch dc into the next st, *[ch1, sk 2, ch 4dcs into the next same st, ch1, sk2, ch dc into the next st ]* rep to eor. At the end sk 2, ch dc into the 3rd ch from ch3 from the previous row.
Rows 3:
Ch 5 (counts as a first dc + ch 2), turn, sk1, ch 4dctog into the next 4 sts, ch 1 to close cluster—(count ch-1 as stitch), ch1, sk1, ch dc into the next st, *[ch2, sk1, ch 4dctog into the next 4 sts, ch 1 to close cluster—(count ch-1 as stitch), ch1, sk1, ch dc into the next st]* rep to eor. At the end ch1, sk 1, ch dc into the 3rd ch from the ch4 from previous row.
Rows 4:
Ch 3, turn, dc in each st.
Rows 5–16 (or until desired length):
Rep this combination of 3 Rows until you have 13 rows for Size XS and S
Rep this combination of 3 Rows until you have 16 rows for Size M and L.
Rep this combination of 3 Rows until you have 19 rows for Size XL and XXL
Rep this combination of 3 Rows until you have 22 rows for Size 3XL
Begin shaping the armhole from this point
Row 14 (XS), 14 (S), 17 (M), 17 (L), 20 (XL):
Turn, cut the yarn, sk 5 sts, attach the yarn into the 6th st. Ch 4 (counts as a first dc + ch 1), sk3, ch 4dcs into the next same st, ch1, sk2, ch dc into the next st, *[ch1, sk 2, ch 4dcs into the next same st, ch1, sk2, ch dc into the next st ]* rep to eor. At the end sk3, ch dc into the 6th st from the corner.
Row 20 (XXL), 23 (3XL):
Turn, cut the yarn, sk 5 sts, attach the yarn into the 12th st. Ch 4 (counts as a first dc + ch 1), sk3, ch 4dcs into the next same st, ch1, sk2, ch dc into the next st, *[ch1, sk 2, ch 4dcs into the next same st, ch1, sk2, ch dc into the next st ]* rep to eor. At the end sk3, ch dc into the 12th st from the corner.
Row 15 (XS), 15 (S), 18 (M), 18 (L), 21 (XL), 21 (XXL), 24 (3XL):
Ch 5 (counts as a first dc + ch 2), turn, sk1, ch 4dctog into the next 4 sts, ch 1 to close cluster—(count ch-1 as stitch), ch1, sk1, ch dc into the next st, *[ch2, sk1, ch 4dctog into the next 4 sts, ch 1 to close cluster—(count ch-1 as stitch), ch1, sk1, ch dc into the next st]* rep to eor. At the end ch1, sk 1, ch dc into the 3rd ch from the ch4 from previous row.
Row 16 (XS), 16 (S), 19 (M), 19 (L), 22 (XL), 22 (XXL), 25 (3XL):
Ch 3, turn, dc in each st.
Repeat the pattern as follows with the basic pattern stitch
By row 19 for Size XS and S
By row 22 for Size M and L.
By row 25 for Size XL and XXL
By row 28 for Size 3XL
Ilsa Crochet Lacy Crop Top: Straps
Starting with row 20 (XS), 20 (S), 23( M), 23 (L), 26 (XL), 26 (XXL), 29 (3XL): Repeat the pattern from the front panel.
Work the pattern stitch by row 25 for Size XS and S
Work the pattern stitch by row 28 for Size M and L.
Work the pattern stitch by row 31 for Size XL and XXL
Work the pattern stitch by row 34 for Size 3XL
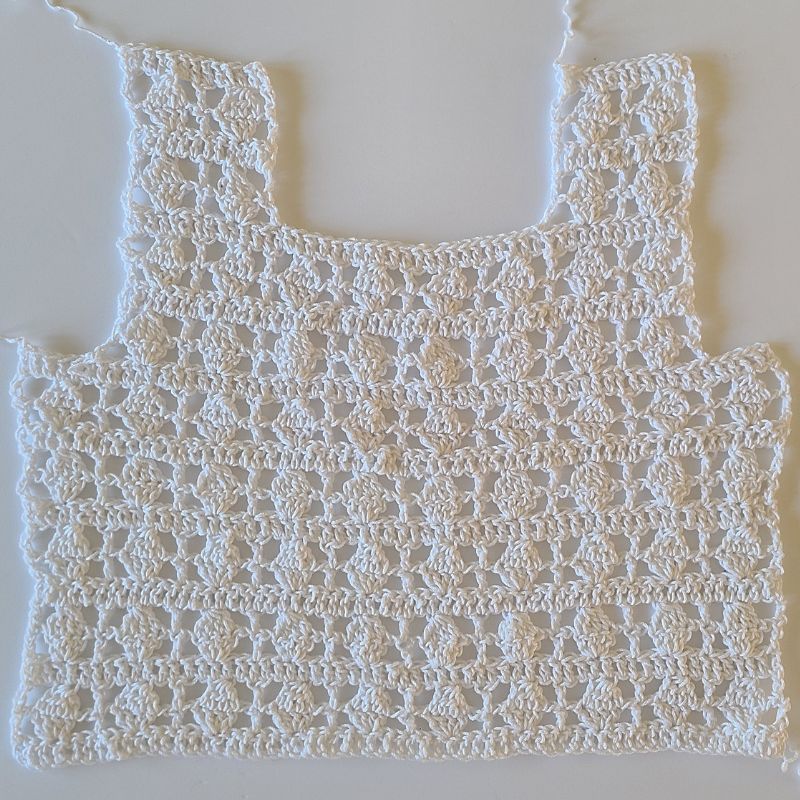
Ilsa Crochet Lacy Crop Top: ASSEMBLY
- Sew front and back panels together along the upper shoulders.
- Sew front and back panels together along side seams.
- Weave in all ends.
Ilsa Crochet Lacy Crop Top: Bottom Edging
Row 1: Attach yarn in the side corner, sc in the same st, sk 2 sts, [ch 3, dc, ch 3, sl st to the base, ch 2, dc] in the next st, sk 2 sts, sc in the next st; rep from * to * ard.
Neckline and Armhole Edging
Row 1: Attach yarn, ch 2, hdc in each st ard.
Ilsa Crochet Lacy Crop Top: Styling Tips
- Pair with high-waisted jeans, skirts, or shorts.
- Add beads or tassels to straps for a boho look.
- Use cotton or bamboo yarn for a breathable summer feel.
“If you enjoyed working with this stitch, the Galena Crochet Lacy Top is another great project to try, showcasing the same pattern in a chic, lightweight top perfect for warm weather.”
Sharing Your Work
If you make this top, share your photos on social media and tag @yelenastylecrochet
Copyright & Disclaimer
This pattern is free for personal use. You may sell finished items but please credit the designer and link back to this tutorial.
Happy crocheting!
One thought on “How to Crochet the Ilsa Lacy Crop Top (Beginner Tutorial)”