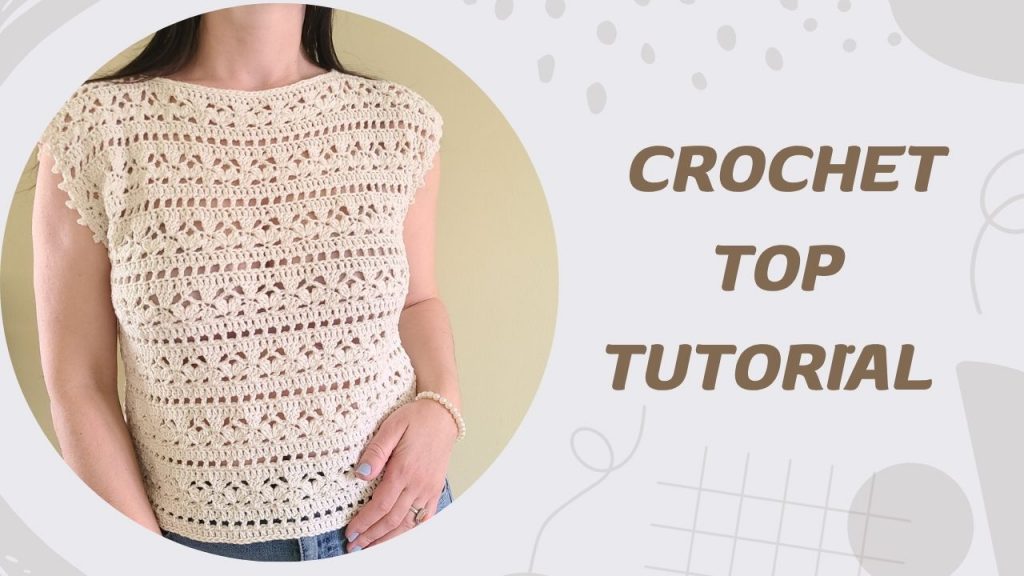
If you’re looking for a stylish and versatile crochet top to add to your handmade wardrobe, the Ira Crochet Top is the perfect project for you. This free crochet top pattern combines simplicity with elegance, making it suitable for both beginners and experienced crocheters. Whether you’re creating a lightweight piece for summer or layering it for cooler days, this design offers endless possibilities.
In this tutorial, you’ll find clear, step-by-step instructions to guide you through the process of making your own crochet top from start to finish. With its modern shape and comfortable fit, the Ira Crochet Top is not only fun to make but also a beautiful piece you’ll love to wear. Grab your yarn and hook, and let’s get started on this must-make crochet top!
About the Pattern:
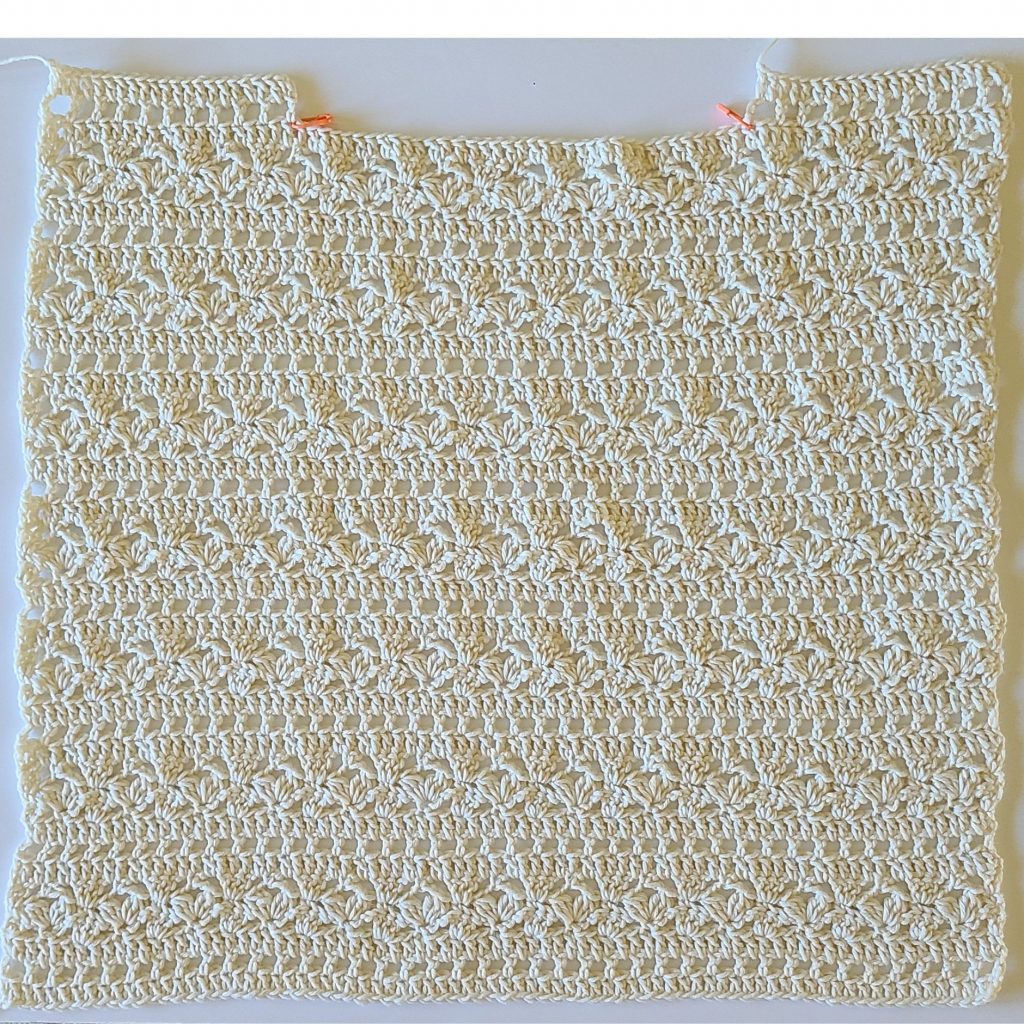
The Ira Crochet Top is a lightweight summer piece designed with a beautiful lace dense stitch that creates the perfect balance between breathability and texture. This crochet top is both stylish and comfortable, making it ideal for warm weather wear. The pattern is simple to follow, with a repetitive stitch design that works up smoothly while still giving an elegant, detailed look. Perfect for layering or wearing on its own, it’s a versatile addition to any handmade wardrobe.
Ira Crochet Top: Materials
- Yarn: Bernat Softee Cotton Cotton Yarn – 3 DK (Light).
- You will need approximately 240 (300, 340, 370, 400, 440, 470 g of yarn for sizes XS (S, M, L, XL, XXL, 3XL).
- Crochet Hook: 4.0 mm (G/6) or size needed to meet gauge
- Tapestry Needle: For weaving in ends
- Scissors
- Stitch Markers (optional but helpful for shaping)
- Measuring Tape
Ira Crochet Top Notes:
- This crochet top is worked using basic stitches, making it beginner-friendly.
- The pattern is written in standard US crochet terminology.
- Gauge is important to ensure proper fit—take time to check your swatch before starting.
- The Ira Crochet Top is designed with a slightly relaxed fit; you can adjust sizing by changing hook size or yarn weight.
- Multiple of 6 + 3
- After each 3dctog cluster, ch 1 to close the cluster — this ch-1 counts as a stitch
- Chaining at the beginning of rows count as a stitch.
- Feel free to customize the length or straps to suit your personal style.
- Always read through the entire pattern before beginning to understand the construction.
Straight Edge Alternative (Stacked Single Crochet):
To create a cleaner, straighter edge, you can replace the traditional turning chain at the beginning of each row with a stacked single crochet. Turn your work, then work 2 sc in the first stitch, placing the second sc into the first loop of the sc you just made. This technique eliminates gaps and creates a neat, straight edge that mimics the height of a turning chain.
At the end of the row, work your final dc into the second sc from the top of the previous row, which forms a straight double crochet edge. This method gives your crochet top a more polished and professional finish. ( I used stacked single crochet)
Gauge
Gauge is important for achieving the correct fit.
Make a small swatch using the lace stitch pattern and adjust your hook size if needed.
4 inches × 4 inches = 16 dcs x 9 rows
“Prefer an ad-free version? Click here to purchase the printable PDF pattern on Etsy.”
Ira Crochet Top: Finished Measurements
Note About Yarn and Measurements:
The measurements provided in this pattern are taken before steaming or blocking. After steaming, the yarn will relax and the lace dense stitch will open up slightly, giving the Ira Crochet Top a longer, more flowing silhouette. Keep this in mind when choosing your size, as the finished top will stretch gently and drape beautifully for a comfortable summer fit.
| Size | Width ( inches) | Length (inches) |
|---|---|---|
| XS | 16.4 | 16 |
| S | 17.7 | 16 |
| M | 19 | 19 |
| L | 20.3 | 19 |
| XL | 21.6 | 19 |
| XXL | 22.9 | 22 |
| 3XL | 24.2 | 22 |
Ira Crochet Top: Starting Chain Sizes
| Size Chest (in) | Start chain for Back and Front Panel |
| XS (28–30) | 66 + 3 |
| S (32–34) | 72 + 3 |
| M (36–38) | 78 + 3 |
| L (40–42) | 84 + 3 |
| XL (44–46) | 90 + 3 |
| XXL (48-50) | 96 + 3 |
| 3XL (52–54) | 102 + 3 |
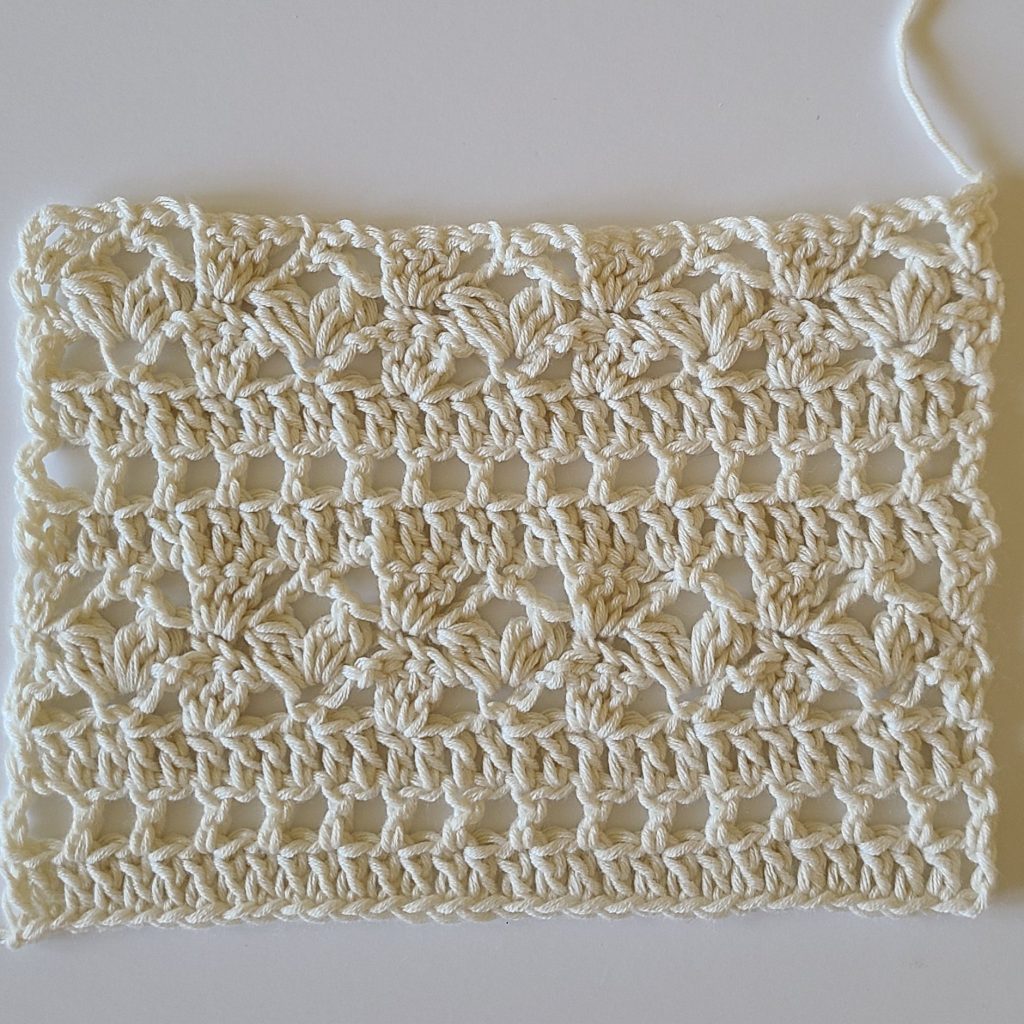
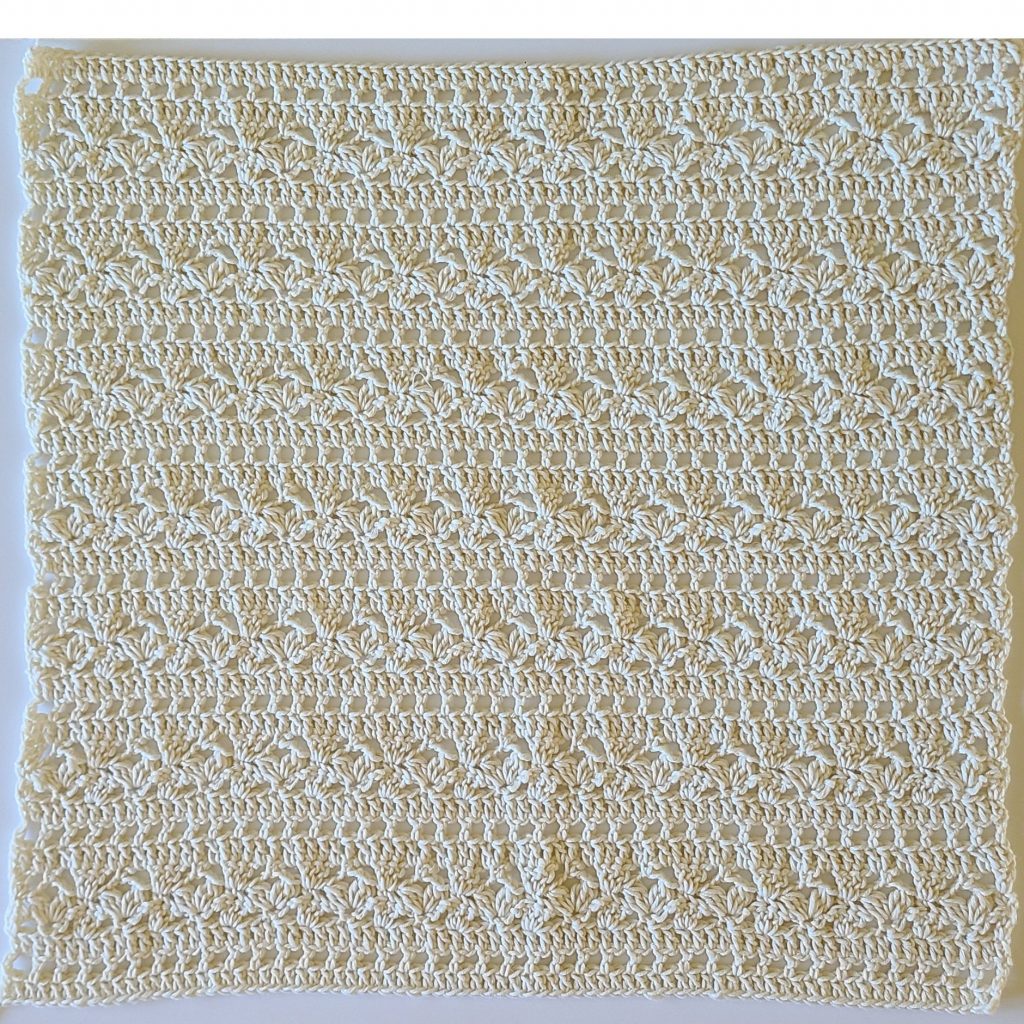
Ira Crochet Top: Stitch Pattern
The Ira Crochet Top is worked in a repeating 6-row stitch pattern that balances simplicity with texture. The first row is all double crochet (dc), followed by a second row of chain 1, skip 1, dc, creating a delicate openwork effect. The third row returns to full dc stitches, and the remaining three rows introduce a more intricate combination of single crochet (sc) and double crochet (dc) stitches. This mix of straightforward and textured rows gives the top its beautiful lace look while keeping it manageable for crocheters of all skill levels.
Ira Crochet Top: Stitch Abbreviations (US Terms)
- ch = chain
- sl st = slip stitch
- sc = single crochet
- dc = double crochet
- sp = space
- rep = repeat
- st: stitch(es)
- 3dctog: 3 double crochets together
- **: repeat instructions between asterisks as described
- ard: around
- eor: end of row
How to Crochet 3 dc tog into One Stitch
The 3 dc tog stitch creates a cluster by combining three double crochets from one stitch into a single stitch at the top.
Step-by-Step Instructions:
- Yarn over (YO) and insert your hook into the stitch.
- YO and pull through, leaving 3 loops on the hook.
- YO and pull through 2 loops, leaving 2 loops on the hook (first dc started).
- Repeat steps 1–2 two more times in the same stitch — after the third dc, you should have 4 loops on your hook.
- YO and pull through all 4 loops — this completes the 3 dc tog cluster.
Tips for Beginners:
- Always leave the last loop of each dc on the hook until you finish the cluster.
- The top of the cluster counts as one stitch, so adjust your stitch count accordingly.
Variation: 3 dc tog with Chain-3 in One Stitch
For some rows, you may work two clusters separated by a chain-3 in the same stitch.
Abbreviation / Pattern Line:(3dctog, ch 3, 3dctog) in same st – Work a 3 dc tog cluster, chain 3, then another 3 dc tog into the same stitch.
- The chain-3 counts as part of the stitch spacing.
- Each cluster’s top counts as one stitch in your stitch count.
Tip: This creates a decorative openwork cluster that’s perfect for the lace dense stitch in the Ira Crochet Top.
If you prefer to learn visually, I’ve included a full step-by-step video tutorial to guide you through making the Ira Crochet Top. In this tutorial, I walk you through each part of the process—from the stitch pattern to shaping the panels and finishing the top—so you can confidently follow along at your own pace.
Ira Crochet Top Pattern Instructions:
Follow the front panel, back panel, straps, and assembly instructions below to complete your handmade top.
Ira Crochet Top: Back Panel
Ch 69 (XS) ,75 (S), 81 (M), 87 (L), 93 (XL), 99 (XXL), 105 (3XL) or any multiple of 6+3.
Row 1:
Dc into 4th ch from hook, dc across.
Row 2:
Ch 4, turn. *Ch 1, skip 1, dc — repeat from * to * across.
Row 3:
Ch 3, turn. Dc across.
Row 4:
Ch 3, turn. Dc into the same first st. *Ch 2, skip 2, sc, ch 2, skip 2, 3 dc into the next same st — repeat from * to * across. Skip 2, 2 dc into the last st.
Row 5:
Ch 1, turn. Sc into the same first st. *Skip 2, (3dctog, ch 3, 3dctog) in next st, skip 2, sc into next st — repeat from * to * across. Skip 2, sc into the last st.
Row 6:
Ch 3, turn. Dc into the same first st. *Skip 3, sc into the ch 3 space from previous row, skip 3, 3 dc into the next same st — repeat from * to * across. Skip 3, 2 dc into the last st.
Row 7:
Repeat Row 3.
Row 8:
Repeat Row 2.
Row 9:
Repeat Row 3.
Row 10 and onward:
Continue repeating Rows 2–7 until the back panel reaches your desired length.
Number of Rows by Size:
- XS–S: 39 rows
- M–L–XL: 45 rows
- XXL–3XL: 51 rows
Ira Crochet Top: Front Panel
Work the front panel by repeating Rows 2–7 of the stitch pattern until you reach the required length for your size.
Number of Rows by Size:
- XS–S: 37 rows
- M–L–XL: 43 rows
- XXL–3XL: 49 rows
Notes:
- Ensure you are repeating the full Rows 2–7 sequence evenly to maintain the lace pattern.
- The final 2 rows are used to form the straps.
- You may adjust the length slightly by adding or removing repeats, keeping in mind the fabric will stretch after blocking.
Front Panel – Strap Shaping (Size XS–S)
Row 38 (Right Side – when wearing):
Ch 4, turn. Skip 1, dc in next st, ch 1, skip 1, dc — repeat from * 7 more times.
You should stop at the 17th stitch.
Row 38 (Left Side – when wearing):
Attach yarn to the 17th stitch on the opposite side.
Ch 4, skip 1, dc in next st, ch 1, skip 1, dc — repeat from * 7 more times.
Row 39 (Both Sides):
Ch 3, turn. Dc across.
Cut yarn and fasten off.
Front Panel – Strap Shaping (Size M–L)
Row 44 (Right Side – when wearing):
Ch 4, turn. Skip 1, dc in next st, ch 1, skip 1, dc — repeat from * 9 more times.
You should stop at the 21st stitch.
Row 44 (Left Side – when wearing):
Attach yarn to the 21st stitch on the opposite side.
Ch 4, skip 1, dc in next st, ch 1, skip 1, dc — repeat from * 9 more times.
Row 45 (Both Sides):
Ch 3, turn. Dc across.
Cut yarn and fasten off.
Front Panel – Strap Shaping (Size XL–XXL)
Row 50 (Right Side – when wearing):
Ch 4, turn. Skip 1, dc in next st, ch 1, skip 1, dc — repeat from * 11 more times.
You should stop at the 25th stitch.
Row 50 (Left Side – when wearing):
Attach yarn to the 25th stitch on the opposite side.
Ch 4, skip 1, dc in next st, ch 1, skip 1, dc — repeat from * 11 more times.
Row 51 (Both Sides):
Ch 3, turn. Dc across.
Cut yarn and fasten off.
Front Panel – Strap Shaping (Size 3XL)
Row 50 (Right Side – when wearing):
Ch 4, turn. Skip 1, dc in next st, ch 1, skip 1, dc — repeat from * 12 more times.
You should stop at the 27th stitch.
Row 50 (Left Side – when wearing):
Attach yarn to the 27th stitch on the opposite side.
Ch 4, skip 1, dc in next st, ch 1, skip 1, dc — repeat from * 12 more times.
Row 51 (Both Sides):
Ch 3, turn. Dc across.
Cut yarn and fasten off.
Ira Crochet Top: ASSEMBLY
- Sew front and back panel together along the upper shoulders.
- Sew front and back panel together along side seams.
- Weave in all ends.
Leave space for the armholes. The recommended armhole openings are:
- Size XS & S: 7 inches
- Size M: 8 inches
- Size L & XL: 9 inches
- Size XXL & 3XL: 10 inches
Make sure to leave these measurements when shaping the panels so your top fits comfortably around the arms.
Ira Crochet Top: Armhole Edging
Attach yarn in any stitch.
Ch 1, sc in the same stitch, *ch 3, sl st to the base, sc in the next 3 sts, ch 3, sl st to the base; repeat from * across to the end of the row. Join with a sl st to the first sc.
Ira Crochet Top: Neck hole Edging
Row 1: Attach yarn, ch 1, sc in each st ard, 3sctog into the front corners to make a good shaping.
Row 1: Attach yarn, ch 1, sl st in each st ard.
Ira Crochet Top: Bottom Edging
Row 1: Attach yarn, ch 1, sl st in each st ard.

If you loved making the Ira Top, you might also enjoy my other crochet summer top designs. It features a similar lightweight, warm-weather construction with an easy, relaxing stitch pattern that’s perfect for beginners and experienced crocheters alike.
I watched your video several times as written instructions does not match what you are doing. example row 3 chain 3 you are stacking a stitch, not chained stitch, which made my sides of garment wonky.
Hello Diane P. Baker. I just added in the notes section that I used Stacked Single Crochet instead of chain 3 at the beginning of the rows. The pattern itself uses a chain 3 as the turning stitch, but I chose to use stacked single crochets instead 😊 Both methods work the same in terms of height, but the ch-3 will leave a small gap at the edge, which is completely normal. The stacked single crochet just gives a neater, straighter edge without that space—so feel free to use whichever you prefer!