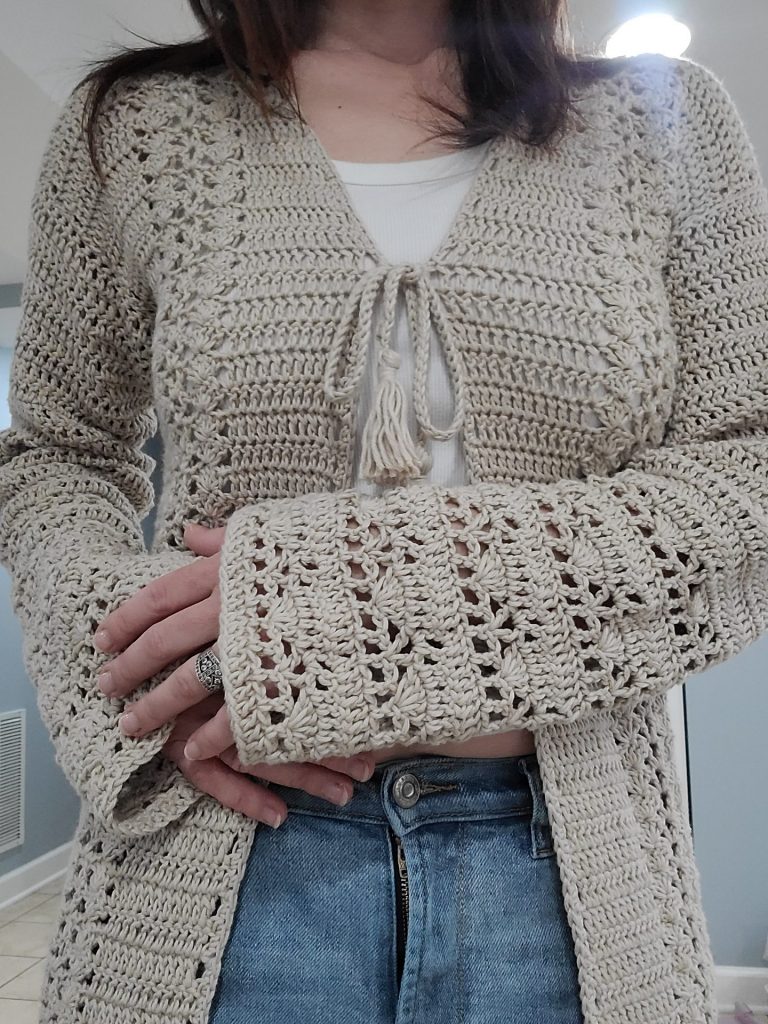
This beautiful crochet cardigan is the perfect addition to your year-round wardrobe. With its elegant style and wide sleeves, you can pair it with any item in your closet – from dresses to jeans. The Aloya Crochet Cardigan is a great project for beginner crocheters who want to try something a bit more intense but using simple, familiar stitches.
If you’re looking to add a handmade touch to your wardrobe, the Aloya Crochet Cardigan is the perfect project to get started. This beautifully textured cardigan blends style, comfort, and timeless design—making it a must-have for every season. Whether you’re heading out for a casual day or layering up for cooler evenings, the Aloya Cardigan adds that cozy, elegant finish to any outfit.
Aloya Crochet Cardigan: About the pattern
In this post, I’ll be sharing the full cardigan pattern along with helpful tips and tricks to make the process as smooth as possible. This crochet women cardigan pattern is designed with simplicity in mind but doesn’t compromise on detail. With its modern fit and gorgeous drape, it’s a great project for both confident beginners and experienced crocheters alike.
To make things even easier, I’ve included a step-by-step video tutorial to guide you through the more intricate parts of the pattern. So if you’re more of a visual learner, you can crochet along with me and see each step in action.
Grab your hooks, choose your favorite yarn, and let’s get started on your very own Aloya Crochet Cardigan!
When complete, the cardigan is blocked – I used steam blocking. The listed measurements are based on standards used by the Craft Yarn Council – and are before blocking. Measurements may change based on hook size, yarn and gauge.
This free pattern is written for a size medium. The downloadable PDF pattern with sizes small to xxl is available in my Etsy Shop!
Aloya Crochet Cardigan Information
Skill Level: Advanced Beginner
Measurements
| Size M | |
| Width Back Panel | 19 inches |
| Width Front Panel | 9 inches |
| Length Sleeve | 21 inches |
| Length back and front panel | Length back and front panel |
Materials Needed:
- Bernat Softee Cotton Yarn, Feather Gray 3 DK (Light) yarn – 600g for Size M
- 3.5 mm hook
- Scissors
- Tapestry needle
- Optional: stitch marker
Gauge
14 dc x 7 rows (4×4 inch square)
Pattern Notes for Aloya Crochet Cardigan
For the Front Panels:
There is a small difference between Row 1 and Row 2:
- At the beginning of Row 1, you have to skip 3 stitches before 5dc into next stitch, between [dc, ch 2, dc] and 5dc into next stitch.
- At the beginning of Row 2, you have to skip 2 stitches before the 5dc and after the second 5dc on the other side of the row.
Stitches Used
US Terms
| ** | Repeat instructions in asterisks defined number of times |
| [ ] | Work these stitches in same stitch |
| Ch | Chain |
| Dc | Double Crochet |
| Dec | Decrease |
| Eor | End of Row |
| Inc | Increase |
| Rep | Repeat |
| Sk | Skip |
| Sp | Space |
| St(s) | Stitch(es) |
Video tutorial is available on my Youtube channel Yelena Style Crochet.
Pattern for Aloya Crochet Cardigan
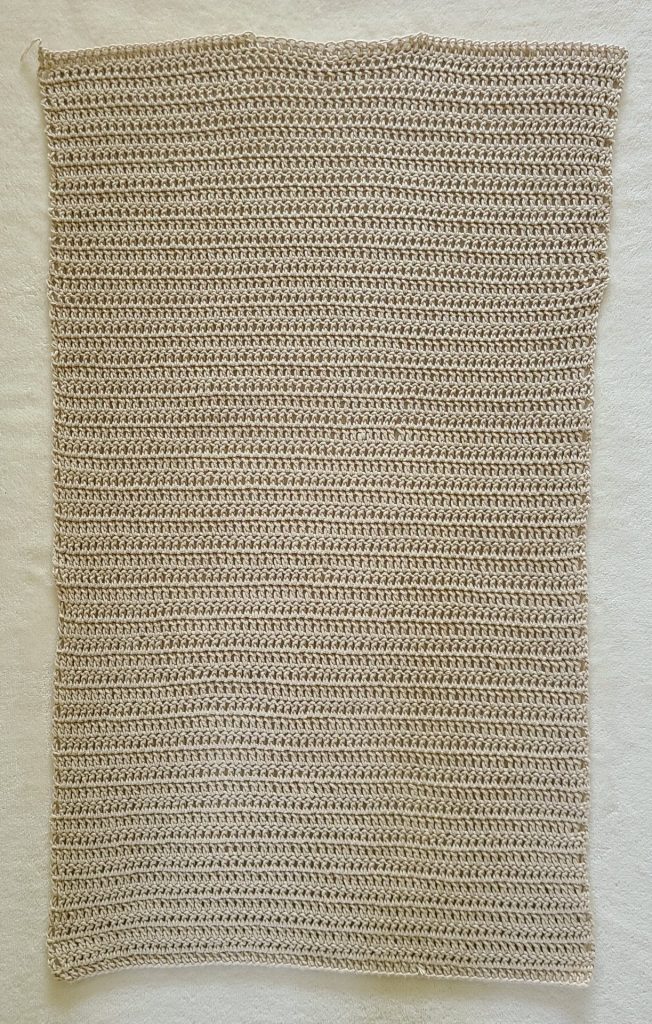
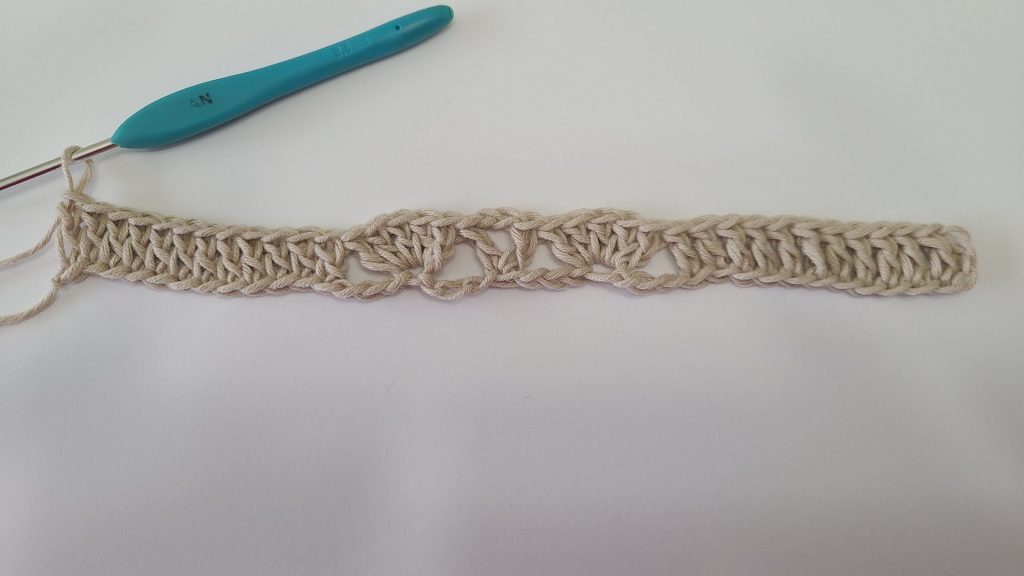
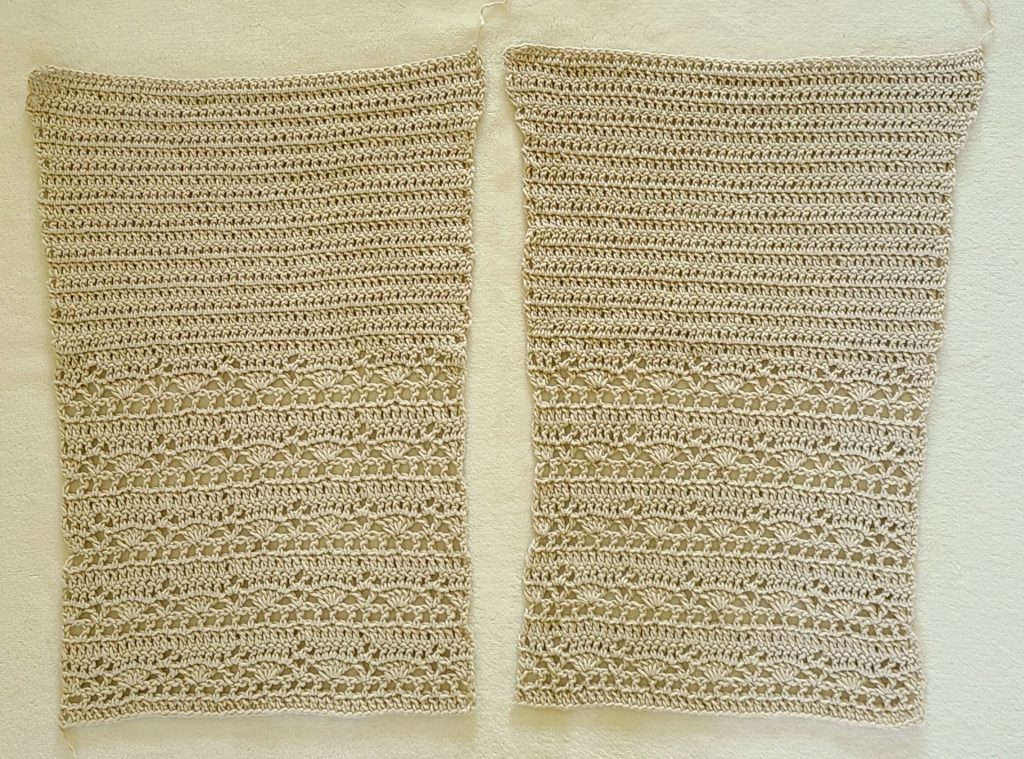
Back Panel
Chain 68 +3
Row 1: dc into 3rd ch from hook, dc in each st to eor (69 dc)
Row 2: ch 3, turn, dc in each st across
Row 3 to Row 57 : Rep Row 2
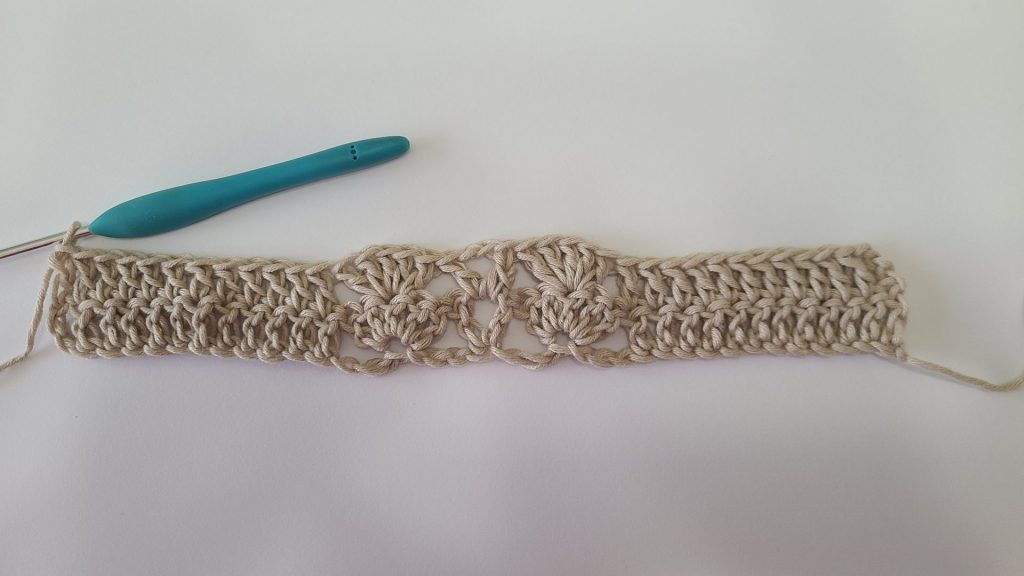
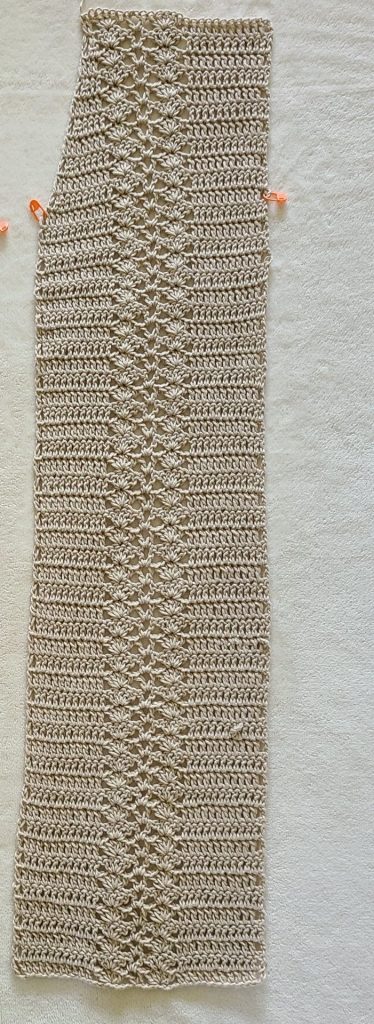
Front Panel (make 2)
Chain 38 +3
Row 1: dc into 3rd ch from hook, dc in the next 10 sts, sk 3, 5dc in the next st, sk 3, [dc, ch 2, dc] into the same st, sk 3, 5dc into the next st, sk 3, dc in the next 12 sts.
Row 2: ch 3, turn, dc in the next 11 st, sk 2, 5dc into the next st (that is the middle of the 5dc from previous row), sk 3, [dc, ch 2, dc] into the next ch2 sp from previous row, sk 3, 5dc into the next st, sk 2, dc in the next 12 sts.
Row 3 to Row 46: Rep Row 2
From Row 47 there is a small difference between the 2 front panels, depending on which side of the row you start decreasing. (see pattern notes section)
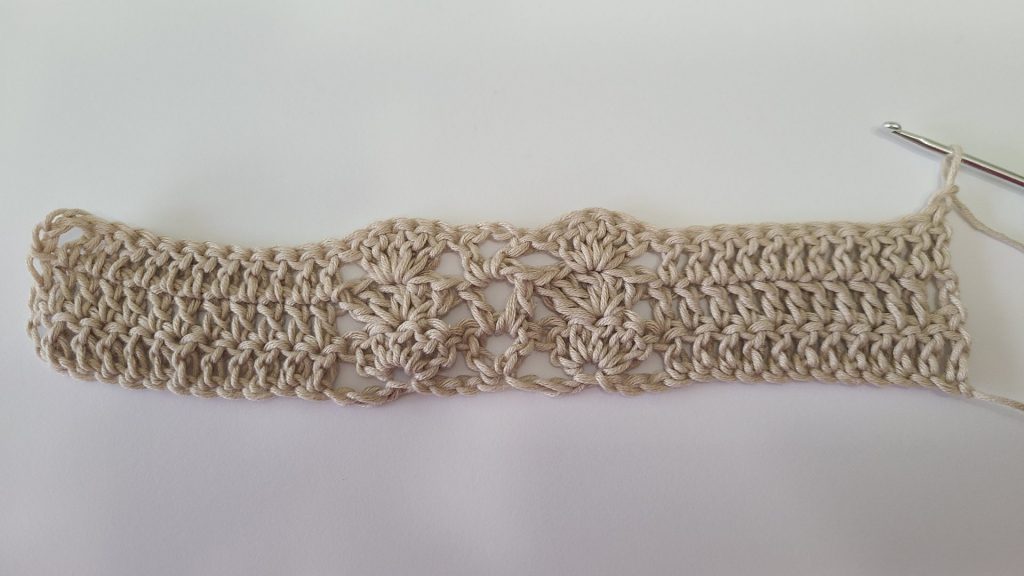
Front Right Side Panel ( when wearing it)
Row 47: ch 3, turn, dc dec into the next 2 sts, dc in the next 9 sts, sk 2, 5dc into the next st (that is the middle of the 5dc from previous row), sk 3, [dc, ch 2, dc] in the next ch2 sp from previous row, sk 2, 5dc into the next st, sk 2, dc in the next 12 sts.
Row 48: ch 3, turn, dc in the next 11 sts, sk 2, 5dc in the next st, sk 3, [dc, ch 2, dc] in the next ch2 sp from previous row, sk 3, 5dc into the next st, sk 2, dc in the next 9 sts, dc dec in the last 2 sts.
Row 49: ch 3, turn, dc dec into the next 2 sts, dc in the next 7 sts, sk 2, 5dc into the next st (that is the middle of the 5dc from previous row), sk 3, [dc, ch 2, dc] in the next ch2 sp from previous row, sk 2, 5dc into the next st, sk 2, dc in the next 12 sts.
Row 50: ch 3, turn, dc in the next 11 sts, sk 2, 5dc in the next st, sk 3, [dc, ch 2, dc] in the next ch2 sp from previous row, sk 3, 5dc into the next st, sk 2, dc in the next 7 sts, dc dec in the last 2 sts.
Row 51: ch 3, turn, dc dec into the next 2 sts, dc in the next 5 sts, sk 2, 5dc into the next st (that is the middle of the 5dc from previous row), sk 3, ]dc, ch 2, dc] in the next ch2 sp from previous row, sk 2, 5dc into the next st, sk 2, dc in the next 12 sts.
Row 52: ch 3, turn, dc in the next 11 sts, sk 2, 5dc in the next st, sk 3, [dc, ch 2, dc] in the next ch2 sp from previous row, sk 3, 5dc into the next st, sk 2, dc in the next 5 sts, dc dec in the last 2 sts.
Row 53: ch 3, turn, dc dec into the next 2 sts, dc in the next 3 sts, sk 2, 5dc into the next st (that is the middle of the 5dc from previous row), sk 3, [dc, ch 2, dc] in the next ch2 sp from previous row, sk 2, 5dc into the next st, sk 2, dc in the next 12 sts.
Row 54: ch 3, turn, dc in the next 11 sts, sk 2, 5dc in the next st, sk 3, [dc, ch 2, dc] in the next ch2 sp from previous row, sk 3, 5dc into the next st, sk 2, dc in the next 3 sts, dc dec in the last 2 sts.
Row 55: ch 3, turn, dc dec into the next 2 sts, dc in the next 1 sts, sk 2, 5dc into the next st (that is the middle of the 5dc from previous row), sk 3, [dc, ch 2, dc] in the next ch2 sp from previous row, sk 2, 5dc into the next st, sk 2, dc in the next 12 sts.
Row 56: ch 3, turn, dc in the next 11 sts, sk 2, 5dc in the next st, sk 3, [dc, ch 2, dc] in the next ch2 sp from previous row, sk 3, 5dc into the next st, sk 2, dc in the next 1 st, dc dec in the last 2 sts.
Row 57: ch 3, turn, dc into the next st, sk 2, 5dc into the next st (that is the middle of the 5dc from previous row), sk 3, [dc, ch 2, dc] in the next ch2 sp from previous row, sk 2, 5dc into the next st, sk 2, dc in the next 12 sts.
Front Left Side Panel ( when wearing it)
Repeat the same pattern as front right side panel until Row 46
Row 47: ch 3, turn, dc in the next 11 sts, sk 2, 5dc in the next st, sk 3, [dc, ch 2, dc] in the next ch2 sp from previous row, sk 3, 5dc into the next st, sk 2, dc in the next 10 sts, dc dec in the last 2 sts.
Row 48: ch 3, turn, dc dec into the next 2 sts, dc in the next 8 sts, sk 2, 5dc into the next st (that is the middle of the 5dc from previous row), sk 3, [dc, ch 2, dc] in the next ch2 sp from previous row, sk 2, 5dc into the next st, sk 2, dc in the next 12 sts.
Row 49: ch 3, turn, dc in the next 11 sts, sk 2, 5dc in the next st, sk 3, [dc, ch 2, dc] in the next ch2 sp from previous row, sk 3, 5dc into the next st, sk 2, dc in the next 8 sts, dc dec in the last 2 sts.
Row 50: ch 3, turn, dc dec into the next 2 sts, dc in the next 6 sts, sk 2, 5dc into the next st (that is the middle of the 5dc from previous row), sk 3, [dc, ch 2, dc] in the next ch2 sp from previous row, sk 2, 5dc into the next st, sk 2, dc in the next 12 sts.
Row 51: ch 3, turn, dc in the next 11 sts, sk 2, 5dc in the next st, sk 3, [dc, ch 2, dc] in the next ch2 sp from previous row, sk 3, 5dc into the next st, sk 2, dc in the next 6 sts, dc dec in the last 2 sts.
Row 52: ch 3, turn, dc dec into the next 2 sts, dc in the next 4 sts, sk 2, 5dc into the next st (that is the middle of the 5dc from previous row), sk 3, [dc, ch 2, dc] in the next ch2 sp from previous row, sk 2, 5dc into the next st, sk 2, dc in the next 12 sts.
Row 53: ch 3, turn, dc in the next 11 sts, sk 2, 5dc in the next st, sk 3, [dc, ch 2, dc] in the next ch2 sp from previous row, sk 3, 5dc into the next st, sk 2, dc in the next 4 sts, dc dec in the last 2 sts.
Row 54: ch 3, turn, dc dec into the next 2 sts, dc in the next 2 sts, sk 2, 5dc into the next st (that is the middle of the 5dc from previous row), sk 3, [dc, ch 2, dc] in the next ch2 sp from previous row, sk 2, 5dc into the next st, sk 2, dc in the next 12 sts.
Row 55: ch 3, turn, dc in the next 11 sts, sk 2, 5dc in the next st, sk 3, [dc, ch 2, dc] in the next ch2 sp from previous row, sk 3, 5dc into the next st, sk 2, dc in the next 2 sts, dc dec in the last 2 sts
Row 56: ch 3, turn, dc dec into the next 2 sts, sk 2, 5dc into the next st (that is the middle of the 5dc from previous row), sk 3, [dc, ch 2, dc] in the next ch2 sp from previous row, sk 2, 5dc into the next st, sk 2, dc in the next 12 sts.
Row 57: ch 3, turn, dc in the next 11 sts, sk 2, 5dc in the next st, sk 3, [dc, ch 2, dc] in the next ch2 sp from previous row, sk 3, 5dc into the next st, sk 2, dc in the next 2 last sts.

Sleeves (make 2)
Chain multiple of 48+3 (multiple of 8 +3)
Row 1: dc into 4th ch from hook, dc across.
Row 2: ch 4 (counts as a first dc + ch 1), turn, *[ch 1, sk 1, dc], rep from * to eor.
Row 3: ch 3, turn, 2dc into the same st, *sk 3, [dc, ch 2, dc], sk 3, 5dc into next st. rep from * to eor, sk 3, 3dc into the last st.
Row 4: ch 3, turn, dc into the next 2 sts, * sk1, [dc, ch 2, dc], into the ch2 sp from previous row, sk 1, dc into the next 5 sts, rep from * to eor, dc into the last 3 sts.
Rep this combination of 4 Rows 5 times until you have 20 rows.
Row 5, 9, 13, 17: Rep Row 1. Ch 3, turn, dc in each st, except the ch 2 space from previous row, ch only one dc into each space. ( counts 49 dc)
Row 6, 10, 14, 18: Rep Row 2;
Row 7, 11, 15, 19: Rep Row 3;
Row 8, 12, 16, 20: Rep Row 4; See the picture bellow.

Row 21: ch 3, turn, dc into each st across.
Row 22: ch 3, dc into the same st (counts as first dc and the first inc), dc until last st, 2dc into last st, (counts as inc at the end of the row).
Row 23 to Row 34: Rep Row 21
Row 35: Rep Row 22
Row 36: Rep Row 21
Row 37: Rep Row 22
Row 38 to Row 40: Rep Row 21
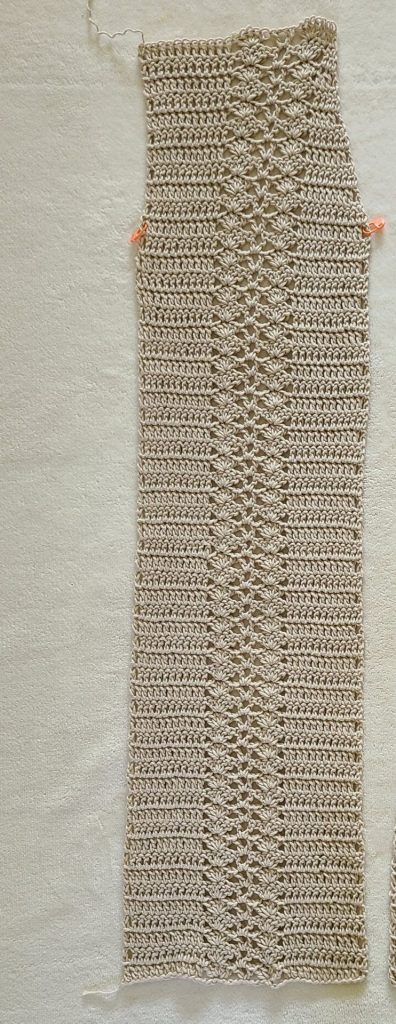
Assembly
- Lay all the pieces together with the wrong sides facing up.
- Start from shoulders and sew.
- Sew the sleeves.
- Sew from bottom of the side and sew up along until armpit and continue under sleeves and finish.
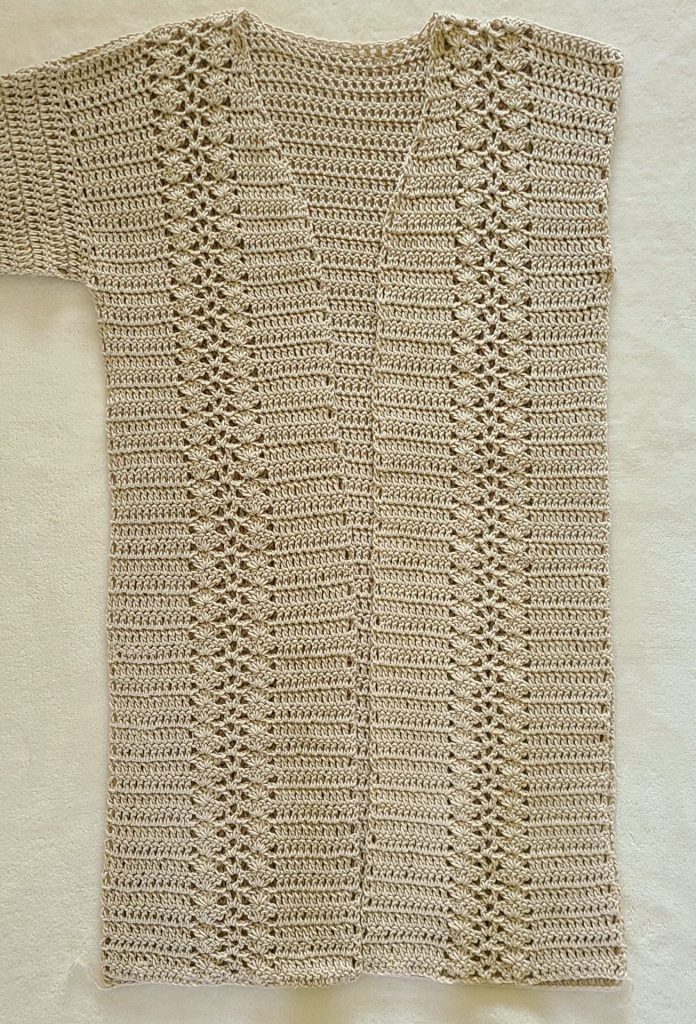
Front Border
Attach yarn in any place.
Ch 1, sc in each st along front panels and neckline, sl st.
Cord or Button for close the front side.
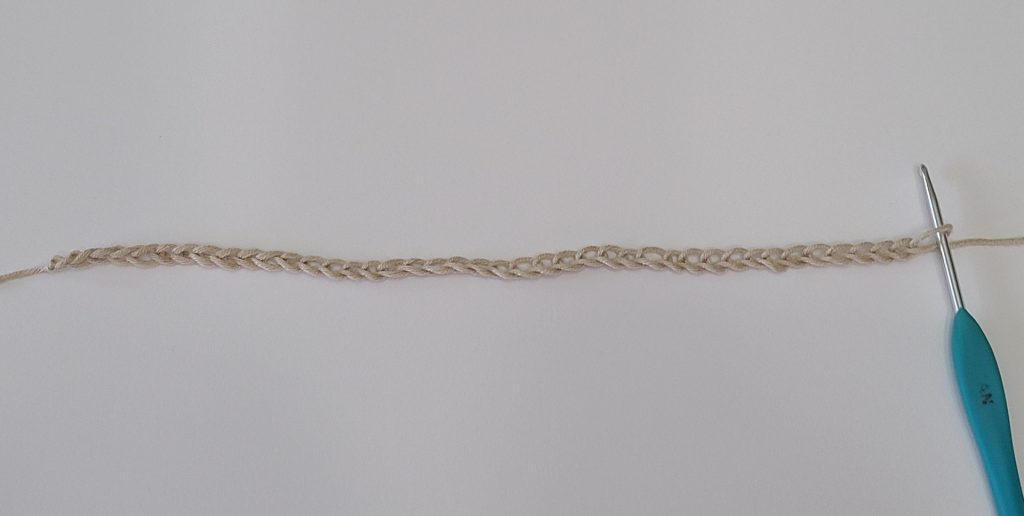
Make a long chain – I chained 100.
Row 1: sl st into 2nd st, sl st to eor.
Tassels
Using the same yarn, wrap the yarn around a 4” book 40 times. Tie a piece of yarn around the top of the bundle and cut the other end. Tie a second piece of yarn an inch from the top of the bundle and trim the bottom strands. Add a bead to the top piece of yarn and tie securely Make two tassels for both sides of the cord.
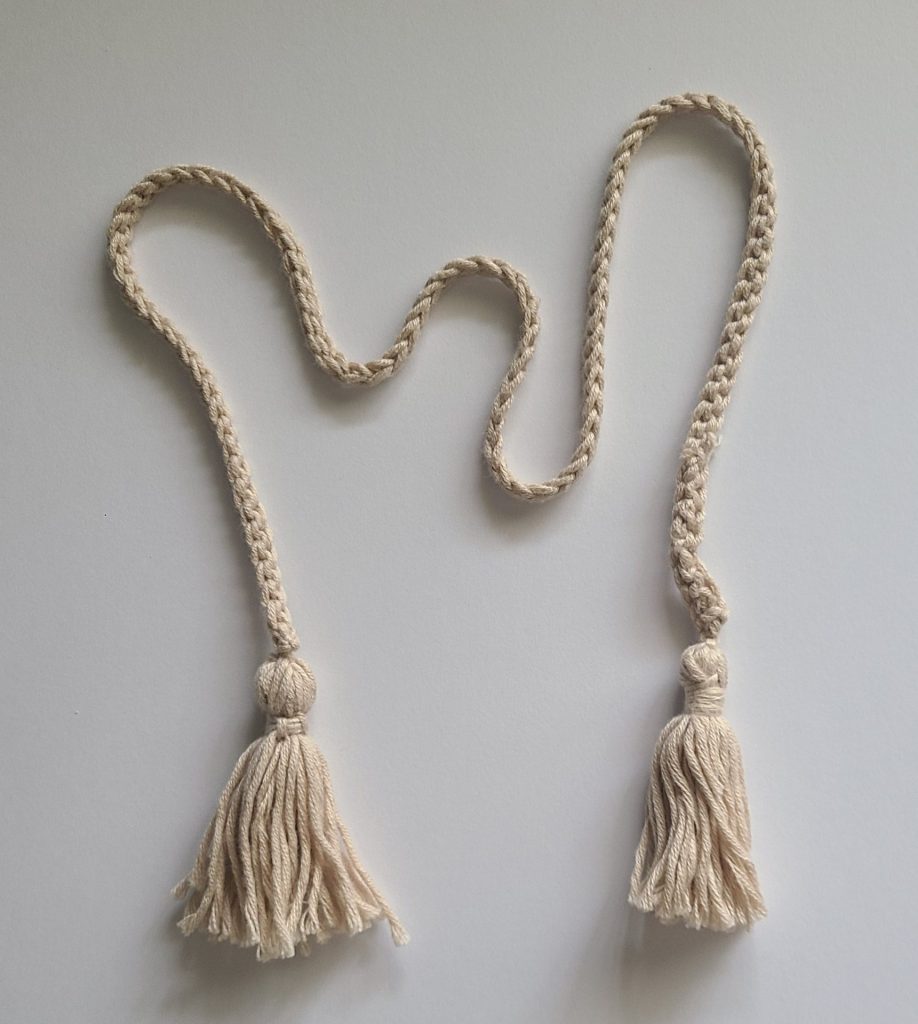
Attach to both front panels and tie.
I used Steam Blocking
More Free Crochet Cardigan Patterns!
If you enjoyed making this elegant crochet cardigan, check out my other free patterns. Share your creations with me on Facebook and Instagram. I love to see your work! If you have any questions, reach out or leave a comment below!
Good morning! I love your pattern and am super excited to start! Quick question though, how much DK yarn is needed for the medium size cardigan? I’m going yarn shopping today! Thanks so much, and keep these adorable patterns coming!
Hello,
I am not able to find the yards of yarn needed for the Aloya Cardigan. I’ll be making it in size Medium.
Thank you for your quick response, as I’m anxious to get going on this beautiful sweater!
Jo
Hello Jolene, sorry for the late reply. for the size M you will need around 600g of Dk yarn with the length 35.5 inches after steam blocking.
How much yarn is required for this pattern, please.
Thanks
Hello Tina, sorry for the late reply. for the size M you will need around 600g of Dk yarn with the length 35.5 inches after steam blocking.
gorgeous sweater. I would love to try it.
How many skeins do I use for size medium.
thank you
Hi Joanne, for the size M you will need around 600g of Dk yarn with the cardigan length 35.5 inches after steam blocking. I used 5 skeins of Bernat Softee Cotton Yarn, Feather Gray 3 Dk Light.
Hi I am currently trying to complete the sleeve on the Aloya cardigan with great difficulty. I think from what I can gather row 3 is a miss print as there don’t
Hello Dale Barnes, I just fixed the mistake and added some more information. Also, there is a video tutorial available for this cardigan on my Youtube Channel. Thank you! Happy Crocheting!
Hi, sorry my message got sent before I had finished it. In row 3 the are no shell patterns and on the cardigan there are. I think I have figured it out, After the “double crochet chain 2 double crochet, I have skipped 3 double crochet 5 into the next stitch skip three” and repeat to end of row, 3 double crochet in the last stitch. Not sure if 100% right but it works lol.
Elena,
I am sorry if I am being a pain but row 3 do you not crochet the 5 double crochet into one stitch? It is on row 4 where you crochet a double crochet in to the next 5 stitches is it not. Those are the 5 stitches of the fan, on row 3, are they not? Sorry for being a pain.
Hello Joanne, I would really love to make this cardigan but I think I need a size large. Please tell me how to get the written pattern in sizes small to xxl. Thank you
Hi Alicia, The written pattern with other sizes is on my esty shop also there is a video tutorial on my youtube channel yelena stylecrochet where are the start chains for the other sizes at the beginning of the tutorial.
I am finding quite a number of mistakes in this pattern. For just one example, Row 55 of Right side states to dc decrease in 2 st, and then dc in next 11. But there are only 2 more stitches on this side (due to all the previous decreases) before the dc 5 in middle of dc 5 previous row. There are other mistakes also along the way.
Hi Christine, I found the mistake at Row 55, I fixed. After dc dec there is only 1 stitch left. Also I added some pictures for the best vision of the pattern. I hope this will help. Thank You!
There are also mistakes on Row 2 of sleeves. This pattern says one thing and your video says another. Counts are also off in back and both side fronts. Very hard to follow pattern. Beautiful pattern but many counts are off
I found the same thing, I’ve been crocheting a long time that I made the adjustments myself, just have to add the cord and tassels and done!
I am currently making this sweater in size M and the back panel is 23″ after crocheting the 57 rows. My friend who im making this for measures 28 inches from the her shoulders to her hips back panel measures out at 23″. How do I make adjustments for this 5″ difference throughout the pattern?
Hi Christina, for the back panel there is no hard adjustments as soon as is just double crochet rows, just add more rows as you need. For the front panels, count how many rows you will have in total from back panel minus 10 rows for the decreasing part and continue without decreasing up more rows as is left.
What is the width of the back panel after blocking. I’m using the same yarn as you and crochet hook and I’m measuring 15.5” without stretching it. I’ve only done the 1st row so far. Not sure if I need more chains to make it a width of 18” Or maybe go up to 4mm hook? I feel like I’m not keeping the tension too tight🤔 What are the widths of the front panels and the width and length of the sleeves in inches? This would be for the medium size. Thanks for your help, I’m a somewhat newbie in garment crocheting. If I am using an even lighter weight yarn could I fit it to the measured inches of each piece or is there an easier way to figure out how many chains you start with?
Hi Carolyn. I did a steam blocking, so the width for back panel is 19 inches, the width for the front panel is 9 inches. Length of the sleeve is 21 inches. Width sleeve 13 inches. You can use any yarn you have, just make it to have the measurements right.
Thankyou so much for your help. I really appreciate it. I believe that will help me a lot.