Table of Contents
- About the Aryna Crochet Cardigan
- Pattern Features
- Pattern Notes
- Sizes & Finished Measurements
- Materials
- Yarn Substitution
- Gauge
- Stitch Abbreviations
- Stitch Pattern
- Construction
- Back Panel
- Front Panels
- Sleeves
- Assembly
- Border & Front Ties
- Finishing
- Video Tutorial
Aryna Crochet Cardigan
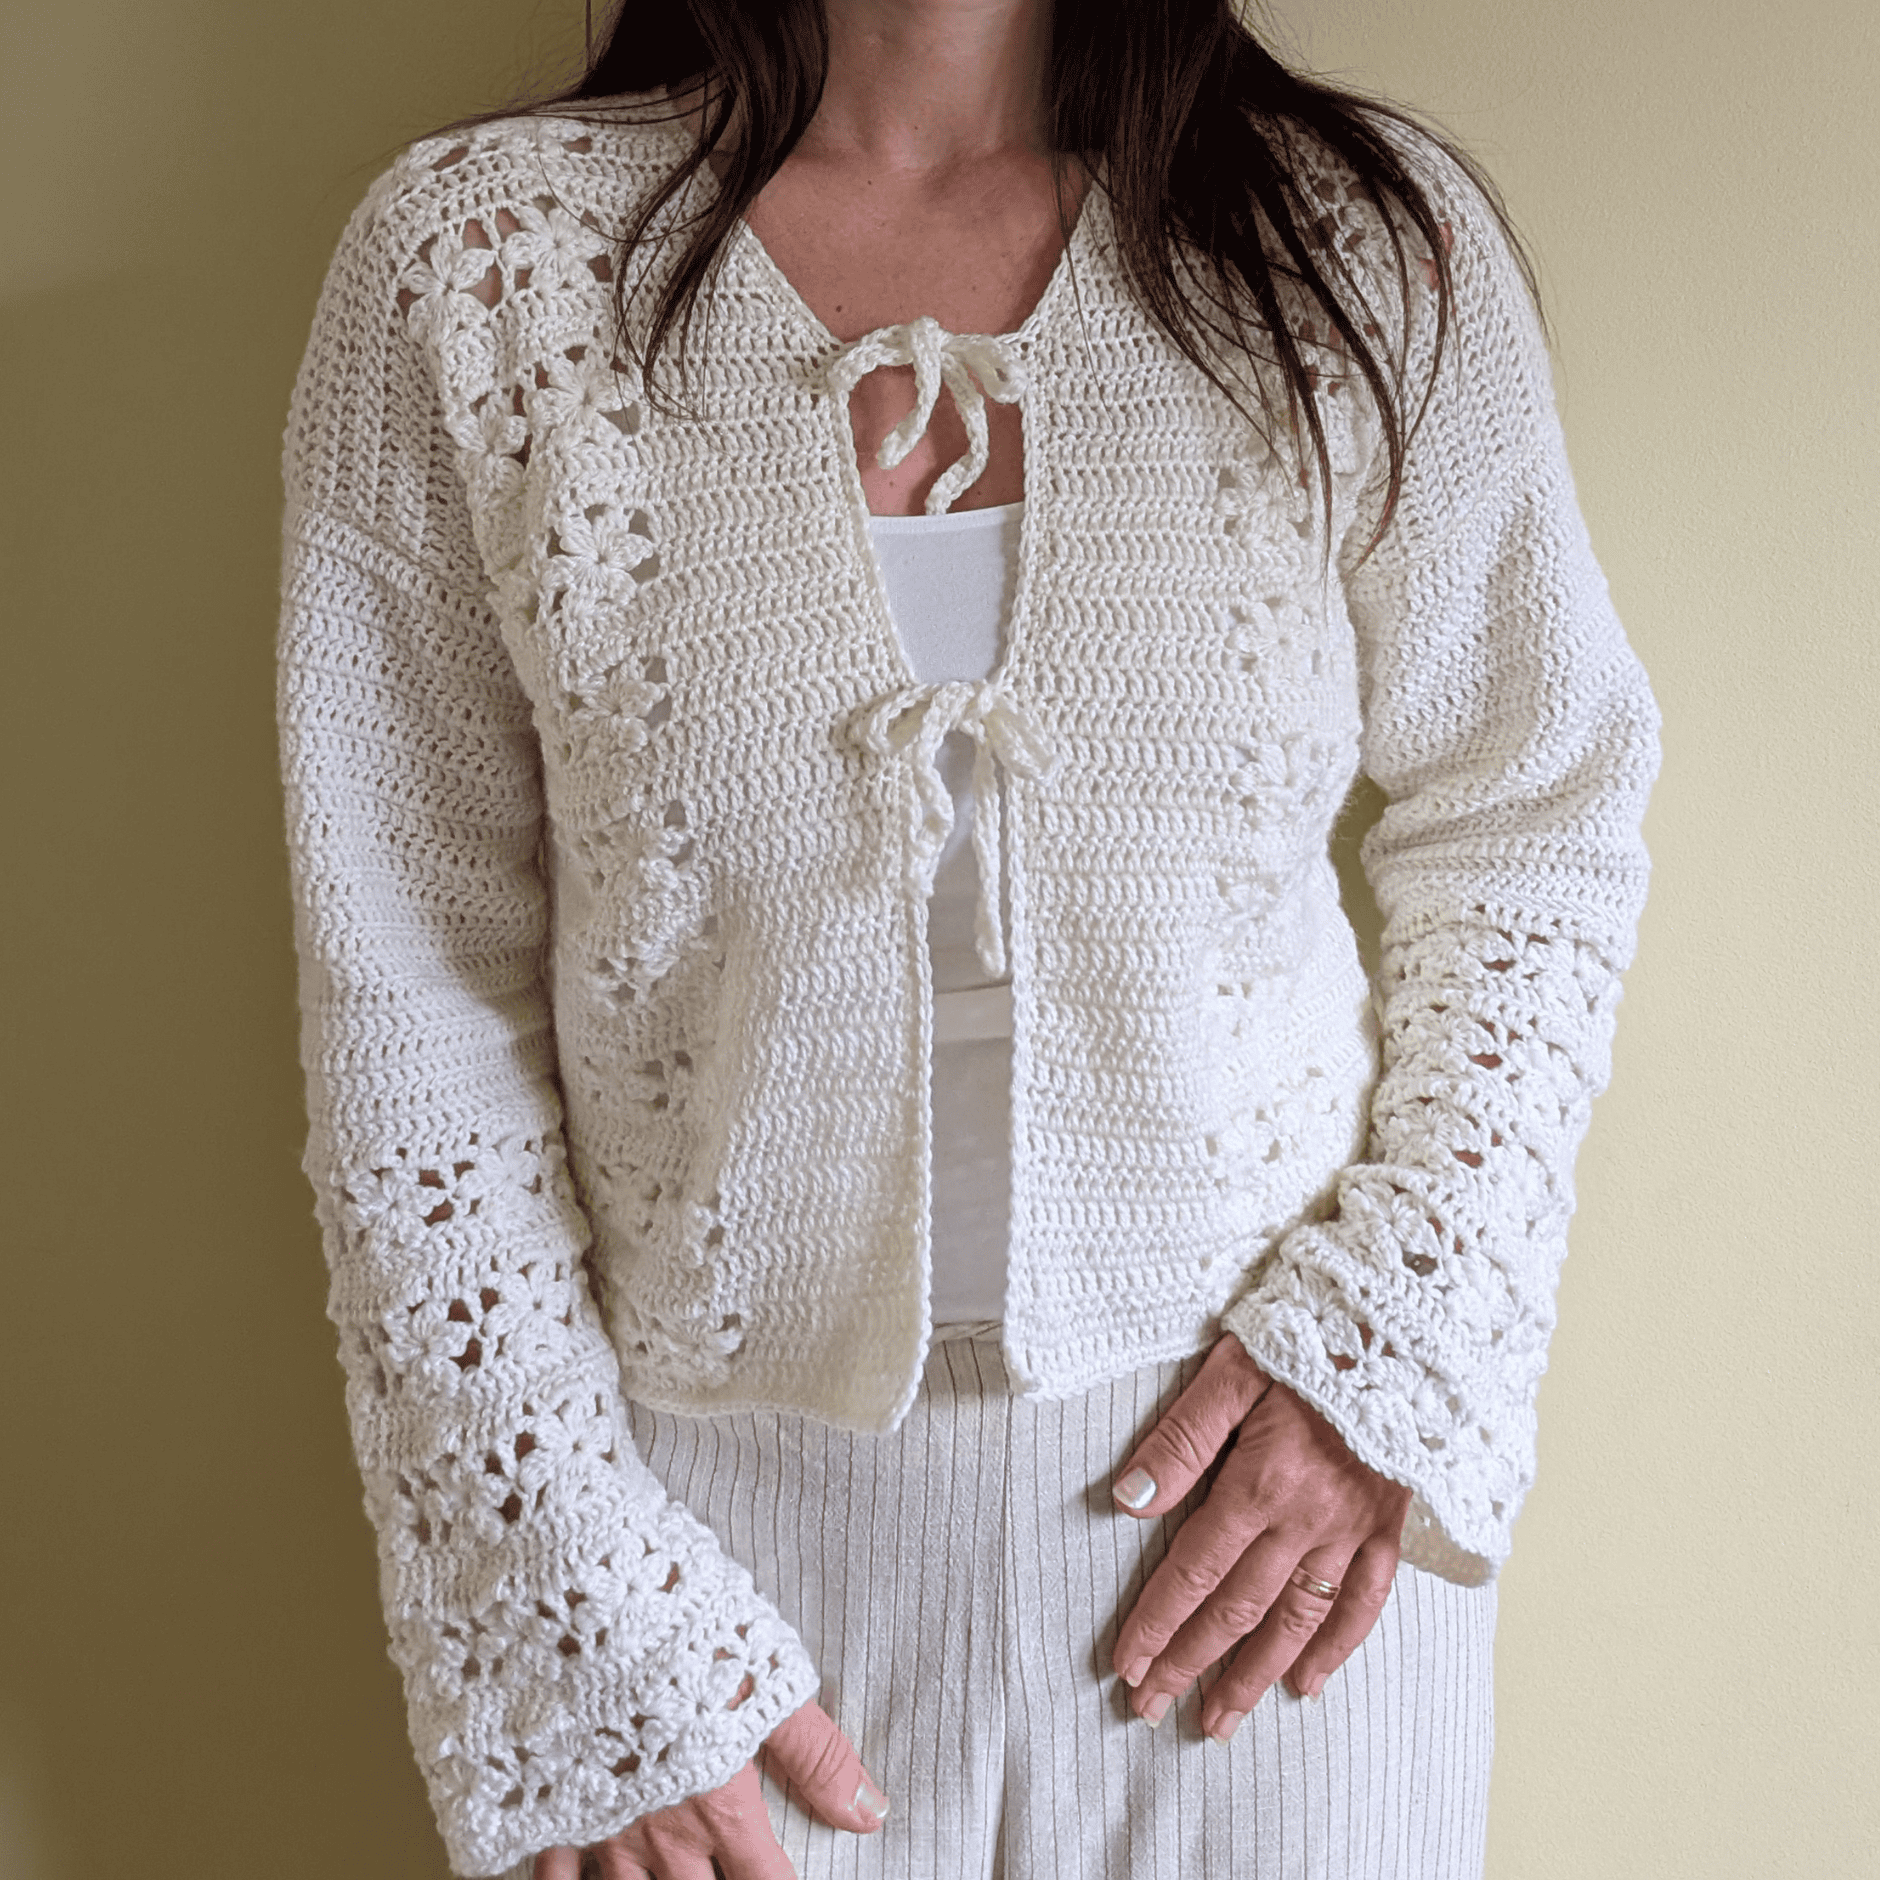
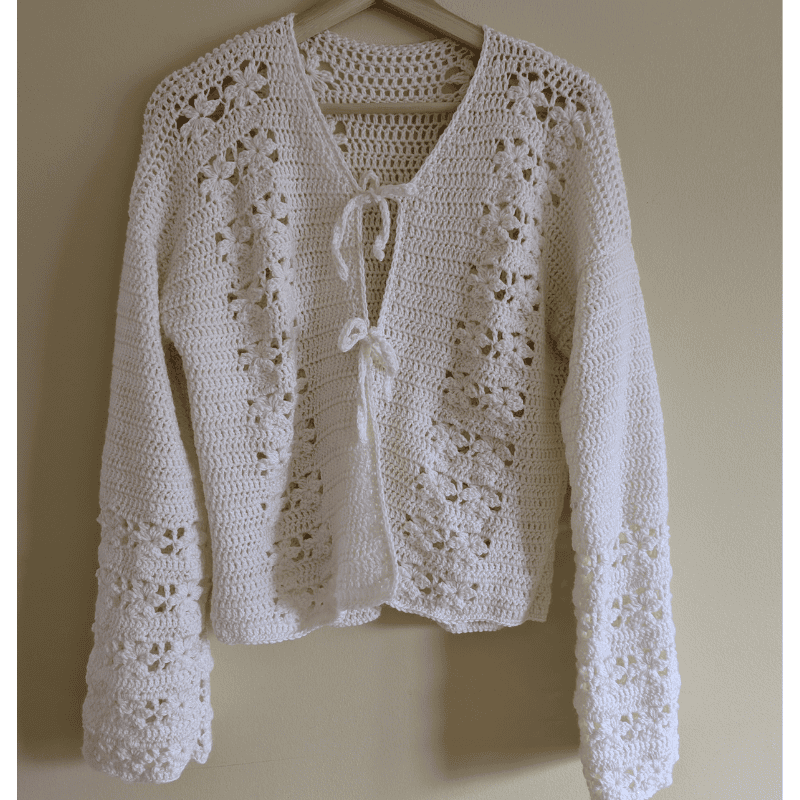
The Aryna Crochet Cardigan is a beautiful and feminine crochet cardigan featuring a simple 4-row lace stitch pattern that creates a lovely combination of texture and openwork. The delicate lace details add interest to the design while keeping the cardigan comfortable and easy to wear.
Thus, this crochet cardigan is made from four separate panels that are joined together to create the finished garment. The repeating lace stitch is easy to memorize after the first few rows, making this a relaxing project to crochet. The sleeves feature the lace pattern as well as sections of double crochet, while the front panels are shaped to create the flattering open neckline.
Additionally, the cardigan features a crochet border and four long ties for closing or leaving it open.
The Aryna Crochet Cardigan pattern is available in sizes S–5XL, and I’ve also included a step-by-step YouTube video tutorial to help you crochet each part of the cardigan.
Aryna Crochet Cardigan Features
- Free crochet cardigan pattern
- Sizes S–5XL
- 4-row repeating lace stitch pattern
- Openwork and textured design
- Separate front and back panels
- Long sleeves with lace details
- Front neckline shaping
- Crochet border with four front ties
- Step-by-step YouTube video tutorial
- Suitable for crocheters who are comfortable with basic crochet stitches
Pattern Notes
- This pattern uses US crochet terminology.
- The cardigan is worked in four separate panels that are assembled to create the finished garment.
- Read through the entire pattern before beginning.
- The sample shown in the photos is a size Medium.
- A Straight Edge Alternative (Stacked Single Crochet) is used in place of the beginning chain-3 to create a straighter edge.
- The stitch pattern consists of a 4-row repeat.
- Gauge is measured over one complete 4-row pattern repeat.
- The fabric may relax and grow slightly after steam blocking.
- Finished measurements are based on the unblocked fabric.
- After each 3-dc-together (3-dc-tog) cluster, work ch 1 to close the cluster. The ch-1 counts as a stitch throughout the pattern.
Sizes & Finished Measurements
Moreover, the Aryna Crochet Cardigan offers a comfortable, slightly relaxed fit.
Please note: all measurements shown in this cardigan are taken before blocking. As a result, your finished garment may grow or relax slightly after blocking, depending on your yarn choice and tension.
| Size Chest (in) | Length (in) | Width (in) |
| S (32–34) | 20 | 19.7 |
| M (36–38) | 20 | 20 |
| L (40–42) | 20.8 | 21 |
| XL (44–46) | 20.8 | 21.5 |
| XXL (48-50) | 20.8 | 22 |
| 3XL (52–54) | 22.6 | 22.5 |
| 4XL (56–58) | 22.6 | 23.5 |
| 5XL (60–62) | 22.6 | 24 |
Aryna Crochet Cardigan: Materials
- Yarn: Luxe Merino™ Solid Yarn by Loops & Threads®, Light (3) weight, 55% Superwash Merino / 45% acrylic.
- Yarn quantity: Approximately 420 (466, 520, 600, 635, 685, 710, 755) g for sizes S (M, L, XL, XXL, 3XL, 4XL, 5XL).
- Crochet hook: 4 mm (G/6)
- Yarn needle
- Scissors
- Stitch markers (optional)
- Measuring tape
Yarn Substitutions
- Lion Brand Wool-Ease — a widely available wool/acrylic blend and a good general substitute.
- Berroco Vintage — DK/light #3, machine-washable acrylic/wool blend; good for garments.
- Berroco Vintage Baby — DK/light #3, 52% acrylic, 40% wool, 8% nylon, with a 4 mm crochet recommendation.
- Knit Picks Brava 300 — 100% acrylic, DK/light #3; a good budget-friendly alternative.
- Premier Basix DK — 100% acrylic, Light #3/DK.
- Premier Value Bag DK Acrylic — Light #3/DK, 100% acrylic, 306 yd per 100 g.
- Premier Colorfusion DK — Light #3, 100% acrylic, 325 yd per 100 g.
Moreover, this is an important note.
Different yarn brands can vary slightly in thickness and drape, even if they are labeled as the same weight. Before starting your project, crochet a gauge swatch and adjust your hook size if needed to achieve the correct measurements. Mercerized cotton yarns are recommended for this pattern because they provide excellent stitch definition, durability, and a beautiful drape that enhances the lace design.
Gauge
Before Blocking
17 dc × 9 rows = 4 × 4 in. (10 × 10 cm) in the lace stitch pattern.
Important: Gauge was measured on the unblocked fabric. The fabric relaxes and expands slightly in both width and length after steam blocking. Therefore, all finished measurements in this pattern are based on the unblocked gauge.
Tip: Always make a gauge swatch before beginning your cardigan. Adjust your hook size if necessary to obtain the correct gauge.
Stitch Abreviations
**: Repeat instructions between asterisks as described
Ard: Around
ch = chain
st(s) = stitch(es)
sl st = slip stitch
dc = double crochet
yo = yarn over
dc2tog = double crochet 2 together
dc3tog = double crochet 3 together
rep = repeat
sk = skip
inc = increase
dec = decrease
Aryna Crochet Cardigan: Stitch Pattern
The Aryna Crochet Cardigan is worked in a simple repeating 4-row lace stitch pattern that creates a beautiful combination of texture and openwork. Once you complete the first repeat, the stitch pattern becomes easy to memorize, making this a relaxing and enjoyable project to crochet.
The 4-row lace stitch repeat is used throughout the main sections of the cardigan.
Sleeves
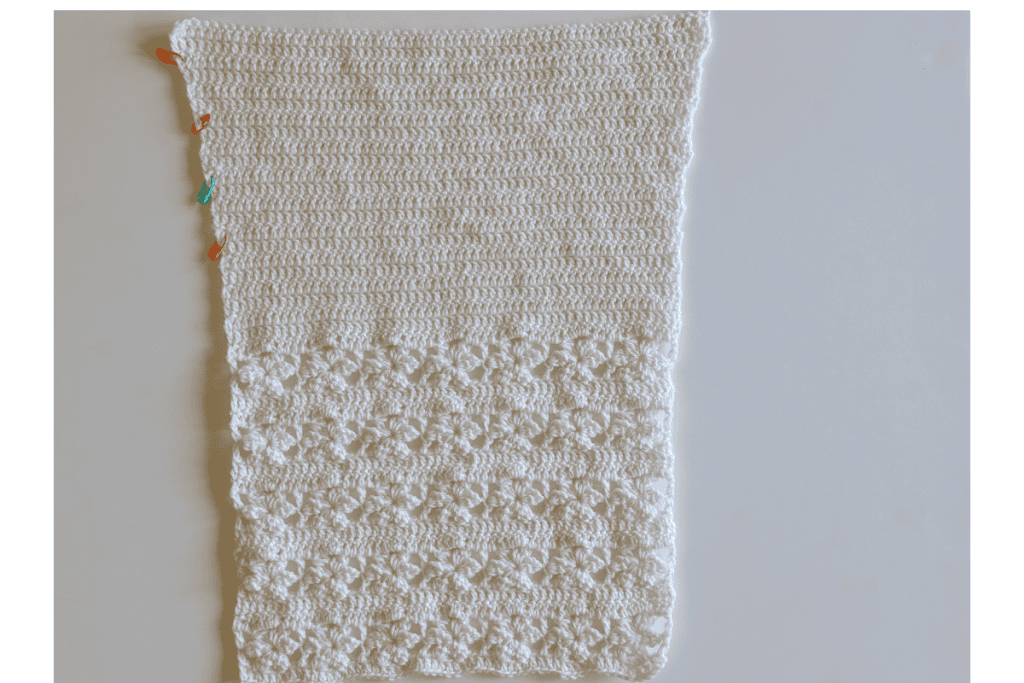
On the sleeves, work the 4-row lace stitch repeat until the specified halfway point. From that point onward, work dc across for the remainder of the sleeve.
Front Panels
The front panels are worked in the 4-row lace stitch repeat until reaching the shaping section for the front opening. Follow the indicated decreases to shape the chest and neckline while continuing the established stitch pattern as instructed.
Construction
The Aryna Crochet Cardigan is made from separate crocheted pieces that are assembled to create the finished garment.
After completing all pieces, arrange them with the right sides facing each other. Sew the pieces together at the shoulders, sleeves, side seams, and underarms as indicated in the assembly instructions.
Once the cardigan has been assembled, work the finishing border around the front opening and bottom edge, including the four crochet ties used to close the cardigan.
“Prefer an ad-free version? Click here to purchase the printable PDF pattern on Etsy.”
Aryna Crochet Cardigan: Back Panel
Foundation Chain
Ch 81 (84, 90, 93, 96, 99, 105, 108) for sizes S (M, L, XL, 2XL, 3XL, 4XL, 5XL).
Row 1: Dc into 4th ch from hook, dc across.
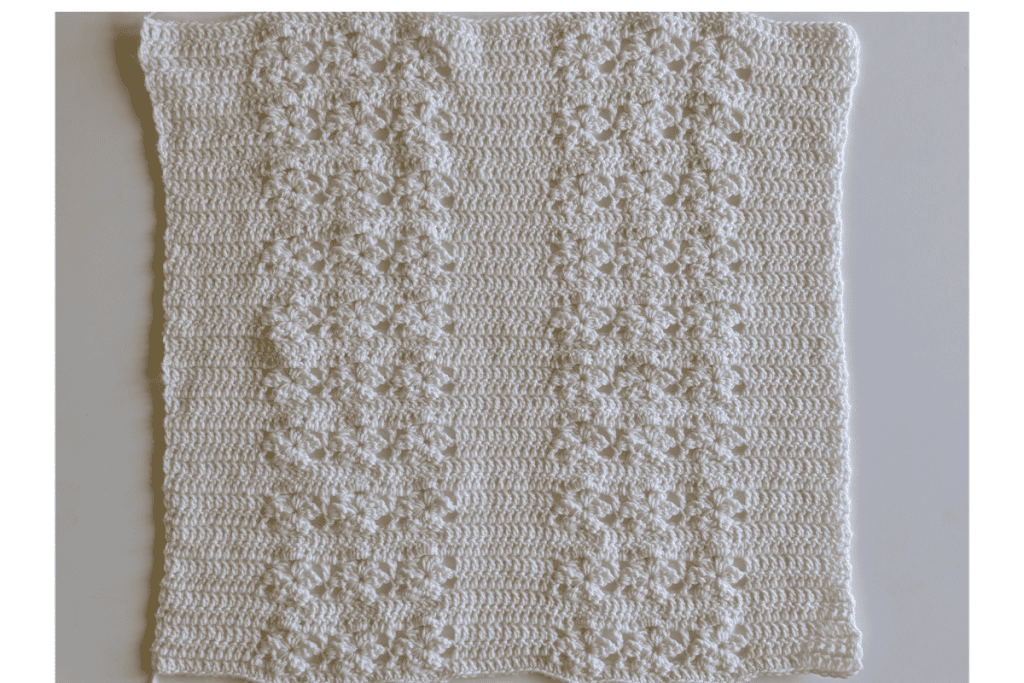
Row 2: Ch 3 (counts as dc). Turn. Dc in next 10(11, 13, 14, 15, 16, 18, 19) – S (M, L, XL, 2XL, 3XL, 4XL, 5XL) sts. *Ch 3 (counts as the first leg of the next cluster), work dc2tog in the base leaving the stitch unfinished. Skip the next st, work an unfinished dc3tog in the next st, skip the next 3 sts, work an unfinished dc3tog in the following st. Yarn over and pull through all 9 loops, ch 1 to close the cluster. Ch 3, work dc2tog in the ch-1 closing space, ch 1 to close, skip the next st, dc in the next st.* Repeat from * 2 more times. Dc in next 10(11, 13, 14, 15, 16, 18, 19) – S (M, L, XL, 2XL, 3XL, 4XL, 5XL) sts. Repeat the flower st from * * 3 times. Dc in the last 10(11, 13, 14, 15, 16, 18, 19) – S (M, L, XL, 2XL, 3XL, 4XL, 5XL)
Row 3: Ch 3 (counts as dc). Turn. Dc in next 10(11, 13, 14, 15, 16, 18, 19) – S (M, L, XL, 2XL, 3XL, 4XL, 5XL) sts. *Ch 1, work (dc3tog, ch 3, dc3tog,) in the center opening of the next flower, ch 1, dc in the next st. and each dc3tog cluster is closed with a ch-1.* Repeat from * * 2 more times. Dc in next 10(11, 13, 14, 15, 16, 18, 19) – S (M, L, XL, 2XL, 3XL, 4XL, 5XL) sts. Repeat the flower st from * * 3 times. Dc in the last 10(11, 13, 14, 15, 16, 18, 19) – S (M, L, XL, 2XL, 3XL, 4XL, 5XL)
Row 4: Ch 3 (counts as dc). Turn. Dc in each stitch and each chain-1 space across.
Row 5: Repeat Row 4.
Row 6: Repeat Row 2
Row 7: repeat Row 3
Row 8, 9: Repeat Row 4
Rows 10: Repeat Row 2
Row 11: Repeat Row 3
Rows 12, 13: Repeat Row 4
Stitch Pattern Repeat
Rows 2–5 form the 4-row stitch repeat.
Continue repeating Rows 2–5 until you have completed
- S – M: 41 rows
- L – XL –XXL: 45 rows
- 3XL – 4XL –5XL: 48 rows
Pattern Note: Rows 2–5 form the 4-row stitch repeat used throughout the back panel.
Aryna Crochet Cardigan: Front Panel (make 2)
Foundation Chain
Ch 41 (43, 45, 47, 49, 51, 53, 53) for sizes S (M, L, XL, 2XL, 3XL, 4XL, 5XL).
Row 1: Dc into 4th ch from hook, dc across.
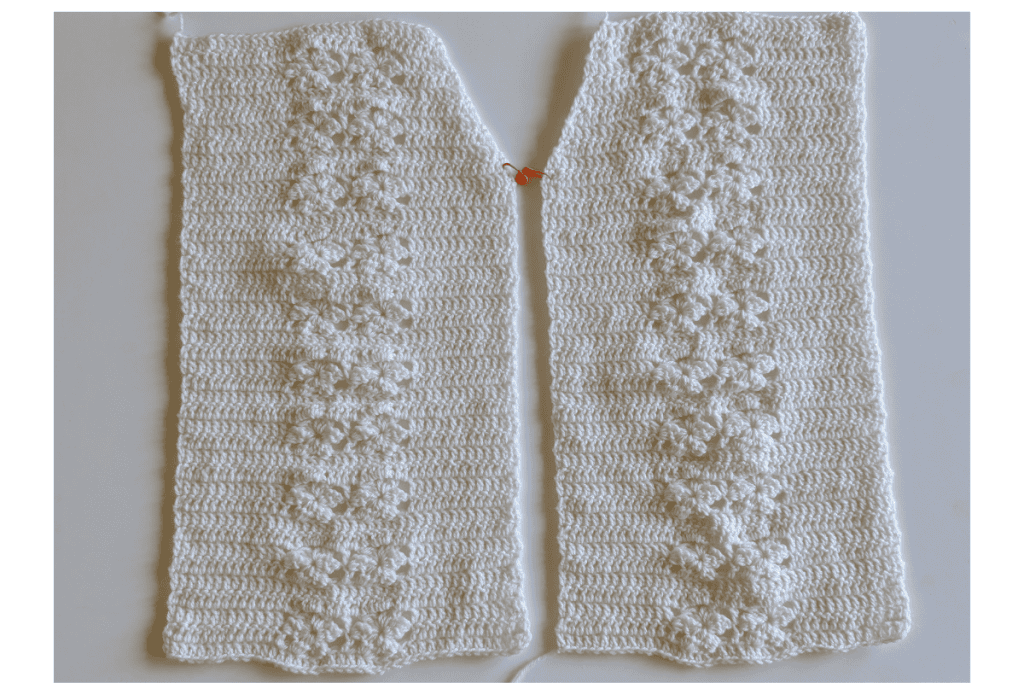
Row 2: Ch 3 (counts as dc). Turn. Dc in next 11(12, 13, 14, 15, 16, 17, 18) – S(M, L, XL, 2XL, 3XL, 4XL, 5XL) sts. *Ch 3 (counts as the first leg of the next cluster), work dc2tog in the base leaving the stitch unfinished. Skip the next st, work an unfinished dc3tog in the next st, skip the next 3 sts, work an unfinished dc3tog in the following st. Yarn over and pull through all 9 loops, ch 1 to close the cluster. Ch 3, work dc2tog in the ch-1 closing space, ch 1 to close, skip the next st, dc in the next st.* Repeat from * one more time. Dc in the last 11(12, 13, 14, 15, 16, 17, 18) – S (M, L, XL, 2XL, 3XL, 4XL, 5XL) sts.
Row 3: Ch 3 (counts as dc). Turn. Dc in next 11(12, 13, 14, 15, 16, 17, 18) – S (M, L, XL, 2XL, 3XL, 4XL, 5XL) sts. *Ch 1, work (dc3tog, ch 3, dc3tog,) in the center opening of the next flower, ch 1, dc in the next st. and each dc3tog cluster is closed with a ch-1.* Repeat from * * one more time. Dc in the last 11(12, 13, 14, 15, 16, 17, 18) – S (M, L, XL, 2XL, 3XL, 4XL, 5XL).
Row 4: Ch 3 (counts as dc). Turn. Dc in each stitch and each chain-1 space across.
Row 5: Repeat Row 4.
Row 6: Repeat Row 2
Row 7: repeat Row 3
Row 8, 9: Repeat Row 4
Rows 10: Repeat Row 2
Row 11: Repeat Row 3
Rows 12, 13: Repeat Row 4
Stitch Pattern Repeat
Rows 2–5 form the 4-row stitch repeat.
Continue repeating Rows 2–5 until you have completed
- S – M: 31 rows
- L – XL –XXL: 35 rows
- 3XL – 4XL –5XL: 39 rows
Pattern Note: Rows 2–5 form the 4-row stitch repeat used throughout the front panel.
From Row 32(32, 36, 36, 36, 40, 40, 40) – S(M, L, XL, 2XL, 3XL, 4XL, 5XL) there is a small difference between the 2 front panels, depending on which side of the row you start decreasing. (see pattern notes section)
Front Right Side Panel (when wearing it)
Row 32(32, 36, 36, 36, 40, 40, 40) – S(M, L, XL, 2XL, 3XL, 4XL, 5XL): Ch 3, turn, dc in each st across, dc dec into the last 2 sts.
Row 33(33, 37, 37, 37, 41, 41, 41) – S(M, L, XL, 2XL, 3XL, 4XL, 5XL): Ch 3, turn, dc dec into the next 2 sts. then continue the stitch pattern across.
Row 34(34, 38, 38, 38, 42, 42, 42) – S(M, L, XL, 2XL, 3XL, 4XL, 5XL): Ch 3, turn, continue the stitch pattern until the last 2 sts, dc dec into the last 2 sts.
Row 35(35, 39, 39, 39, 43, 43, 43) – S(M, L, XL, 2XL, 3XL, 4XL, 5XL): Ch 3, turn, dc dec into the next 2 sts. then continue the stitch pattern across.
Row 36(36, 40, 40, 40, 44, 44, 44) – S(M, L, XL, 2XL, 3XL, 4XL, 5XL): Ch 3, turn, continue the stitch pattern until the last 2 sts, dc dec into the last 2 sts.
Row 37(37, 41, 41, 41, 45, 45, 45) – S(M, L, XL, 2XL, 3XL, 4XL, 5XL): Ch 3, turn, dc dec into the next 2 sts. then continue the stitch pattern across.
Row 38(38, 42, 42, 42, 46, 46, 46) – S(M, L, XL, 2XL, 3XL, 4XL, 5XL): Ch 3, turn, continue the stitch pattern until the last 2 sts, dc dec into the last 2 sts.
Row 39(39, 43, 43, 43, 47, 47, 47) – S(M, L, XL, 2XL, 3XL, 4XL, 5XL): Ch 3, turn, dc dec into the next 2 sts. then continue the stitch pattern across.
Row 40(40, 44, 44, 44, 48, 48, 48) – S(M, L, XL, 2XL, 3XL, 4XL, 5XL): Ch 3, turn, continue the stitch pattern until the last 2 sts, dc dec into the last 2 sts.
Row 41(41, 45, 45, 45, 49, 49, 49) – S(M, L, XL, 2XL, 3XL, 4XL, 5XL): Ch 3, turn, dc dec into the next 2 sts. then continue the stitch pattern across.
Front Left Side Panel (when wearing it)
Row 32(32, 36, 36, 36, 40, 40, 40) – S(M, L, XL, 2XL, 3XL, 4XL, 5XL): Ch 3, turn, dc dec into the next 2 sts. then continue the stitch pattern across.
Row 33(33, 37, 37, 37, 41, 41, 41) – S(M, L, XL, 2XL, 3XL, 4XL, 5XL): Ch 3, turn, continue the stitch pattern until the last 2 sts, dc dec into the last 2 sts.
Row 34(34, 38, 38, 38, 42, 42, 42) – S(M, L, XL, 2XL, 3XL, 4XL, 5XL): Ch 3, turn, dc dec into the next 2 sts. then continue the stitch pattern across.
Row 35(35, 39, 39, 39, 43, 43, 43) – S(M, L, XL, 2XL, 3XL, 4XL, 5XL): Ch 3, turn, continue the stitch pattern until the last 2 sts, dc dec into the last 2 sts.
Row 36(36, 40, 40, 40, 44, 44, 44) – S(M, L, XL, 2XL, 3XL, 4XL, 5XL): Ch 3, turn, dc dec into the next 2 sts. then continue the stitch pattern across.
Row 37(37, 41, 41, 41, 45, 45, 45) – S(M, L, XL, 2XL, 3XL, 4XL, 5XL): Ch 3, turn, continue the stitch pattern until the last 2 sts, dc dec into the last 2 sts.
Row 38(38, 42, 42, 42, 46, 46, 46) – S(M, L, XL, 2XL, 3XL, 4XL, 5XL): Ch 3, turn, dc dec into the next 2 sts. then continue the stitch pattern across.
Row 39(39, 43, 43, 43, 47, 47, 47) – S(M, L, XL, 2XL, 3XL, 4XL, 5XL): Ch 3, turn, continue the stitch pattern until the last 2 sts, dc dec into the last 2 sts.
Row 40(40, 44, 44, 44, 48, 48, 48) – S(M, L, XL, 2XL, 3XL, 4XL, 5XL): Ch 3, turn, dc dec into the next 2 sts. then continue the stitch pattern across.
Row 41(41, 45, 45, 45, 49, 49, 49) – S(M, L, XL, 2XL, 3XL, 4XL, 5XL): Ch 3, turn, continue the stitch pattern until the last 2 sts, dc dec into the last 2 sts.
Aryna Crochet Cardigan: Sleeves (make 2)
Foundation Chain
Ch 59 (59, 59, 67, 67, 67, 75, 75) for sizes S (M, L, XL, 2XL, 3XL, 4XL, 5XL) or any multiple of 8 + 3.
Row 1: dc into 4th ch from hook, dc across.
Row 2: Ch 6 (counts as the first dc and first leg of the cluster), turn. Work dc2tog in the 3rd ch from the hook, leaving the stitch unfinished (3 loops remain on the hook). Sk the next st, work an unfinished dc3tog in the next st, skip the next 3 sts, then work another unfinished dc3tog in the following st.
You should now have 9 loops on your hook. Yarn over and pull through all loops, then ch 1 to close the cluster.
Ch 3 (counts as the first leg of the next cluster)
Work dc2tog in the ch-1 closing space of the cluster just made, ch 1 to close the cluster, skip the next st, dc in the next st. *Ch 3 (counts as the first leg of the next cluster), work dc2tog in the base leaving the stitch unfinished. Skip the next st, work an unfinished dc3tog in the next st, skip the next 3 sts, work an unfinished dc3tog in the following st. Yarn over and pull through all 9 loops, ch 1 to close the cluster. Ch 3, work dc2tog in the ch-1 closing space, ch 1 to close, skip the next st, dc in the next st.* Repeat from * *across. Skip the next st, dc in the last st.
Row 3: Ch 4 (counts as dc + ch 1). Turn. Work (dc3tog, ch 3, dc3tog,) in the center opening of the flower from the previous row, and each dc3tog cluster is closed with a ch-1.
Ch 1, dc in the next st. *Ch 1, work (dc3tog, ch 3, dc3tog,) in the center opening of the next flower, ch 1, dc in the next st. and each dc3tog cluster is closed with a ch-1.* Repeat from * *across. Ch 1, dc in the last st.
Row 4: Ch 3 (counts as dc), turn. Dc in each stitch and each chain-1 space across.
Row 5: Repeat Row 4
Stitch Pattern Repeat
Rows 2–5 form the 4-row stitch repeat.
- for all sizes: Repeat Rows 2–5 until you have completed Row 19
Rows 20 to row 27: Repeat row 4
Row 28: Ch 3, dc into the same st (counts as first dc and the first inc), dc until last st, 2dc into last st, (counts as inc at the end of the row).
Rows 29, 30, 31: Repeat row 4
Row 32: Repeat row 28
Row 33, 34, 35: Repeat row 4
Row 36: Repeat Row 28
Rows 37, 38, 39: Repeat row 4
Row 40: Repeat Row 28
Row 41, 42: Repeat Row 4
Aryna Crochet Cardigan: Assembly
- Place the front and back panels together with the right sides facing each other.
- Sl st the shoulder seams first, making sure all panels align evenly.
- Sl st the sleeves.
- Sl st from bottom of the side and sl st up along until armpit and continue under sleeves and finish.
- Weave in ends.
Aryna Crochet Cardigan: Border
Row 1: With RS facing, attach yarn to the right front panel. Ch 1, sc evenly around the front panels, neckline, sleeves, and bottom edge, working into each st where applicable. Sl st to the first sc to join.
Row 2 – Border & Front Ties
Row 2: Ch 1, sc in each st across the bottom edge until you reach Row 20 from the bottom edge of the right front panel. Ch 35, then sc in each ch across. Continue working sc along the front edge until you reach the row where the front-panel decreases begin. Ch 35, then sc in each ch across. Continue working sc along the neckline and down the opposite front edge until you reach the row where the decreases begin on the left front panel. Ch 35, then sc in each ch across. Continue working sc along the left front edge until you reach Row 20 from the bottom edge. Ch 35, then sc in each ch across. Continue working sc around the remaining edge until you reach the first sc. Sl st to join.
More Crochet Cardigans
If you love making handmade layers, be sure to check out my other crochet cardigan patterns. From simple and cozy designs to more detailed lace styles, you’ll find a variety of crochet cardigans to add to your handmade wardrobe. Explore all crochet cardigan patterns → Crochet Cardigans
Aryna Crochet Cardigan: Video Tutorial Series
Need a little extra help while making the Aryna Crochet Cardigan? I’ve created a step-by-step crochet cardigan video tutorial to guide you through the pattern. The tutorial is divided into four parts, covering the sleeves, back panel, front panels, and final assembly and border. Follow along with each video as you crochet your cardigan, and refer back to the written pattern whenever needed.
Part 1: Back Panel
Crochet the back panel with the repeating lace stitch pattern. [Watch on YouTube]
Part 2: Front Panels
Crochet both front panels and follow the neckline shaping. [Watch on YouTube]
Part 3: Sleeves
Crochet the sleeves and learn how to transition from the lace pattern to the double crochet section. [Watch on YouTube]
Part 4: Assembly & Border
Put all the pieces together and finish your cardigan with the border and four front ties. [Watch on YouTube]