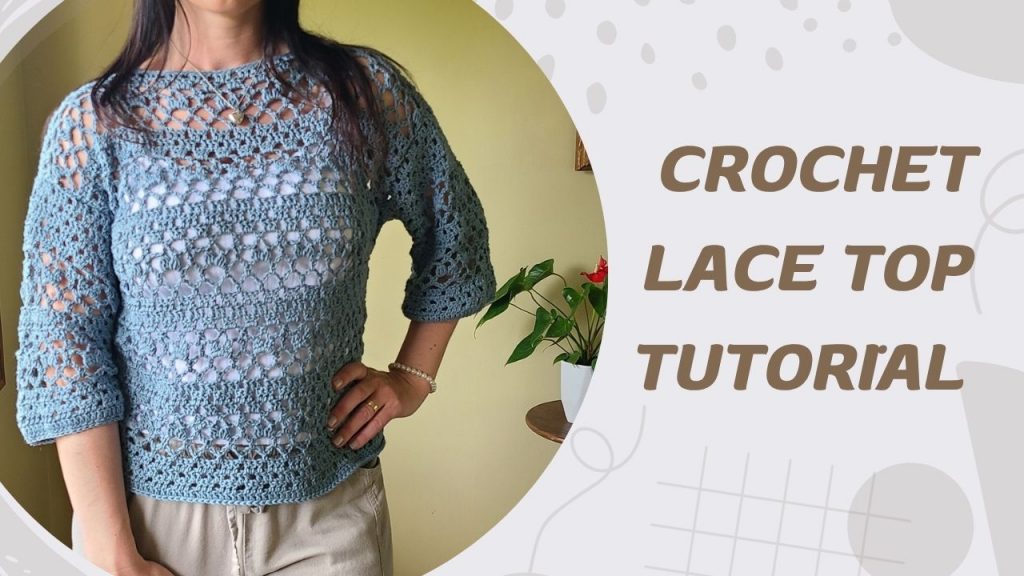
If you’re looking for a stylish and breathable handmade piece, this crochet lace top is the perfect project to add to your wardrobe. The Brilena Crochet Lace Top combines delicate lace details with a modern silhouette, making it ideal for warm weather or layering throughout the seasons.
Whether you’re an experienced crocheter or an adventurous beginner, this free pattern and tutorial will guide you through each step. With its elegant texture and customizable fit, the Brilena top is designed to be both beautiful and wearable—perfect for casual days or dressed-up evenings.
Materials Needed for the Brilena Crochet Lace Top
Before starting your crochet lace top, gather the following materials:
Yarn Selection
Choose a lightweight yarn such as cotton or a cotton blend for breathability and stitch definition. DK or sport weight yarn works best for lace patterns.
Tools & Notions
- Yarn: Yarn Bee Bamboo-Tiful Yarn
- You will need approximately 350 (400, 440, 480, 530, 570, 620) g of yarn for sizes XS (S, M, L, XL, XXL, 3XL).
- Crochet Hook: 4.0 mm (G/6) or size needed to meet gauge
- Tapestry Needle: For weaving in ends
- Scissors
- Stitch Markers (optional but helpful for shaping)
- Measuring Tape
Crochet Lace Top Pattern Overview
Design Features
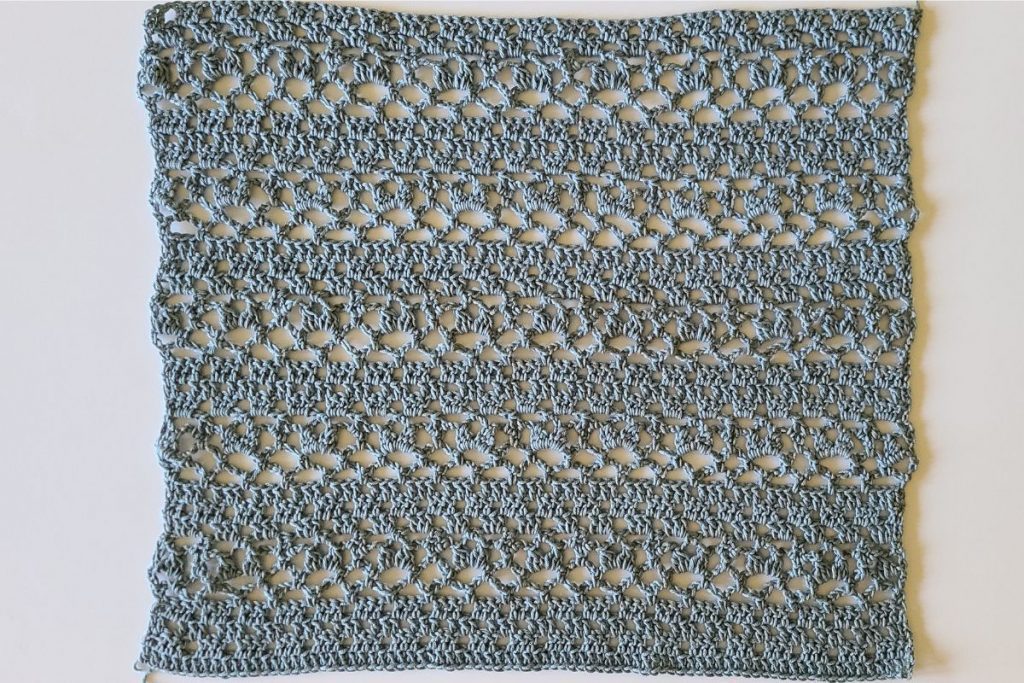
The Brilena crochet lace top features an airy lace stitch pattern, a flattering drape, and a versatile design suitable for layering or wearing on its own.
Construction Method
This crochet lace top is worked in separate panels (front and back) and then seamed together, making it easier to customize sizing and length.
Brilena Crochet Lace Top Notes:
- This crochet top is worked using basic stitches, making it beginner-friendly.
- The pattern is written in standard US crochet terminology.
- Gauge is important to ensure proper fit—take time to check your swatch before starting.
- The Brilena Crochet Lace Top is designed with a slightly relaxed fit; you can adjust sizing by changing hook size or yarn weight.
- Multiple of 8 + 3
- After each 3dctog cluster, ch 1 to close the cluster — this ch-1 counts as a stitch
- Chaining at the beginning of rows count as a stitch.
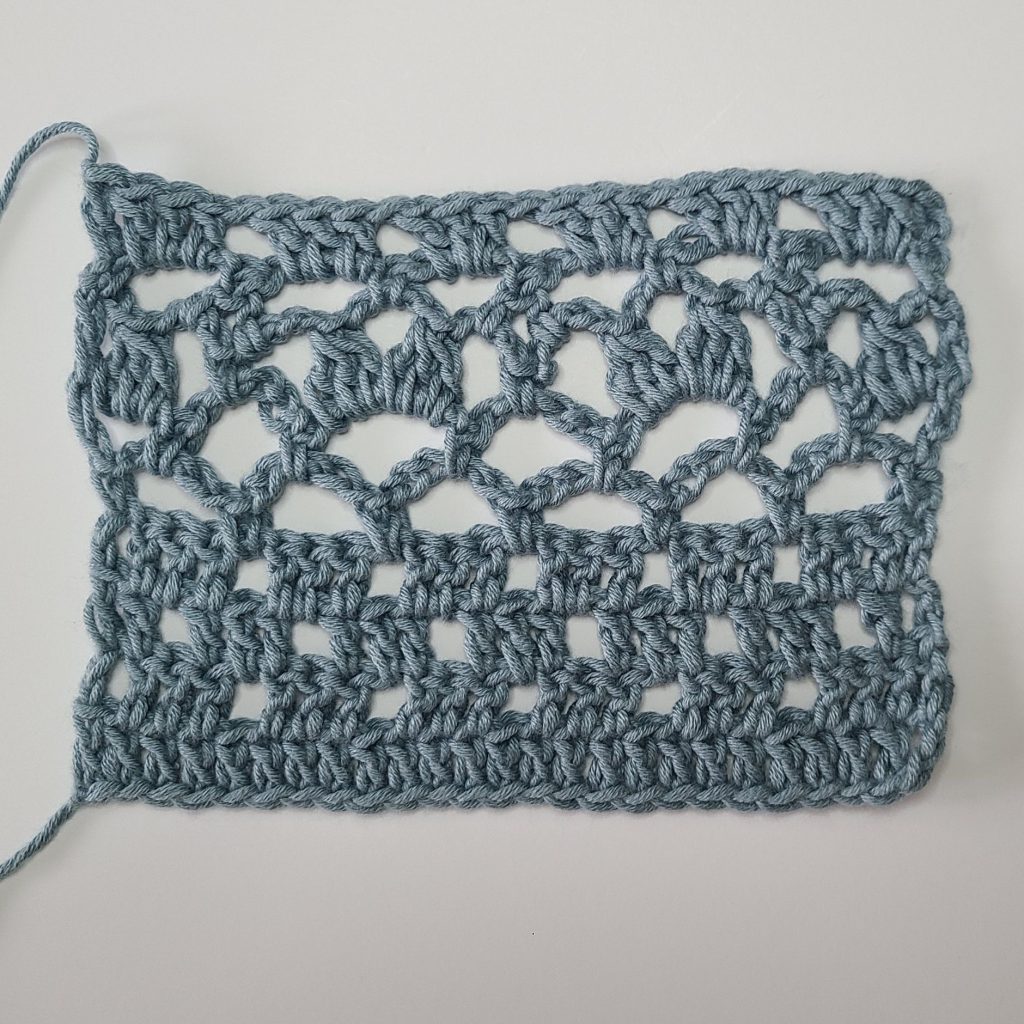
How to Crochet 3 dc tog into One Stitch
The 3 dc tog stitch creates a cluster by combining three double crochets from one stitch into a single stitch at the top.
Step-by-Step Instructions:
- Yarn over (YO) and insert your hook into the stitch.
- YO and pull through, leaving 3 loops on the hook.
- YO and pull through 2 loops, leaving 2 loops on the hook (first dc started).
- Repeat steps 1–2 two more times in the same stitch — after the third dc, you should have 4 loops on your hook.
- YO and pull through all 4 loops — this completes the 3 dc tog cluster.
Tips for Beginners:
- Always leave the last loop of each dc on the hook until you finish the cluster.
- The top of the cluster counts as one stitch, so adjust your stitch count accordingly.
Variation: 3 dc tog with Chain-3 in One Stitch
For some rows, you may work two clusters separated by a chain-3 in the same stitch.
Abbreviation / Pattern Line:(3dctog, ch 3, 3dctog) in same st – Work a 3 dc tog cluster, chain 3, then another 3 dc tog into the same stitch.
- The chain-3 counts as part of the stitch spacing.
- Each cluster’s top counts as one stitch in your stitch count.
Tip: This creates a decorative openwork cluster that’s perfect for the lace dense stitch in the Brilena Crochet Lace Top.
Straight Edge Alternative (Stacked Single Crochet):
To create a cleaner, straighter edge, you can replace the traditional turning chain at the beginning of each row with a stacked single crochet. Turn your work, then work 2 sc in the first stitch, placing the second sc into the first loop of the sc you just made. This technique eliminates gaps and creates a neat, straight edge that mimics the height of a turning chain.
At the end of the row, work your final dc into the second sc from the top of the previous row, which forms a straight double crochet edge. This method gives your crochet top a more polished and professional finish. ( I used stacked single crochet)
Skill Level & Abbreviations for This Crochet Lace Top
Skill Level
This crochet lace top is suitable for advanced beginners to intermediate crocheters who are comfortable with basic stitches and following patterns.
Brilena Crochet Lace Top: Stitch Abbreviations (US Terms)
- ch = chain
- sl st = slip stitch
- sc = single crochet
- dc = double crochet
- sp = space
- rep = repeat
- st: stitch(es)
- 3dctog: 3 double crochets together
- 2dctog: 2 double crochets together
- **: repeat instructions between asterisks as described
- ard: around
- eor: end of row
Gauge
Make a small swatch using the lace stitch pattern and adjust your hook size if needed.
4 inches × 4 inches = 16 dcs x 8 rows
How to Crochet the Brilena Crochet Lace Top
Follow the front panel, back panel, straps, and assembly instructions below to complete your handmade top.
Learn how to create the elegant Brilena Crochet Lace Top with this step-by-step tutorial designed for confident beginners and intermediate crocheters. This lightweight lace design is perfect for warm weather layering and showcases delicate stitch work that gives the top its signature airy texture. In this video, you’ll follow along with clear instructions covering the foundation, lace pattern repeats, shaping, and finishing touches so you can confidently complete your own wearable piece. Whether you’re making it for yourself or as a handmade gift, this project is both stylish and rewarding to crochet.
Brilena Crochet Lace Top: Measurements
🧵 Please note: all measurements shown in this top are taken before blocking. Your finished garment may grow or relax slightly after blocking, depending on your yarn choice and tension.
| Size Chest (in) | Length (in) | Width (in) |
| XS (28–30) | 18.7 | 15.5 |
| S (32–34) | 18.7 | 17.5 |
| M (36–38) | 21 | 19.5 |
| L (40–42) | 21 | 21.5 |
| XL (44–46) | 21 | 23.5 |
| XXL (48-50) | 21 | 25.5 |
| 3XL (52–54) | 21 | 27.5 |
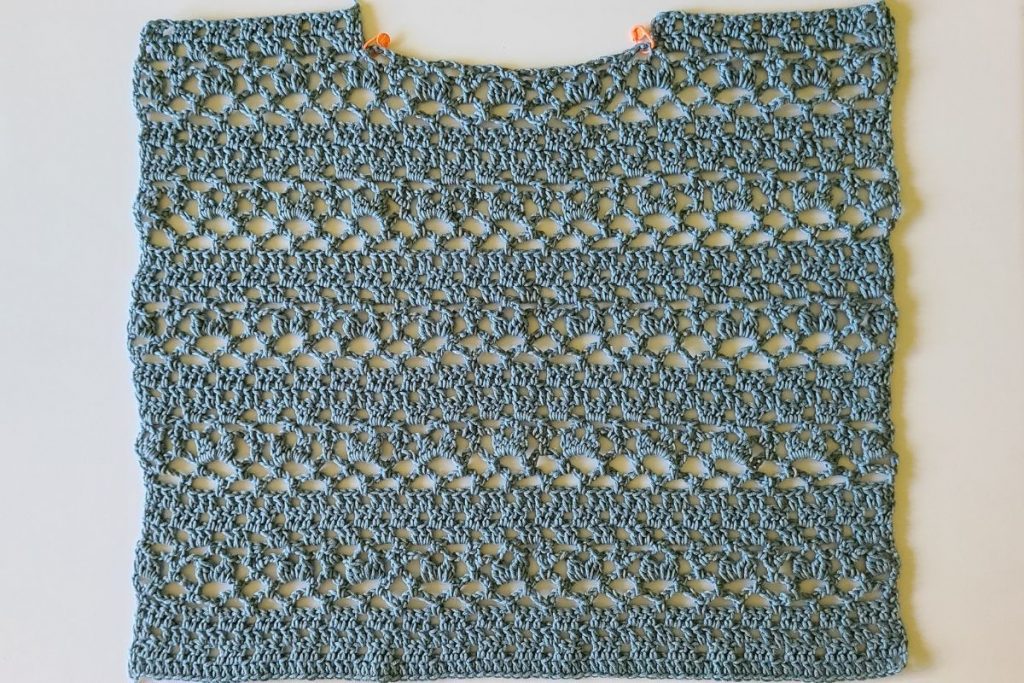
Brilena Crochet Lace Top: Back Panel
Foundation Chain:
Ch 66 (XS), 75 (S), 83 (M), 91 (L), 99 (XL), 107 (XXL), 115 (3XL), or any multiple of 8 + 3.
Row 1: Dc in 4th ch from hook and in each ch across.
Row 2: Ch 3 (counts as dc), turn, dc in next 3 sts, *ch 1, sk 1, dc in next 3 sts; repeat from * across, ch 1, sk 1, dc in last 4 sts.
Row 3: Ch 3 (counts as dc), turn, dc in next st, *ch 1, sk 1, dc in next 3 sts; repeat from * across, ch 1, sk 1, dc in last 2 sts.
Row 4: Repeat Row 2.
Row 5: Ch 1, turn, sc in first st, *ch 5, sk next 3 sts, sc in next ch-1 sp; repeat from * across, ch 5, sk next 3 sts, sc in last st.
Row 6: Ch 6 (counts as dc + ch 3), turn, sc in first ch-5 sp, *ch 5, sc in next ch-5 sp; repeat from * across, ch 3, dc in last st.
Row 7: Ch 4 (counts as dc + ch 1), turn, 3 dc together (3dctog) in next ch-3 sp, *ch 3, sc in next ch-5 sp, ch 3, (3dctog, ch 3, 3dctog) in next ch-5 sp; repeat from * across, ch 3, 3dctog in last ch-3 sp, ch 1, dc in last st.
Row 8: Ch 1, turn, sc in first st, *ch 3, 2 dc together (2dctog) over next 2 ch-3 sps, ch 3, sc in next ch-3 sp; repeat from * across, ch 3, sc in last st.
Row 9: Repeat Row 2.
Row 10: Repeat Row 3.
Row 11: Repeat Row 4.
Row 12: Repeat Row 5.
Row 13: Repeat Row 6.
Row 14: Repeat Row 7.
Row 15: Repeat Row 9.
Continue Pattern
Repeat Rows 2–8 until piece measures:
- XS–S: Repeat through Row 31
- M–XL: Repeat through Row 38
- (Adjust length as desired)
Brilena Crochet Lace Top: Front Panel
Work the same stitch pattern as the back panel:
- XS–S: Repeat through Row 29
- M–3XL: Repeat through Row 36
The final 2 rows form the shoulder straps.
Strap Shaping
Sizes XS–S
Left Strap (when wearing)
Row 30: Ch 3 (counts as dc), turn, dc in next 3 sts, *ch 1, sk 1, dc in next 3 sts; repeat from * 2 more times,
ch 1, sk 1, dc in next 4 sts.
Row 31: Ch 3 (counts as dc), turn, dc in next st, *ch 1, sk 1, dc in next 3 sts; repeat from * across,
ch 1, sk 1, dc in last 2 sts.
Right Strap (when wearing)
Row 30: Attach yarn in the 21st st from the right edge, ch 3 (counts as dc), dc in next 3 sts, *ch 1, sk 1, dc in next 3 sts; repeat from * across, ch 1, sk 1, dc in last 4 sts.
Row 31: Repeat Row 31 of Left Strap.
Sizes M–L
Left Strap
Row 37: Ch 3 (counts as dc), turn, dc in next 3 sts, *ch 1, sk 1, dc in next 3 sts; repeat from * 3 more times,
ch 1, sk 1, dc in next 4 sts.
Row 38: Ch 3 (counts as dc), turn, dc in next st, *ch 1, sk 1, dc in next 3 sts; repeat from * across, ch 1, sk 1, dc in last 2 sts.
Right Strap
Row 37: Attach yarn in the 25th st from the right edge, ch 3 (counts as dc), dc in next 3 sts, *ch 1, sk 1, dc in next 3 sts; repeat from * across, ch 1, sk 1, dc in last 4 sts.
Row 38: Repeat Row 38 of Left Strap.
Sizes XL–XXL
Left Strap
Row 37: Ch 3 (counts as dc), turn, dc in next 3 sts, *ch 1, sk 1, dc in next 3 sts; repeat from * 4 more times,
ch 1, sk 1, dc in next 4 sts.
Row 38: Repeat Row 38 as written above.
Right Strap
Row 37: Attach yarn in the 29th st from the right edge, ch 3 (counts as dc), dc in next 3 sts, *ch 1, sk 1, dc in next 3 sts; repeat from * across, ch 1, sk 1, dc in last 4 sts.
Row 38: Repeat Row 38 of Left Strap.
Size 3XL
Left Strap
Row 37: Ch 3 (counts as dc), turn, dc in next 3 sts, *ch 1, sk 1, dc in next 3 sts; repeat from * 5 more times, ch 1, sk 1, dc in next 4 sts.
Row 38: Repeat Row 38 as written above.
Right Strap
Row 37: Attach yarn in the 33rd st from the right edge, ch 3 (counts as dc), dc in next 3 sts, *ch 1, sk 1, dc in next 3 sts; repeat from * across, ch 1, sk 1, dc in last 4 sts.
Row 38: Repeat Row 38 of Left Strap.
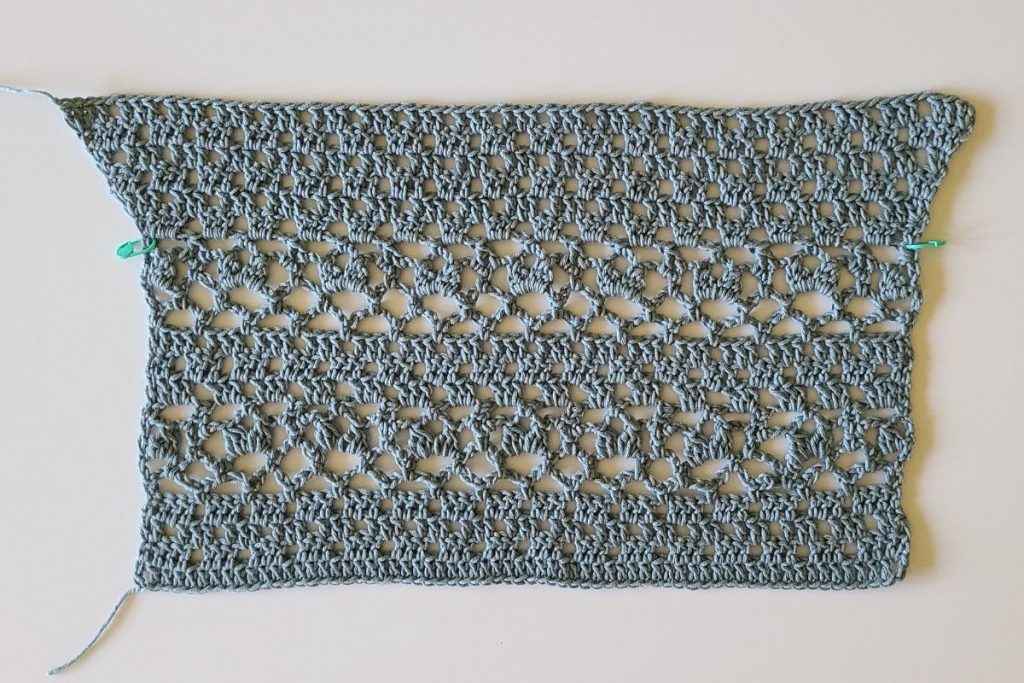
Brilena Crochet Lace Top: Sleeves (make 2)
Foundation Chain
- XS–S: Ch 56 + 3
- M–L: Ch 64 + 3
- XL–3XL: Ch 72 + 3
Establish Pattern
Work Rows 1–15 of the stitch pattern as written for the body.
Increase Section
Row 16: Ch 3 (counts as dc), turn, 2 dc in first st, dc in next 3 sts, *ch 1, sk 1, dc in next 3 sts; repeat from * across,
ch 1, sk 1, dc in next 3 sts, 2 dc in last st.
Row 17:Ch 3 (counts as dc), turn, 2 dc in first st, dc in next 2 sts, *ch 1, sk 1, dc in next 3 sts; repeat from * across, ch 1, sk 1, dc in next 2 sts, 2 dc in last st.
Row 18: Ch 3 (counts as dc), turn, 2 dc in first st, dc in next st, *ch 1, sk 1, dc in next 3 sts; repeat from * across, ch 1, sk 1, dc in next st, 2 dc in last st.
Row 19: Ch 3 (counts as dc), turn, 2 dc in first st, *ch 1, sk 1, dc in next 3 sts; repeat from * across, ch 1, sk 1, 2 dc in last st.
Row 20: Ch 3 (counts as dc), turn, 2 dc in first st, dc in next 3 sts, *ch 1, sk 1, dc in next 3 sts; repeat from * across, ch 1, sk 1, dc in next 3 sts, 2 dc in last st.
Row 21: Ch 3 (counts as dc), turn, 2 dc in first st, dc in next 2 sts, *ch 1, sk 1, dc in next 3 sts; repeat from * across, ch 1, sk 1, dc in next 2 sts, 2 dc in last st.
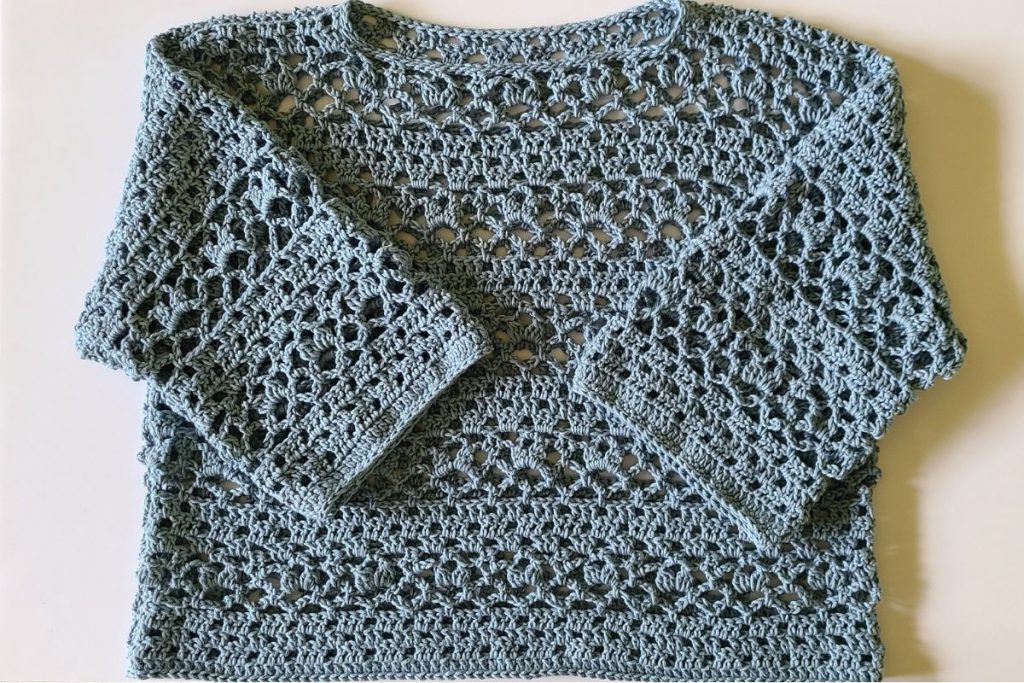
Assembly Instructions for the Brilena Crochet Lace Top
Joining the Panels
Use a slip stitch to seam all pieces together.
Turn Right Side Out
Once all seams are complete, turn the top right side out.
- Position the Panels
Place the front and back panels with right sides facing each other (inside out). - Join the Shoulders
Slip stitch across both shoulder seams, leaving the neck opening unworked. - Attach the Sleeves
- Align each sleeve with the armhole opening.
- Make sure the center of the sleeve matches the shoulder seam.
- Slip stitch the sleeves to the panels evenly on both sides.
- Join the Sides and Sleeves
- Fold the top so seams align.
- Starting from the bottom edge, slip stitch up the side of the body and continue along the sleeve to the underarm.
- Finishing the Seams
Carefully slip stitch all edges, ensuring the lace pattern aligns neatly for a clean, professional finish.
Brilena Crochet Lace Top – Edging
Neck Edging
Join yarn in any stitch along the neckline.
Row 1: Ch 1, slip stitch in each st around, join with a slip stitch to first sl st.
Row 2: Ch 1, slip stitch in each st in back loops only ard, join with a slip stitch to first sl st.
Bottom Border
Join yarn in any stitch along the bottom edge.
Row 1: Ch 1, slip stitch in each st ard, join with a slip stitch to first sl st.
Sleeve Border
Join yarn in any stitch along the sleeve opening.
Row 1: Ch 1, sc in first st, sc in next 2 sts, *sc2tog over next 2 sts, sc in next 3 sts; repeat from * ard, join with a slip stitch to first sc.
Row 2: Ch 1, slip stitch in each st ard, join with a slip stitch to first sl st.
Blocking Your Crochet Lace Top
Lightly block your finished piece to open up the lace stitches and improve drape.
Styling Ideas for Your Crochet Lace Top
Casual Looks
Pair your crochet lace top with jeans or shorts for an effortless everyday outfit.
Layered Outfits
Wear it over a tank top, bralette, or dress for added texture and style.
If you love lightweight handmade garments, this crochet lace top is just the beginning. Lace designs are perfect for warm weather, offering breathability and effortless style. If you’re looking for more inspiration, be sure to explore my collection of summer lace tops, where you’ll find a variety of patterns that are just as airy, stylish, and beginner-friendly as the Brilena Crochet Lace Top.