
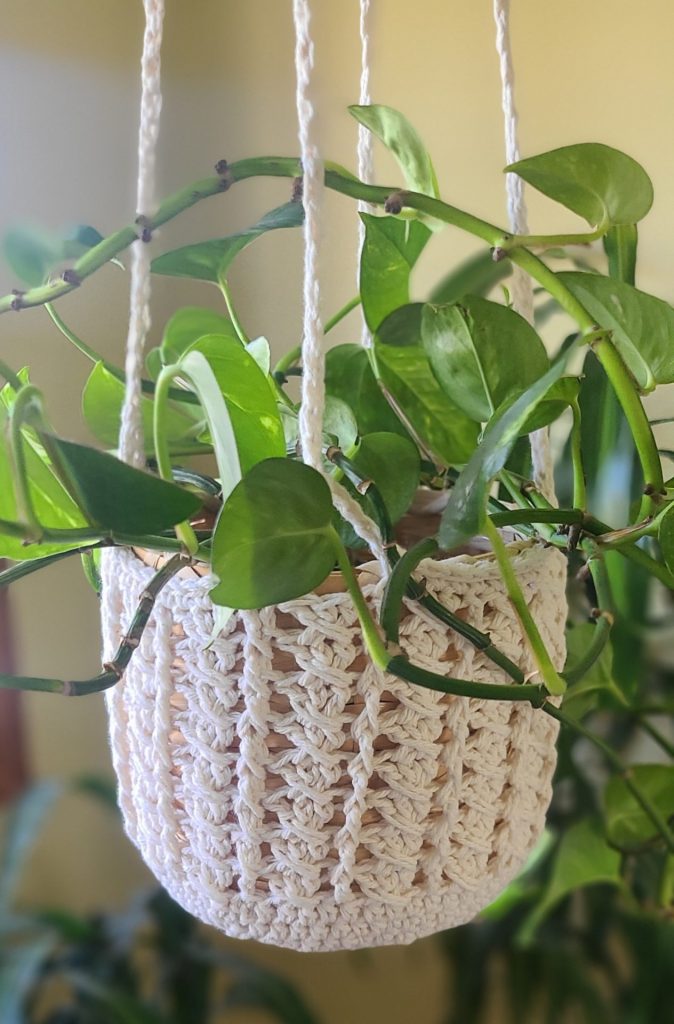
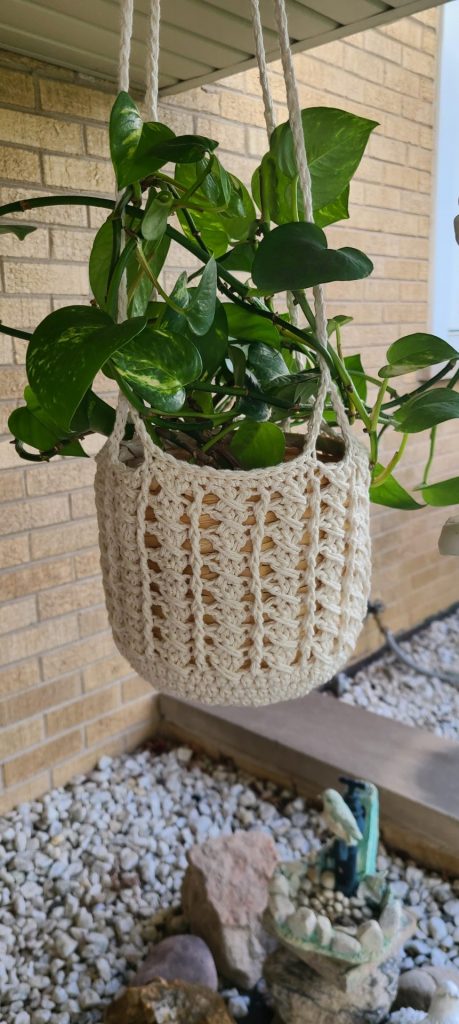
Available in 2 sizes!
Looking for a simple and stylish way to showcase your favorite houseplants? Say hello to this crochet plant pot holder free pattern! Whether you’re a beginner looking to dive into a new craft or a seasoned crocheter in search of your next project, this easy crochet plant pot hanger pattern is just what your home needs.
Crochet plant pot holders are a great way to blend functionality with design. Not only do they help free up shelf and table space, but they also bring a cozy, boho vibe to any room. This pattern is quick to work up, uses simple stitches, and can be customized to fit various pot sizes and colors.
Plant hangers are making a huge comeback in home décor, and there’s no better way to add a touch of handmade charm than with a crochet holder plant pattern. They’re perfect for small spaces, add a boho vibe to any room, and make thoughtful gifts too. Best of all? You can create these beautiful plant pot holders with just a few basic stitches and some yarn you probably already have on hand.
In this blog post, I’ll share my favorite crochet plant pot holder free pattern, complete with step-by-step instructions, photos, and helpful tips. Whether you’re decorating your living room, balcony, or gifting to a fellow plant lover, there’s a pattern here for everyone.
Ready to get hooked? Let’s dive into the world of creative greenery!
What You Need to Make the Crochet Lace Top
The best part of making this crochet project plant pot hanger? It’s an easy stitch crochet plant pot hanger, meaning you don’t need to be an expert to complete it! Here’s what you’ll need to get started:
– Yarn: Choose a worsted cotton or cotton cord yarn to keep things solid
– Crochet Hook: Use the size recommended on the yarn label, typically a 5 mm hook works well for this patterns.
– Pattern: The Free Plant Pot Hanger Pattern offers a clear and easy-to-follow guide, ensuring you create a beautiful hanger with ease.
– Time & Patience: Crocheting is a relaxing and rewarding craft, and this project will take a little time, but the end result will be well worth it!
Plant Pot Holder Pattern
Notes
– Level: Easy +
– This pattern is written in US terms
– The written pattern is available in 2 sizes
– Pattern uses Crochet Cross Over Stitch and Modified Crochet Cross Over Stitch (see next note).
– From row 7 to row 11 the first Fpdc you have to make starting with by chaining 1 and then take a loop and then make the Fpdc around the dc from previous row.
– The pattern for both sizes are the same with a difference at the number of rows of the base and at the last 2 rows.
– Refer photos on pages 6-8 for more detail
Materials
– Yarn: 4 skeins of Sugar ‘n Cream Weight 4 yarn [480yds/436 m]
Substitute any other weight 4yarn
– 5 mm Crochet Hook
– Tapestry Needle
– Scissors
– Stitch Markers
If you’re interested in purchasing this crochet top pattern in a downloadable, printable PDF format, it is available for purchase on the shop bellow:
Etsy
Abbreviations
| ** | Repeat instructions | Rem | Remaining |
| Ard | Around | Rpt | Repeat |
| Ch | Chain | Rnd | Round |
| Dc | Double crochet | Sc | Single Crochet |
| Fpdc | Front post double crochet | Sk | Skip |
| Hdc | Half double crochet | Sk ch | Skipped chain |
| Inc | Increase | Sl st | Slip stitch |
| MR | Magic Ring | Sp | Space |
| Prev | Previous | St(s) | Stitch(es) |
Sizes
| Small (folded) | Large |
| Height: 5 inches (13 cm) | Height: 6.5 inches (16.5 cm) |
| Width: 5 inches (13 cm) | Width: 24 inches (61 cm) |
Gauge
11 sc x 6 rows (4×4 inch/ 10×10 cm square)
Special Stitches
How to Make a Magic Ring
Step 1: Loop the yarn around your fingers
Step 2: Insert the hook and pull up a loop
Step 3: Chain 1
Step 4: Make (8) hdc into the ring.
Step 5: Tighten the ring.
Step 6: Slip stitch to close the round.
Step 7: Continue to work pattern as instructed

Crochet Cross Over Stitch
– (Ch multiple of 5+3)
– Dc, *sk1, dc in next 3 st, dc back in sk ch (work over the 3 dc), dc in next st.
– Repeat from * as pattern instructs.
Modified Crochet Cross Over Stitch
– Fpdc, *sk 1, dc 2, dc back in sk ch, Fpdc in next dc from previous row.
– Repeat from * as pattern instructs.
Plant Pot Holder Pattern
8 hdc in MR
Rnd 2: Ch 1, 2hdc in each st around. Join with sl st. (16)
Rnd 3: Ch 1, inc, 1 hdc ard, sl st into first hdc. (24)
Rnd 4: Ch 1, inc, 2 hdc ard, sl st into first hdc. (32)
Rnd 5: Ch 1, 1 hdc in each st ard, sl st into first hdc. (32)
Rnd 6: Ch 3 (counts as 1st dc), turn, crochet cross over stitch, 9 times, finish with sl st in the 3rd ch from first ch 3 {10 Clusters}
Rnd 7: Ch 3 (counts as 1st dc), crochet cross over stitch, 9 times, finish with sl st in the 3rd ch of first dc. {10 Clusters}
Rnd 8: Ch 1, take a loop, Fpdc to the dc from previous row (counts as 1stFpdc), modified crochet crossover stitch, 9 times, finish with sl st in the 3rd ch of first Fpdc. {10Clusters}
Rnds 9, 10, 11: Rep Rnd 8 (3 rnds)
Rnd 12: Ch 1, sc into next 5 sts, ch 9, sk 2 sts, sc 9, ch 9, sk 2, sc 9, ch 9, sk2, sc 3, sl st to the first sc.
Rnd 13: ch 1, sl st into next 5 sts and right to middle of ch 9, ch as long as you need, sl st to the 2nd st, and continue sl st all the way down the next 9 chs, repeat ard (you should have 3 ch 9 spaces).


Base for the big size
8 hdc in MR
Rnd 2: Ch 1, 2hdc in each st around. Join with sl st. (16)
Rnd 3: Ch 1, inc, 1hdc ard, sl st into first hdc. (24)
Rnd 4: Ch 1, inc, 2hdc ard, sl st intofirst hdc. (32)
Rnd 5: Ch 1, inc, 3hdc ard, slst into first hdc. (40)
Rnd 6: Ch 1, inc, 4hdc ard, slst into first hdc. (48)
Rnd 7: Ch 1, inc, 5hdc ard, slst into first hdc. (56)
Rnd 8: Ch 1, inc, 6hdc ard, slst into first hdc. (64)
Rnd 9: Ch 1, 1hdc in each st ard, sl st into first hdc. (64)
Rnd 10: Ch 3 (counts as 1st dc), modified crochet cross overstitch, 14 times, finish with sl st in the 3rd ch of first dc. {15 Clusters}
Rnd 11: Ch 1, take a loop, Fpdc to the dc from prev row (counts as 1stFpdc), sk 1, dc 2, dc back in sk ch, Fpdc in next dc from previous row,9 times, finish sl st in the 3rd ch from first Fpdc. {15 Clusters}
Rnd 12, 13, 14, 15, 16, 17: Rep Row 11
Row 18: Ch 1, sc in next 13 sts, ch 9, skip 3 sts, (cluster from prev rnd), sc in next 13 sts, rep 2 more times, sl st to the first sc (you should have 4ch9 spaces).
Row 19: Ch 1, sl st into next 13 sts and right to middle of ch 9, ch as long as you need, sl st to the 2nd st, and continue to sl st all the way down to the next ch 9 and repeat ard.
2 thoughts on “How to Crochet a Plant Pot Holder – Free Step-by-Step Pattern”