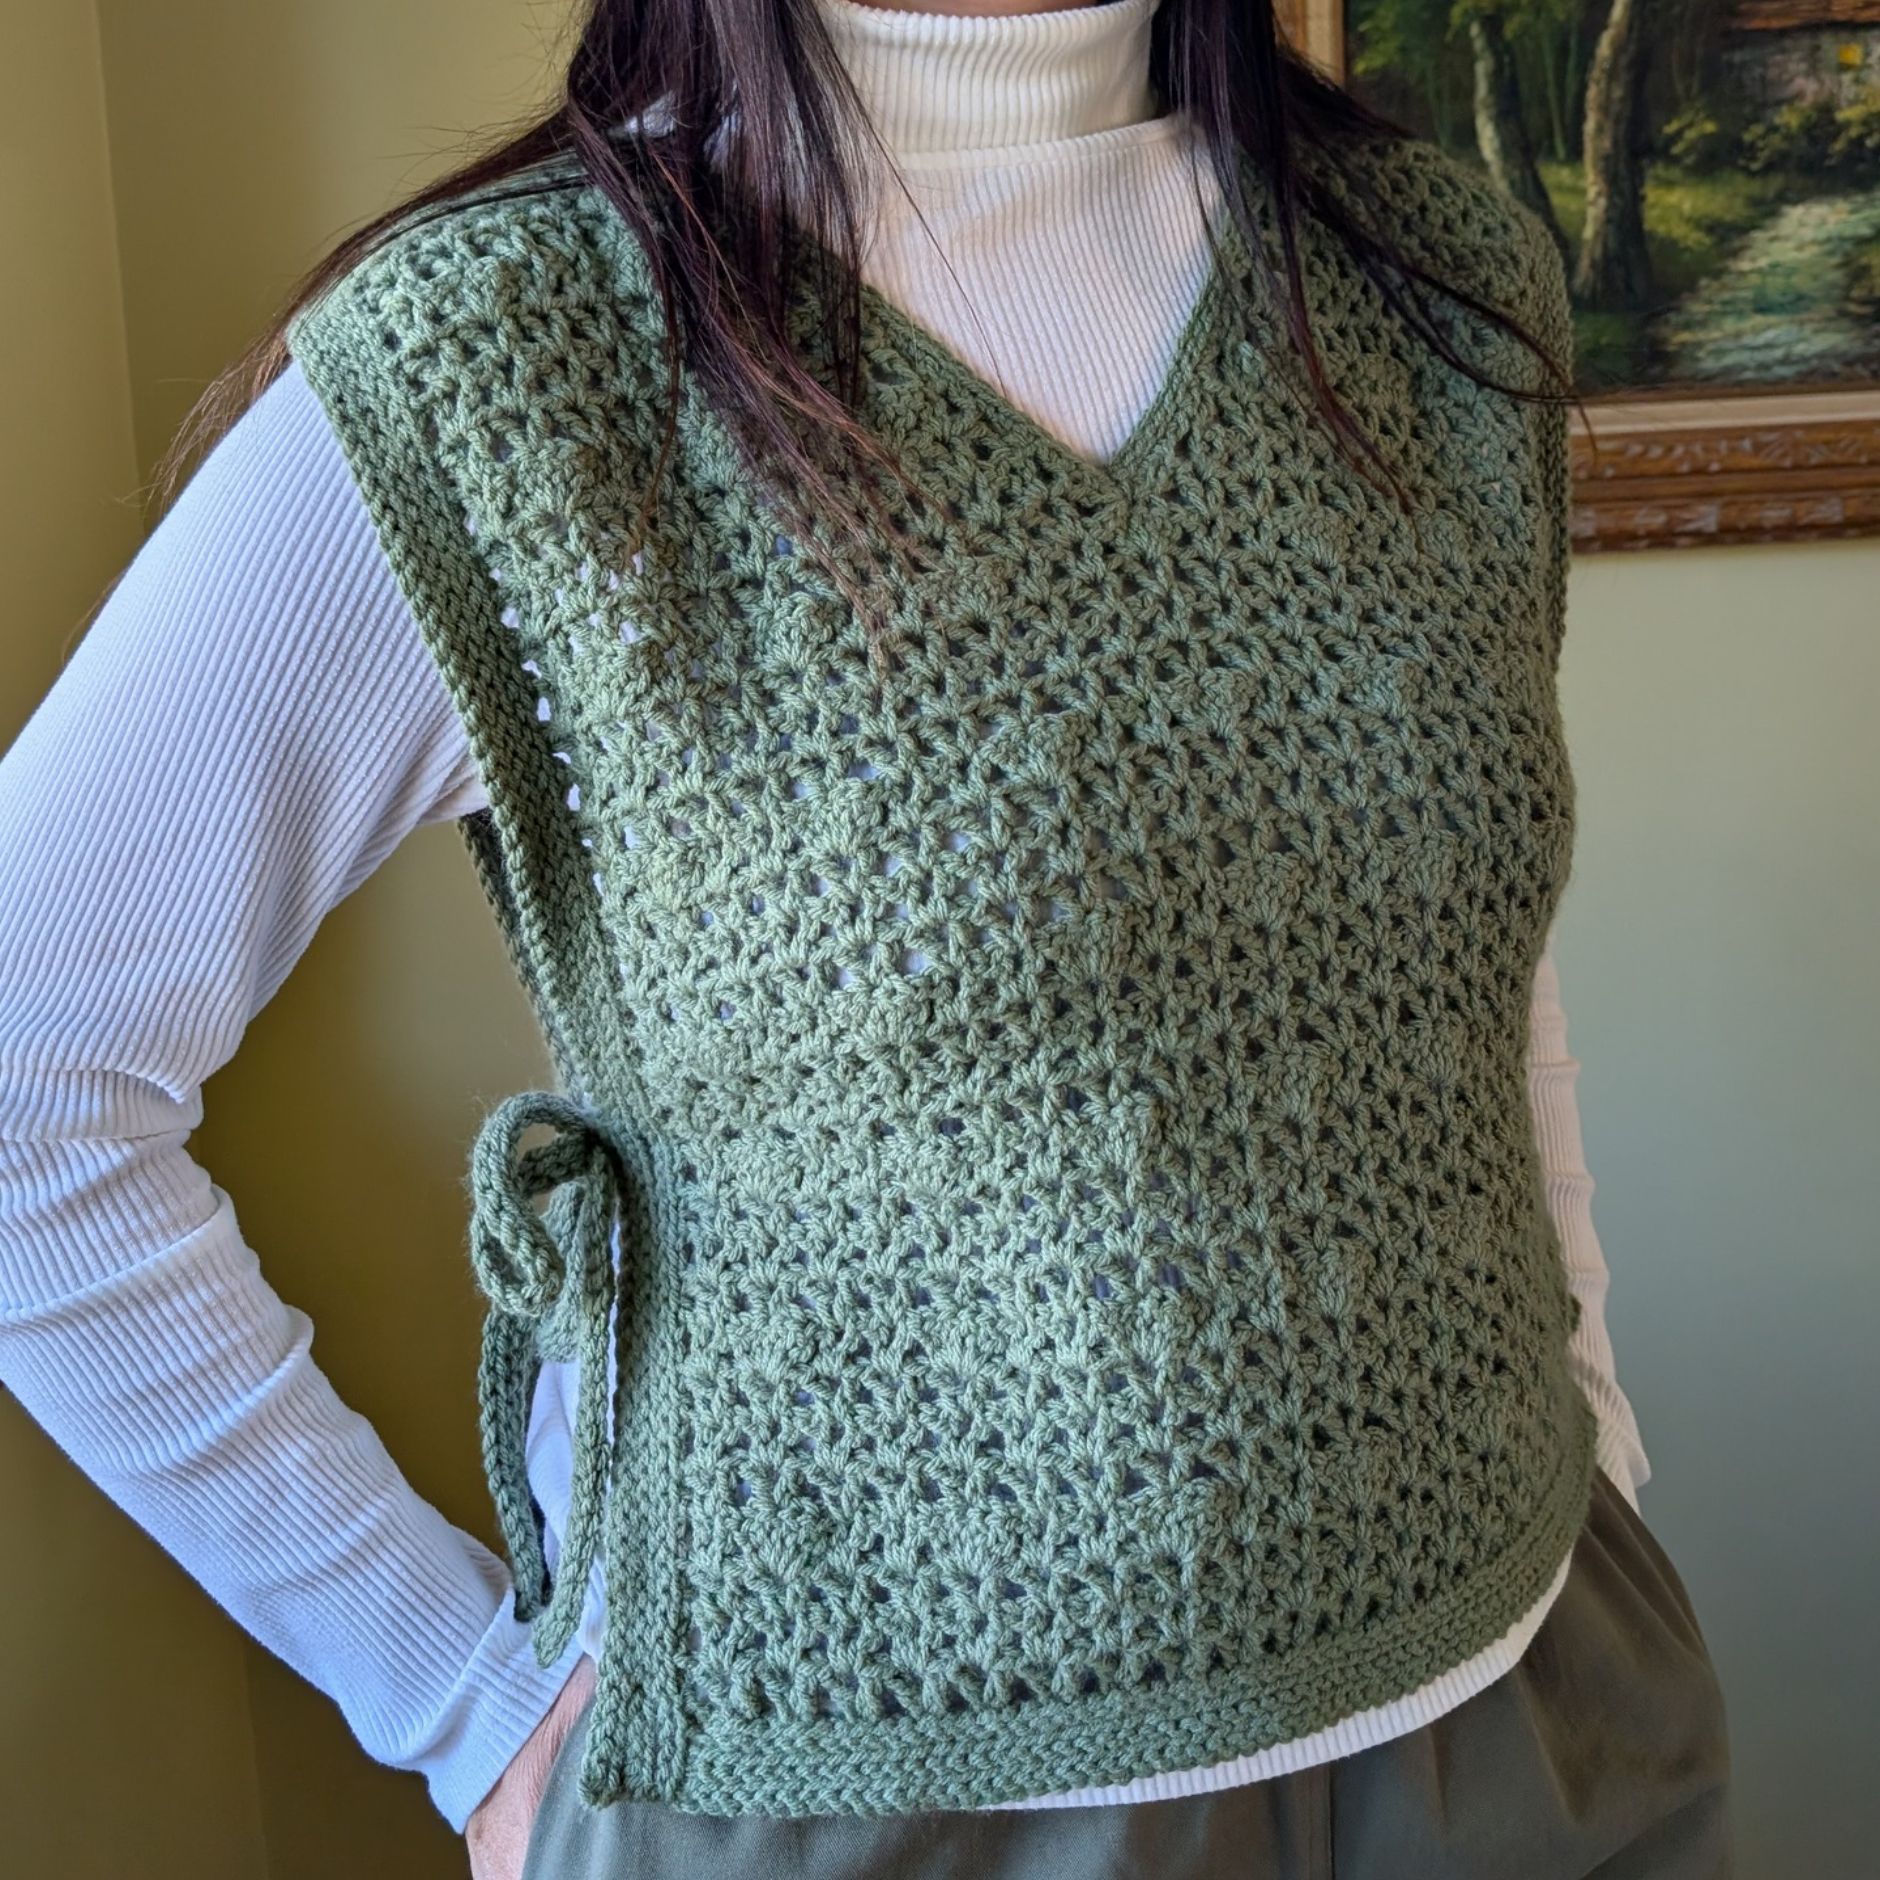
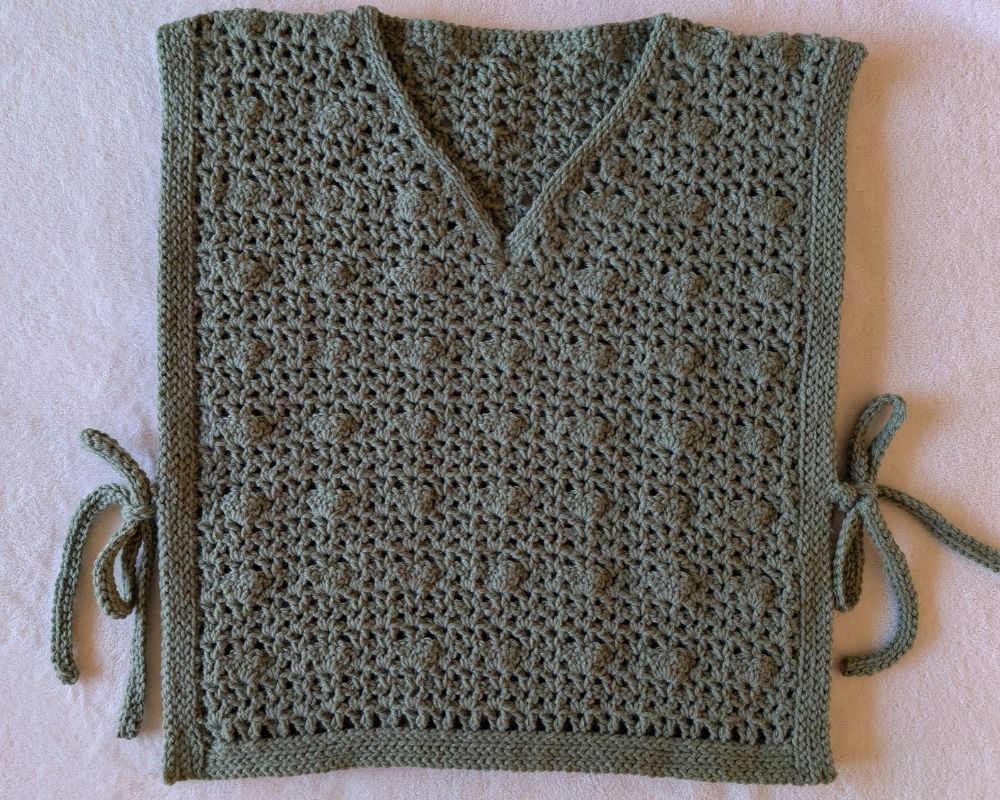
Looking for a stylish crochet vest with a beautiful neckline? This V-Neck Crochet Tie Vest is a lovely handmade layering piece featuring a textured stitch pattern, a flattering V-shaped neckline, and adjustable side ties.
The vest is made using simple panels, making it an enjoyable project for crocheters who love creating their own handmade clothing. The back panel follows the same construction as my original Zarina Crochet Sweater Vest, while the front panel features V-neck shaping for a slightly different and more open look.
I used the same yarn and crochet hook as the original design, but made a few changes to the neckline border and side ties to give this version its own style.
Follow the free written crochet pattern and step-by-step video tutorial to make your own V-neck crochet vest!
- About the V-Neck Crochet Vest
- Why You’ll Love This Pattern
- Construction
- Materials You’ll Need
- Gauge
- Sizes and Measurements
- Abbreviations and Stitch Guide
- Free V-Neck Crochet Vest Pattern
- Back Panel
- Front Panel with V-Neck Shaping
- Joining the Shoulders
- Neckline Border
- Bottom and Side Borders
- Side Ties
- Finishing
- Video Tutorial
- More Free Crochet Vest Patterns
About This V-Neck Crochet Vest
This design is inspired by my original Zarina Crochet Sweater Vest, but with a few changes to create a different look.
Both vests use the same textured stitch pattern, yarn, and 5 mm crochet hook. The back panel is also worked in the same way.
The main differences are:
- Front panel: This version features decreases to create a flattering V-shaped neckline.
- Neckline border: A different border is used to follow the V-neck shape neatly.
- Side ties: The ties are worked in 3 rows instead of 6, giving them a slightly different finish.
The construction is beginner-friendly, using separate panels that are joined together to create the finished vest.
Why You’ll Love This Pattern
This V-Neck Crochet Tie Vest is a beautiful and versatile addition to your handmade wardrobe. It features a lovely textured stitch pattern, a flattering V-shaped neckline, and adjustable side ties that give the vest a stylish, feminine look. The design is made using simple panels, making it an enjoyable project without complicated construction. You can easily layer it over a blouse, shirt, or long-sleeved top, making it perfect for different seasons. If you’re looking for a crochet vest pattern that combines texture, comfort, and timeless style, this one is a lovely choice!
V-Neck Crochet Vest: Construction
The V-Neck Crochet Vest is worked in separate front and back panels using the same textured stitch pattern. The back panel is worked as a simple rectangle, while the front panel includes decreases to create the flattering V-shaped neckline. Once both panels are completed, the shoulders are joined, and the neckline is finished with a neat crochet border. The bottom and side edges are also finished with borders, and adjustable crochet ties are added to the sides. The ties are worked in just three rows, creating a simple and pretty finish. This straightforward construction makes the vest a fun and approachable project for crocheters who enjoy making their own clothing.
Materials You’ll Need
- Yarn: Lion Brand Pound of Love
- You will need approximately 250 (275, 315, 365, 400, 450 )g of yarn for sizes S (M, L, XL, 2XL, 3XL).
- Fiber: 100% acrylic
- Yarn weight: Worsted weight (Category 4)
- Crochet hook: 5 mm (US H/8)
- Yarn color: Green
Yarn Substitutions
If you can’t find Lion Brand Pound of Love, you can substitute another worsted-weight (Category 4) yarn with a similar thickness and drape. Look for a smooth acrylic yarn or an acrylic blend that will show off the textured stitches of the V-Neck Crochet Vest.
When choosing a substitute, keep in mind that different yarns can produce slightly different results, even when they share the same yarn weight.
V-Neck Crochet Vest: Gauge
16 stitches × 8 rows = 4 × 4 in (10 × 10 cm)
Pattern Notes
- The pattern is written using US crochet terminology.
- The starting chain is worked as a multiple of 9 + 4 to maintain the stitch repeat.
- Ch 3 counts as the first dc throughout.
- Size from the pictures is Medium.
- Instructions written between asterisks
* *are repeated as indicated. - The gauge for this pattern is measured before steam blocking.
V-Neck Crochet Vest: Sizes and Finished Measurements
All measurements are taken with the borders included.
Blocking note: After steam blocking, the vest grew approximately 1 inch (2.5 cm) in length, while the width remained unchanged. The measurements include the side borders, which are approximately 1 inch wide on each side. Results may vary depending on yarn and crochet tension.
| Size | Width (inches) | Length (inches) |
|---|---|---|
| S | 15.8 | 18 |
| M | 18 | 20 |
| L | 20.2 | 20 |
| XL | 22.4 | 21 |
| 2XL | 24.6 | 21 |
| 3XL | 26.8 | 22 |
Crochet Abbreviations
The following US crochet terms are used throughout this pattern:
- ch – chain
- sl st – slip stitch
- dc – double crochet
- sp – space
- st (s) – stitch (es)
- rep – repeat
- sk – skip
- BLO – back loop only
- FLO – front loop only
- **: repeat instructions between asterisks as described
- ard: around
V-Neck Crochet Tie-Vest: Back Panel
Ch 58 (S), 67 (M), 76 (L), 85 (XL), 94 (2XL), 103 (3XL) or any multiple of 9 + 4
Row 1: (Dc, ch 1, dc) in the 5th ch from the hook. *Sk 2 ch, (dc, ch 1, dc) in the next ch. Rep from * across. Sk 1 ch, dc in the last ch.
Row 2: Ch 3, turn, sk 1 st, (dc, ch 1, dc) in the next st. *Sk 2 sts, (dc, ch 1, dc) in the next st. Rep from * across. Sk 1 st, dc in the last st.
Row 3: Repeat Row 2
Row 4: Ch 3, turn, sk 1 st, (dc, ch 1, dc) in the next st. *Sk 2 sts, 5 dc in the next st, sk 2 sts, (dc, ch 1, dc) in the next st, sk 2 sts, (dc, ch 1, dc) in the next st. Rep from * across. Sk 2 sts, (dc, ch 1, dc) in the next st. Sk 1 st, dc in the last st.
Row 5: Ch 3, turn, sk 1 st, (dc, ch 1, dc) in the next st. *Sk 3 sts, (dc, ch 1, dc) in the next st, sk 3 sts, (dc, ch 1, dc) in the next st, sk 2 sts, (dc, ch 1, dc) in the next st. Rep from * across. Sk 1 st, dc in the last st.
Row 6: Rep Row 2.
Row 7: Rep Row 2.
Row 8: Rep Row 4.
Row 9: Rep Row 5.
Continue the pattern: Repeat Rows 2–6 until the back panel reaches the designated final row for your size.
- Size S: Row 35
- Sizes M and L: Row 37
- Sizes XL and 2XL: Row 39
- Size 3XL: Row 41
Fasten off.
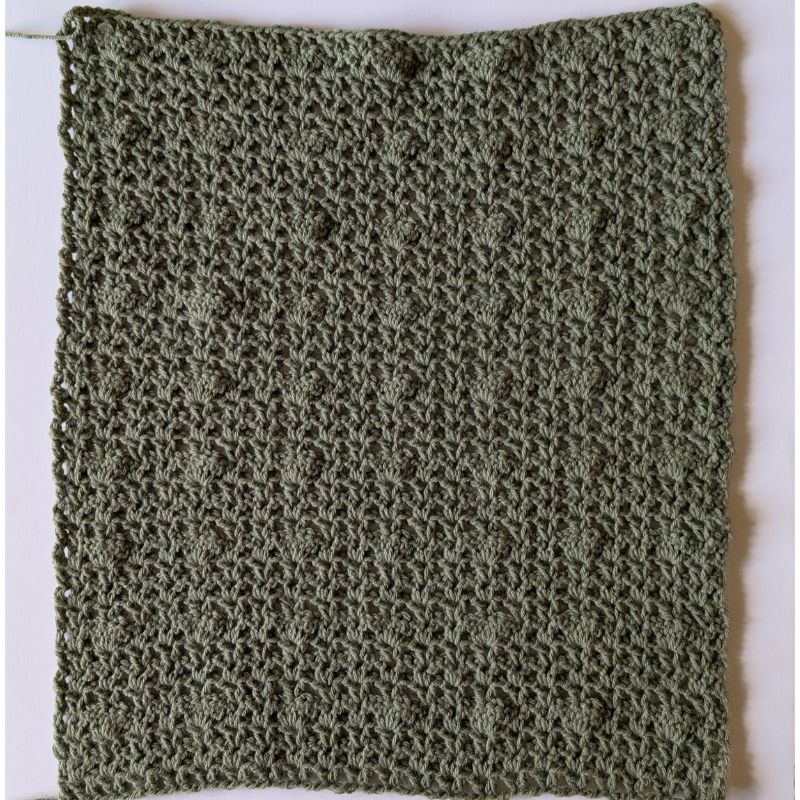
V-Neck Crochet Tie-Vest: Front Panel
Ch 58 (S), 67 (M), 76 (L), 85 (XL), 94 (2XL), 103 (3XL) or any multiple of 9 + 4
Work the same stitch pattern as the Back Panel, following Rows 1–9 and the established pattern repeat, until you reach the designated final row for your size.
- Size S: Row 22
- Size M and L: Row 24
- Sizes XL and 2XL: Row 26
- Sizes 3XL: Row 28
Do not fasten off if continuing directly into the straps.
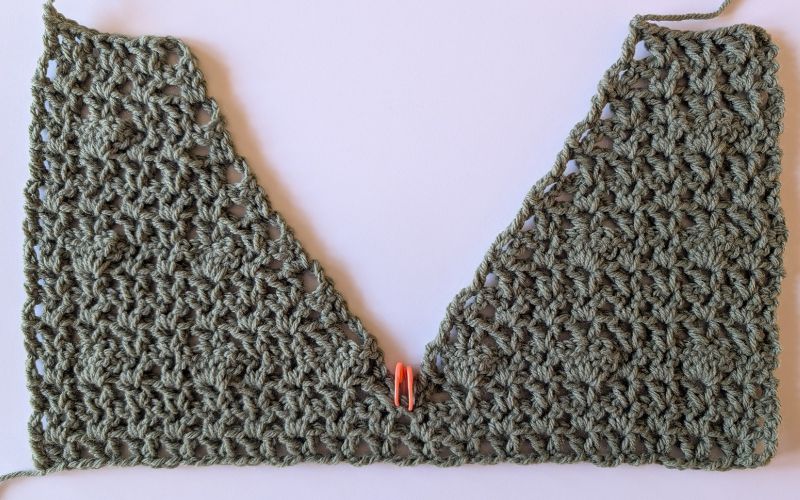
V-Neck Shaping
The front panel is divided into two sections to create the V-shaped neckline. First, work the front panel straight until you reach the designated row for your size. Then, place a stitch marker in the center of the panel.
You will now work the left and right sides separately, following the instructions for your size. The shaping is worked over 13 rows, with decreases along the inner edges to create the V-neckline.
Begin the V-neck shaping on the following row:
- Size S: Row 23
- Sizes M and L: Row 25
- Sizes XL and 2XL: Row 27
- Size 3XL: Row 29
Important: The left and right sides are worked separately. Make sure to follow the corresponding instructions for each side to keep the V-neck shaping symmetrical.
V-Neck Shaping – Size Small
After completing Row 22 of the front panel, place a stitch marker in the center of the panel. There will be 18 v- stitches (dc, ch 1, dc). Place one stitch marker on top of the 2nd dc from the (dc, ch 1, dc) – that will be the 9th v-stitch counts from the corner. And for the right side place the stitch marker on top of the first dc from the (dc, ch 1, dc) – that will be the 9th v-stitch counts from the right side corner. You will now work the left and right sides separately to create the V-shaped neckline.
Left Side (when wearing it)
Row 23: Ch 3 (counts as the first dc), turn, then work Row 2 of the stitch pattern across until 4 sts remain, counting from the stitch marker. Sk 3 sts, work 2 dc in the last st at the stitch marker.
Row 24: Ch 3 (counts as the first dc), turn, sk 2 sts, work 5 dc in the next st, then work Row 4 of the stitch pattern across.
Row 25: Ch 3 (counts as the first dc), turn, then work Row 5 of the stitch pattern across until 3 sts remain. Sk 2 sts, dc in the last st.
Row 26: Ch 3 (counts as the first dc), turn, dc in the next st, sk 3 sts, work (dc, ch 1, dc) in the next st, then work Row 2 of the stitch pattern across.
Row 27: Ch 3 (counts as the first dc), turn, then work Row 2 of the stitch pattern across until 3 sts remain, sk 2 sts, dc in the last st.
Row 28: Ch 3 (counts as the first dc), turn, work dc in the next st, sk 3 sts, work (dc, ch 1, dc) in the next st, then work Row 4 of the stitch pattern across.
Row 29: Ch 3 (counts as the first dc), turn, then work Row 5 of the stitch pattern across until 3 sts remain. Sk 2 sts, dc in the last st.
Row 30: Rep Row 26
Row 31: Rep Row 27
Row 32: Ch 3 (counts as the first dc), turn, dc in the next st, sk 3 sts, work (dc, ch 1, dc) in the next st, then work Row 4 of the stitch pattern across.
Row 33: Rep Row 29
Row 34: Rep Row 26
Row 35: Rep Row 27
Fasten off.
Right Side (when wearing it)
Row 23: Ch 3 (counts as the first dc), dc in the same first st, sk 3 sts, work (dc, ch 1, dc) in the next st, then work Row 2 of the stitch pattern across.
Row 24: Ch 3 (counts as the first dc), turn, then work Row 4 of the stitch pattern across until the last 3 sts remain, sk 2 sts, dc in the last st.
Row 25: Ch 3 (counts as the first dc), turn, sk 2 sts, work (dc, ch 1, dc) in the next st, then work Row 5 of the stitch pattern across.
Row 26: Ch 3 (counts as the first dc), turn, then work Row 2 of the stitch pattern across until the last 5 sts remain, sk 3 sts, dc in each of the last 2 sts.
Row 27: Ch 3 (counts as the first dc), turn, sk 2 sts, work (dc, ch 1, dc) in the next st, then work Row 2 of the stitch pattern across.
Row 28: Ch 3 (counts as the first dc), turn, then work Row 4 of the stitch pattern across until the last 5 sts remain, sk 3 sts, dc in each of the last 2 sts.
Row 29: Ch 3 (counts as the first dc), turn, sk 2 sts, work (dc, ch 1, dc) in the next st, then work Row 5 of the stitch pattern across.
Row 30: Rep Row 26
Row 31: Rep Row 27
Row 32: Ch 3 (counts as the first dc), turn, then work Row 4 of the stitch pattern across until the last 5 sts remain, sk 3 sts, dc in each of the last 2 sts.
Row 33: Rep Row 29
Row 34: Rep Row 26
Row 35: Rep Row 27
Fasten off.
V-Neck Crochet Tie-Vest: V-Neck Shaping – Size Medium
After completing Row 24 of the front panel, place a stitch marker in the center of the panel, at the middle of the 5-dc group. You will now work the left and right sides separately to create the V-shaped neckline.
Left Side (when wearing it)
Row 25: Ch 3 (counts as the first dc), turn, then work Row 5 of the stitch pattern across until 4 sts remain, counting from the stitch marker. Sk 3 sts, work 2 dc in the last st at the stitch marker.
Row 26: Ch 3 (counts as the first dc), turn, sk 2 sts, work (dc, ch 1, dc) in the next st, then work Row 2 of the stitch pattern across.
Row 27: Ch 3 (counts as the first dc), turn, then work Row 2 of the stitch pattern across until 5 sts remain. Sk 3 sts, dc in each of the last 2 sts.
Row 28: Ch 3 (counts as the first dc), turn, sk 2 sts, work (dc, ch 1, dc) in the next st, then work Row 4 of the stitch pattern across.
Row 29: Ch 3 (counts as the first dc), turn, then work Row 5 of the stitch pattern across until 6 sts remain. Sk 4 sts, dc in each of the last 2 sts.
Row 30: Ch 3, (counts as the first dc), turn, sk 2 sts, work (dc, ch 1, dc) in the next st, then work Row 2 of the stitch pattern across.
Row 31: Rep Row 27.
Row 32: Rep Row 28.
Row 33: Ch 3 (counts as the first dc), turn, then work Row 2 of the stitch pattern across until 5 sts remain. Sk 3 sts, dc in each of the last 2 sts.
Row 34: Rep Row 26.
Row 35: Rep Row 27.
Row 36: Ch 3 (counts as the first dc), turn, sk 2 sts, work 5 dc in the next st, then work Row 4 of the stitch pattern across.
Row 37: Ch 3 (counts as the first dc), turn, then work Row 5 of the stitch pattern across until 3 sts remain, sk 2 sts, dc in the last st.
Fasten off.
Right Side (when wearing it)
Attach yarn at the center of the same stitch marker to begin working the right side.
Row 25: Ch 3 (counts as the first dc), work 1 dc in the same first st. Sk 3 sts, work (dc, ch 1, dc) in the next st, then work Row 5 of the stitch pattern across.
Row 26: Ch 3 (counts as the first dc), turn, then work Row 2 of the stitch pattern across until 3 sts remain, sk 2 sts, dc in the last st.
Row 27: Ch 3 (counts as the first dc), turn, dc in the next st. Sk 3 sts, work (dc, ch 1, dc) in the next st, then work Row 2 of the stitch pattern across.
Row 28: Ch 3 (counts as the first dc), turn, then work Row 4 of the stitch pattern across until 3 sts remain, sk 2 sts, dc in the last st.
Row 29: Ch 3 (counts as the first dc), turn, work dc in the next st, sk 4 sts, work (dc, ch 1, dc) in the next st, then work Row 5 of the stitch pattern across.
Row 30: Ch 3 (counts as the first dc), turn, then work Row 2 of the stitch pattern across, until 3 sts remain, sk 2 sts, dc in the last st.
Row 31: Rep Row 27.
Row 32: Rep Row 28.
Row 33: Ch 3 (counts as the first dc), turn, work dc in the next st, sk 3 sts, work (dc, ch 1, dc) in the next st, then work Row 5 of the stitch pattern across.
Row 34: Rep Row 26.
Row 35: Rep Row 27.
Row 36: Ch 3 (counts as the first dc), turn, then work Row 4 of the stitch pattern across until 3 sts remain, sk 2 sts, dc in the last st.
Row 37: Ch 3, turn, sk 2 sts, work (dc, ch 1, dc) in the next st, then work Row 5 of the stitch pattern across.
Fasten off.
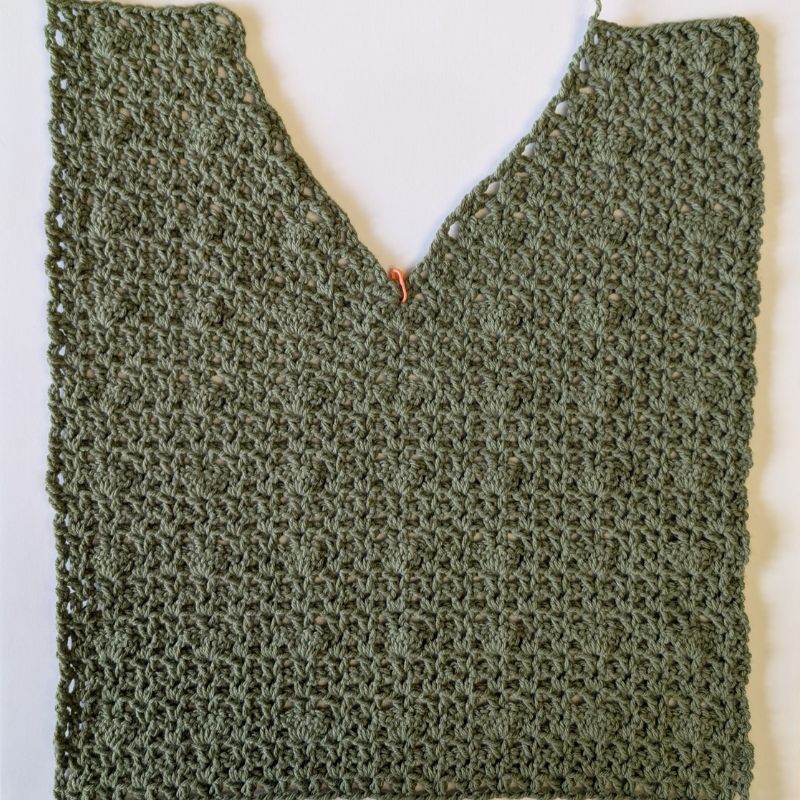
V-Neck Crochet Tie-Vest: V-Neck Shaping – Size L
After completing Row 24 of the front panel, place a stitch marker in the center of the panel. There will be 24 v- stitches (dc, ch 1, dc). Place one stitch marker on top of the 2nd dc from the (dc, ch 1, dc) – that will be the 12th v-stitch counts from the corner. And for the right side place the stitch marker on top of the first dc from the (dc, ch 1, dc) – that will be the 12th v-stitch counts from the right side corner. You will now work the left and right sides separately to create the V-shaped neckline.
Left Side (when wearing it)
Row 25: Ch 3 (counts as the first dc), turn, then work Row 5 of the stitch pattern across until 5 sts remain, counting from the stitch marker. Sk 3 sts, work dc in each of the last 2 sts.
Row 26: Ch 3 (counts as the first dc), turn, sk 2 sts, work (dc, ch 1, dc) in the next st, then work Row 2 of the stitch pattern across.
Row 27: Ch 3 (counts as the first dc), turn, then work Row 2 of the stitch pattern across until 5 sts remain. Sk 3 sts, dc in each of the last 2 sts.
Row 28: Ch 3 (counts as the first dc), turn, sk 2 sts, work (dc, ch 1, dc) in the next st, then work Row 4 of the stitch pattern across.
Row 29: Ch 3 (counts as the first dc), turn, then work Row 5 of the stitch pattern across until 5 sts remain. Sk 3 sts, dc in each of the last 2 sts.
Row 30: Ch 3, (counts as the first dc), turn, sk 2 sts, work (dc, ch 1, dc) in the next st, then work Row 2 of the stitch pattern across.
Row 31: Rep Row 27.
Row 32: Ch 3 (counts as the first dc), turn, sk 2 sts, work 5dc in the next st, then work Row 4 of the stitch pattern across.
Row 33: Ch 3 (counts as the first dc), turn, then work Row 5 of the stitch pattern across until 3 sts remain. Sk 2 sts, dc in the last st.
Row 34: Ch 3 (counts as the first dc), turn, dc in the next st, sk 3 sts, work (dc, ch 1, dc) in the next st, then work Row 2 of the stitch pattern across.
Row 35: Ch 3 (counts as the first dc), turn, then work Row 2 of the stitch pattern across until 3 sts remain. Sk 2 sts, dc in the last 2 st.
Row 36: Ch 3 (counts as the first dc), turn, work dc in the next st, sk 3 sts, work (dc, ch 1, dc) in the next st, then work Row 4 of the stitch pattern across.
Row 37: Ch 3 (counts as the first dc), turn, then work Row 5 of the stitch pattern across until 3 sts remain, sk 2 sts, dc in the last st.
Fasten off.
Right Side (when wearing it)
Attach yarn at the 2nd stitch marker to begin working the right side.
Row 25: Ch 3 (counts as the first dc), work 1 dc in the next st. Sk 3 sts, work (dc, ch 1, dc) in the next st, then work Row 5 of the stitch pattern across.
Row 26: Ch 3 (counts as the first dc), turn, then work Row 2 of the stitch pattern across until 3 sts remain, sk 2 sts, dc in the last st.
Row 27: Ch 3 (counts as the first dc), turn, work dc in the next st. Sk 3 sts, work (dc, ch 1, dc) in the next st, then work Row 2 of the stitch pattern across.
Row 28: Ch 3 (counts as the first dc), turn, then work Row 4 of the stitch pattern across until 3 sts remain, sk 2 sts, dc in the last st.
Row 29: Ch 3 (counts as the first dc), turn, dc in the next st, sk 3 sts, work (dc, ch 1, dc) in the next st, then work Row 5 of the stitch pattern across.
Row 30: Ch 3 (counts as the first dc), turn, then work Row 2 of the stitch pattern across, until 3 sts remain, sk 2 sts, dc in the last st.
Row 31: Rep Row 27.
Row 32: Rep Row 28
Row 33: Ch 3 (counts as the first dc), turn, sk 2 sts, work (dc, ch 1, dc) in the next st, then work Row 5 of the stitch pattern across.
Row 34: Ch 3 (counts as the first dc), turn, then work Row 2 of the stitch pattern across until 5 sts remain, sk 3 sts, dc in each of the last 2 sts.
Row 35: Ch 3 (counts as the first dc), turn, sk 2 sts, work (dc, ch 1, dc) in the next st, then work Row 2 of the stitch pattern across.
Row 36: Ch 3 (counts as the first dc), turn, then work Row 4 of the stitch pattern across until 5 sts remain, sk 3 sts, dc in each of the last 2 sts.
Row 37: Ch 3 (counts as the first dc), turn, sk 2 sts, work (dc, ch 1, dc) in the next st, then work Row 5 of the stitch pattern across.
Fasten off.
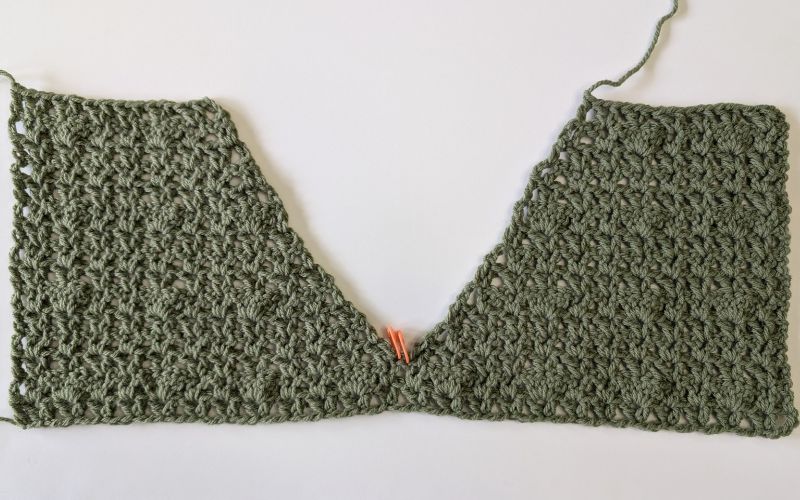
V-Neck Crochet Tie-Vest: V-Neck Shaping – Size XL
After completing Row 26 of the front panel, place a stitch marker in the center of the panel. There will be the ch-1 space from the (dc, ch 1, dc) – that will be the 14th v-stitch counts from the corner. You will now work the left and right sides separately to create the V-shaped neckline.
Left Side (when wearing it)
Row 27: Ch 3 (counts as the first dc), turn, then work Row 2 of the stitch pattern across until 3 sts remain, counting from the stitch marker. Sk 2 sts, work 1 dc in the last st at the stitch marker.
Row 28: Ch 3 (counts as the first dc), turn, dc in the next st, sk 3 sts, work (dc, ch 1, dc) in the next st, then work Row 4 of the stitch pattern across.
Row 29: Ch 3 (counts as the first dc), turn, then work Row 5 of the stitch pattern across until 3 sts remain. Sk 2 sts, dc in the last st.
Row 30: Ch 3 (counts as the first dc), turn, work dc in the next st, sk 3 sts, work (dc, ch 1, dc) in the next st, then work Row 2 of the stitch pattern across.
Row 31: Ch 3 (counts as the first dc), turn, then work Row 2 of the stitch pattern across until 3 sts remain, sk 2 sts, dc in the last st.
Row 32: Rep Row 28
Row 33: Rep Row 29
Row 34: Rep Row 30
Row 35: Rep Row 31
Row 36: Ch 3 (counts as the first dc), turn, work dc in the next st, sk 3 sts, work 5dc in the next st, then work Row 4 of the stitch pattern across.
Row 37: Ch 3 (counts as the first dc), turn, then work Row 5 of the stitch pattern across until 4 sts remain, sk 2 sts, dc in each of the last 2 sts.
Row 38: Ch 3 (counts as the first dc), turn, sk 2 sts, work (dc, ch 1, dc) in the next st, then work Row 2 of the stitch pattern across.
Row 39: Ch 3 (counts as the first dc), turn, then work Row 2 of the stitch pattern across until 5 sts remain, sk 3 sts, dc in each of the last 2 sts.
Fasten off.
Right Side (when wearing it)
Attach yarn at the center of the same stitch marker to begin working the right side.
Row 27: Ch 3 (counts as the first dc), sk 2 sts, work (dc, ch 1, dc) in the next st, then work Row 2 of the stitch pattern across.
Row 28: Ch 3 (counts as the first dc), turn, then work Row 4 of the stitch pattern across until 5 sts remain. Sk 3 sts, dc in each of the last 2 sts.
Row 29: Ch 3 (counts as the first dc), turn, sk 2 sts, work (dc, ch 1, dc) in the next st, then work Row 5 of the stitch pattern across.
Row 30: Ch 3 (counts as the first dc), turn, then work Row 2 of the stitch pattern across until 5 sts remain. Sk 3 sts, dc in each of the last 2 sts.
Row 31: Ch 3 (counts as the first dc), turn, sk 2 sts, work (dc, ch 1, dc) in the next st, then work Row 2 of the stitch pattern across.
Row 32: Rep Row 28
Row 33: Rep Row 29
Row 34: Rep Row 30
Row 35: Rep Row 31
Row 36: Ch 3 (counts as the first dc), turn, then work Row 4 of the stitch pattern across until 5 sts remain. Sk 3 sts, dc in each of the last 2 sts.
Row 37: Ch 3 (counts as the first dc), turn, work dc in the next st, sk 2 sts, (dc, ch 1, dc) in the next st, then work Row 5 of the stitch pattern across.
Row 38: Ch 3 (counts as the first dc), turn, then work Row 2 of the stitch pattern across until 3 sts remain. Sk 2 sts, dc in the last st.
Row 39: Ch 3 (counts as the first dc), turn, dc in the next st, sk 3 sts, (dc, ch 1, dc) in the next st then work Row 2 of the stitch pattern across.
Fasten off.
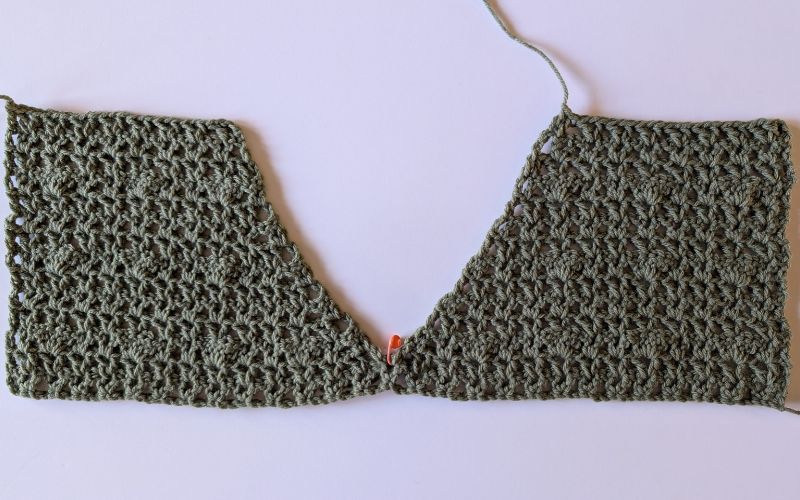
V-Neck Crochet Tie-Vest: V-Neck Shaping – Size 2XL
After completing Row 26 of the front panel, place a stitch marker in the center of the panel. There will be 30 v- stitches (dc, ch 1, dc). Place one stitch marker on top of the 2nd dc from the (dc, ch 1, dc) – that will be the 15th v-stitch counts from the corner. And for the right side place the stitch marker on top of the first dc from the (dc, ch 1, dc) – that will be the 15th v-stitch counts from the right side corner. You will now work the left and right sides separately to create the V-shaped neckline.
Left Side (when wearing it)
Row 27: Ch 3 (counts as the first dc), turn, then work Row 2 of the stitch pattern across until 4 sts remain, counting from the stitch marker. Sk 2 sts, work dc in each of the last 2 sts by the stitch marker.
Row 28: Ch 3 (counts as the first dc), turn, sk 2 sts, work 5dc in the next st, then work Row 4 of the stitch pattern across.
Row 29: Ch 3 (counts as the first dc), turn, then work Row 5 of the stitch pattern across until 3 sts remain. Sk 2 sts, dc in the last st.
Row 30: Ch 3 (counts as the first dc), turn, work dc in the next st, sk 3 sts, work (dc, ch 1, dc) in the next st, then work Row 2 of the stitch pattern across.
Row 31: Ch 3 (counts as the first dc), turn, then work Row 2 of the stitch pattern across until 3 sts remain, sk 2 sts, dc in the last st.
Row 32: Ch 3 (counts as the first dc), turn, work dc in the next st, sk 3 sts, work (dc, ch 1, dc) in the next st, then work Row 4 of the stitch pattern across.
Row 33: Rep Row 29
Row 34: Rep Row 30
Row 35: Rep Row 31
Row 36: Rep Row 32
Row 37: Rep Row 29
Row 38: Rep Row 30
Row 39: Rep Row 31
Fasten off.
Right Side (when wearing it)
Row 27: Ch 3 (counts as the first dc), work dc in the next st, sk 2 sts, work (dc, ch 1, dc) in the next st, then work Row 2 of the stitch pattern across.
Row 28: Ch 3 (counts as the first dc), turn, then work Row 4 of the stitch pattern across until 3 sts remain. Sk 2 sts, dc in the last st.
Row 29: Ch 3 (counts as the first dc), sk 2 sts, work (dc, ch 1, dc) in the next st, then work Row 5 of the stitch pattern across.
Row 30: Ch 3 (counts as the first dc), turn, then work Row 2 of the stitch pattern across until 5 sts remain. Sk 3 sts, dc in each of the last 2 sts.
Row 31: Ch 3 (counts as the first dc), turn, sk 2 sts, work (dc, ch 1, dc) in the next st, then work Row 2 of the stitch pattern across.
Row 32: Ch 3 (counts as the first dc), turn, then work Row 4 of the stitch pattern across until 5 sts remain. Sk 3 sts, dc in each of the last 2 sts.
Row 33: Rep Row 29
Row 34: Rep Row 30
Row 35: Rep Row 31
Row 36: Rep Row 32
Row 37: Rep Row 29
Row 38: Rep Row 30
Row 39: Rep Row 31
Fasten off.
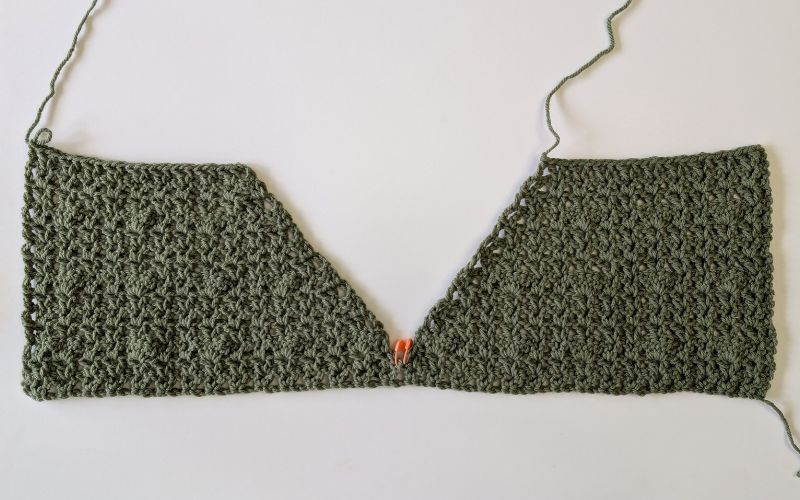
V-Neck Crochet Tie-Vest: V-Neck Shaping – Size 3XL
After completing Row 28 of the front panel, place a stitch marker in the center of the panel, at the middle of the 5-dc group. You will now work the left and right sides separately to create the V-shaped neckline from Row 29 to Row 41
Repeat the pattern from the V-Neck Shaping – Size Medium.
Assembly Instructions for the V-Neck Crochet Tie-Vest
Joining the Panels
Place the Front Panel and Back Panel with the right sides facing each other. The vest should be inside out while you join the seams.
Join the Shoulders
Using a slip stitch seam, join the front and back panels at both shoulders. Leave the neckline opening unworked.
Once both shoulder seams are complete, turn the vest right side out.
Bottom Border
Place the vest with the right side facing you.
Join yarn at one corner of the bottom edge.
Row 1: Ch 1, sl st in each st across.
Row 2: Ch 1, turn, sl st in the FLO of each st across.
Rows 3–6: Rep Row 2.
Fasten off.
Side Borders — Left and Right Sides
With the right side of the vest facing you, join yarn at the corner of one side edge.
Row 1: Ch 1, sl st evenly along the side edge.
Row 2: Ch 1, turn, sl st in the FLO of each st across.
Rows 3–6: Rep Row 2.
Fasten off.
Repeat the same instructions along the opposite side edge.
Tie Cords (4 counts)
Make 4 tie cords in total: two on each side of the vest.
Attach yarn at the 30th stitch, counting upward from the bottom edge, on each side of the front and back panels.
Foundation: Ch 1, then sl st 3 times along the panel edge.
Chain 55 or adjust the chain length to your preference.
Row 1: Sl st in the second ch from the hook.
Row 2: Sl st 2 times along the panel edge, then sl st in the FLO of each st across the tie cord.
Row 3: Ch 1, sl st in the FLO of each st across.
Fasten off.
Repeat to make the remaining tie cords.
Neckline Border
With the right side of the vest facing you, join yarn in any stitch along the neckline.
Round 1: Ch 1, sc in each st around the neckline. Join with a sl st to the first sc.
Round 2: Ch 1, sl st in the BLO of each st around. Join with a sl st to the first sl st.
Fasten off.
Your V-Neck Crochet Tie-Vest is now complete!
Video Tutorial
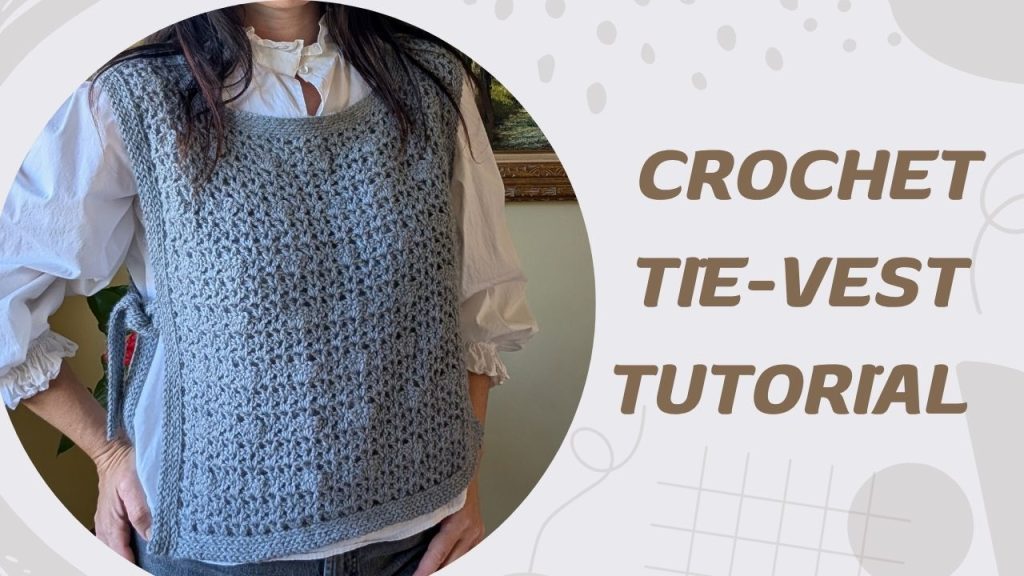
Would you like a little extra help with this crochet vest? You can follow along with my original Zarina Crochet Sweater Vest video tutorial! The video demonstrates the textured stitch pattern and the basic construction of the vest, including the panels and side ties. Although the video shows the original neckline design, you can use the written instructions on this page to create the V-neck version, including the front-panel decreases and modified neckline border.
Watch the video below and follow the written pattern above to make your own V-neck crochet tie vest!
Love This Design? Try the Original Version!
If you prefer a different neckline, take a look at my original Zarina Crochet Sweater Vest – Free Tie Vest Pattern & Video Tutorial. It features the same beautiful textured stitch pattern and adjustable side ties, but with a different front neckline design. Both versions are lovely layering pieces and fun additions to your handmade wardrobe!