
Table of Contents
- About the Zarina Crochet Sweater Vest
- Why You’ll Love This Crochet Sweater Vest
- How the Zarina Tie-Vest Is Constructed
- Materials You’ll Need
- Yarn Substitutions
- Crochet Sweater Vest Gauge
- Finished Measurements
- Crochet Abbreviations
- Zarina Crochet Sweater Vest Pattern
- Back Panel
- Front Panel
- Shoulder Seam
- Side Ties
- Finishing
- Video Tutorial
- More Free Crochet Patterns
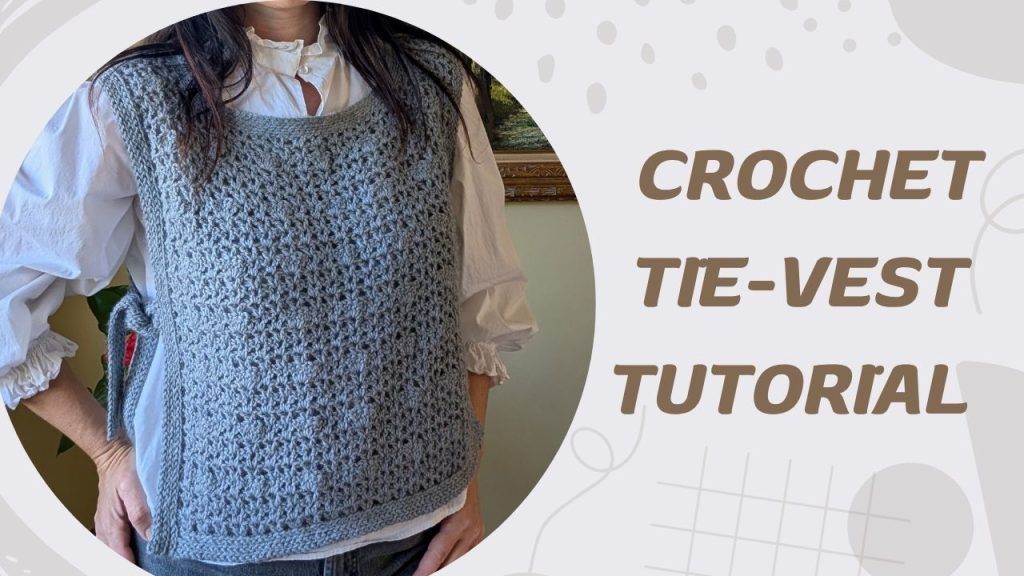
The Zarina Crochet Sweater Tie-Vest is a stylish and versatile crochet sweater vest that is perfect for layering throughout the year. With its beautiful textured stitch pattern, simple construction, and adjustable tie sides, this vest can easily be dressed up or down and worn over a blouse, T-shirt, dress, or long-sleeve top. Whether you’re looking for a cozy layer for cooler days or a lightweight handmade piece for spring and summer, this free crochet sweater vest pattern is a fun project to add to your wardrobe. I’ve included the complete written pattern along with a step-by-step YouTube video tutorial to help you create your own Zarina vest.
Why You’ll Love the Zarina Crochet Sweater Vest
- Free crochet pattern with a step-by-step video tutorial
- Versatile design that can be worn in every season
- Tie sides allow you to adjust the fit
- Beautiful textured crochet stitch pattern
- Easy to layer over shirts, blouses, dresses, or T-shirts
- A handmade wardrobe piece you can customize with your favorite yarn and color
How the Zarina Tie-Vest is Constructed
The Zarina Tie-Vest is constructed from two separate panels that are joined together at the shoulders. Each panel is worked individually, then connected at the top to create the basic structure of the vest. The open sides and front allow the vest to drape naturally on the body, while the tie closure adds an adjustable and stylish finishing touch. This simple construction makes the Zarina Tie-Vest easy to assemble while giving it a beautiful, flattering fit.
Materials You’ll Need
For the Zarina Crochet Sweater Tie-Vest, I used Lion Brand Pound of Love, a worsted-weight (Category 4) acrylic yarn. This yarn creates a soft, textured fabric that works beautifully with the stitch pattern while making the vest comfortable for layering throughout the year.
- Yarn: Lion Brand Pound of Love
- You will need approximately 250 (275, 315, 365, 400, 450 )g of yarn for sizes S (M, L, XL, 2XL, 3XL).
- Fiber: 100% acrylic
- Yarn weight: Worsted weight (Category 4)
- Crochet hook: 5 mm (US H/8)
- Yarn color: Gray
Yarn Substitutions
If you can’t find Lion Brand Pound of Love, you can substitute another worsted-weight (Category 4) yarn with a similar thickness and drape. Look for a smooth acrylic yarn or an acrylic blend that will show off the textured stitches of the Zarina Crochet Sweater Tie-Vest.
When choosing a substitute, keep in mind that different yarns can produce slightly different results, even when they share the same yarn weight. Your finished vest may vary in size, texture, and drape depending on the yarn you choose and your crochet tension.
Important: Before starting the vest, make a gauge swatch using your chosen yarn and the 5 mm crochet hook. Adjust your hook size if necessary to match the pattern gauge. Matching gauge will help you achieve the intended finished measurements.
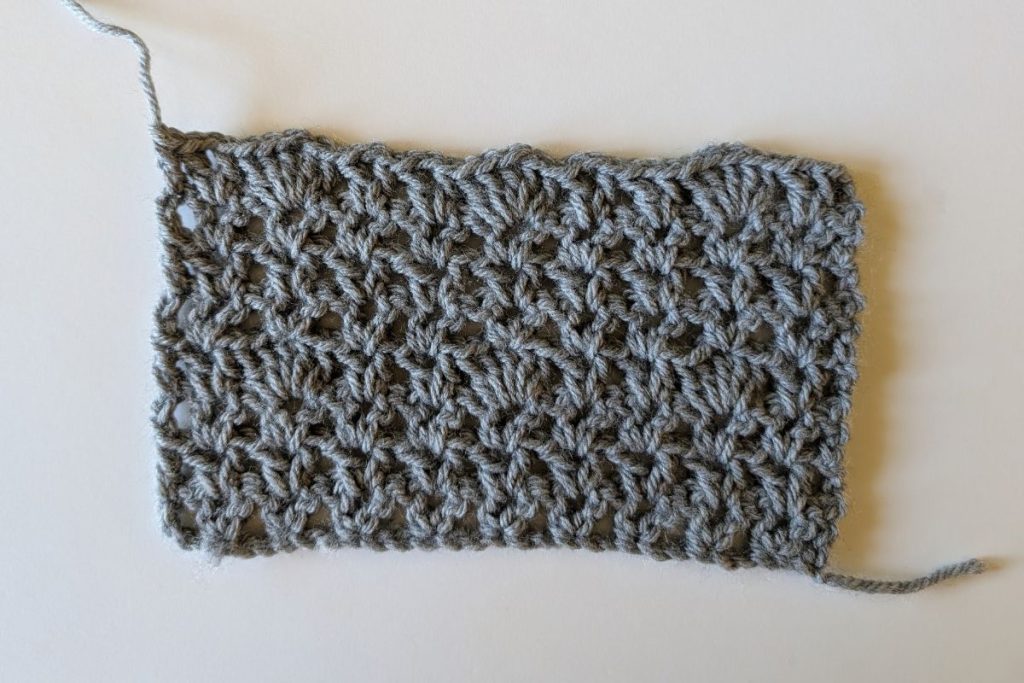
Zarina Crochet Tie-Vest: Gauge
Gauge is important when crocheting a garment because it determines the final size and fit of your Zarina Crochet Tie-Vest .
16 stitches × 8 rows = 4 × 4 in (10 × 10 cm)
Zarina Crochet Tie-Vest: Pattern Notes
- The pattern is written using US crochet terminology.
- The starting chain is worked as a multiple of 9 + 4 to maintain the stitch repeat.
- Ch 3 counts as the first dc throughout.
- Size from the pictures is Medium.
- Instructions written between asterisks
* *are repeated as indicated. - The gauge for this pattern is measured before steam blocking.
- Take your time checking your stitch count, especially when beginning each panel, to ensure the stitch pattern remains aligned.
- The front and back panels are worked almost straight, but includes simple neckline shaping.
- Panels are sewn together at the shoulders
Zarina Crochet Tie-Vest: Sizes and Finished Measurements
Size M
All measurements are taken with the borders included.
| Measurement | Before Blocking | After Steam Blocking |
|---|---|---|
| Length | 20 in (51 cm) | 21 in (53.5 cm) |
| Width, including borders | 18 in (45.5 cm) | 18 in (45.5 cm) |
| Border width, each side | 1 in (2.5 cm) | 1 in (2.5 cm) |
Blocking note: After steam blocking, the vest grew approximately 1 inch (2.5 cm) in length, while the width remained unchanged. The measurements include the side borders, which are approximately 1 inch wide on each side. Results may vary depending on yarn and crochet tension.
| Size | Width (inches) | Length (inches) |
|---|---|---|
| S | 15.8 | 18 |
| M | 18 | 20 |
| L | 20.2 | 20 |
| XL | 22.4 | 21 |
| 2XL | 24.6 | 21 |
| 3XL | 26.8 | 22 |
Zarina Crochet Tie-Vest: Crochet Abbreviations
The following US crochet terms are used throughout this pattern:
- ch – chain
- sl st – slip stitch
- dc – double crochet
- sp – space
- st (s) – stitch (es)
- rep – repeat
- sk – skip
- BLO – back loop only
- FLO – front loop only
- **: repeat instructions between asterisks as described
- ard: around
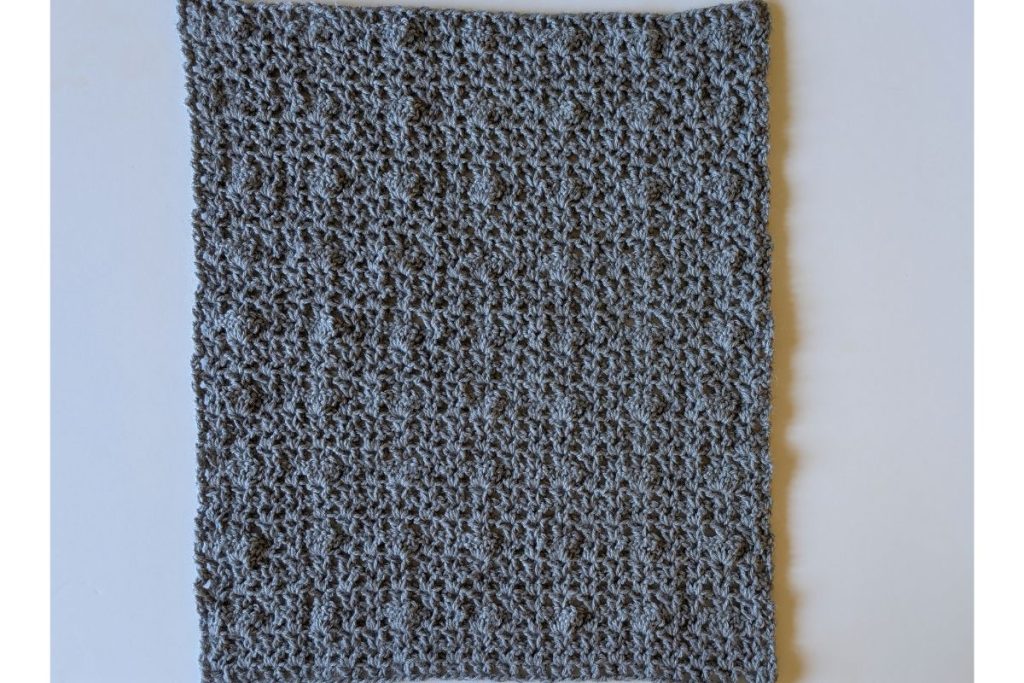
Zarina Crochet Tie-Vest: Back Panel
Ch 58 (S), 67 (M), 76 (L), 85 (XL), 94 (2XL), 103 (3XL) or any multiple of 9 + 4
Row 1: (Dc, ch 1, dc) in the 5th ch from the hook. *Sk 2 ch, (dc, ch 1, dc) in the next ch. Rep from * across. Sk 1 ch, dc in the last ch.
Row 2: Ch 3, turn, sk 1 st, (dc, ch 1, dc) in the next st. *Sk 2 sts, (dc, ch 1, dc) in the next st. Rep from * across. Sk 1 st, dc in the last st.
Row 3: Repeat Row 2
Row 4: Ch 3, turn, sk 1 st, (dc, ch 1, dc) in the next st. *Sk 2 sts, 5 dc in the next st, sk 2 sts, (dc, ch 1, dc) in the next st, sk 2 sts, (dc, ch 1, dc) in the next st. Rep from * across. Sk 2 sts, (dc, ch 1, dc) in the next st. Sk 1 st, dc in the last st.
Row 5: Ch 3, turn, sk 1 st, (dc, ch 1, dc) in the next st. *Sk 3 sts, (dc, ch 1, dc) in the next st, sk 3 sts, (dc, ch 1, dc) in the next st, sk 2 sts, (dc, ch 1, dc) in the next st. Rep from * across. Sk 1 st, dc in the last st.
Row 6: Rep Row 2.
Row 7: Rep Row 2.
Row 8: Rep Row 4.
Row 9: Rep Row 5.
Continue the pattern: Repeat Rows 2–6 until the back panel reaches the designated final row for your size.
- Size S: Row 35
- Sizes M and L: Row 37
- Sizes XL and 2XL: Row 39
- Size 3XL: Row 41
Fasten off.
Zarina Crochet Tie-Vest: Front Panel
Ch 58 (S), 67 (M), 76 (L), 85 (XL), 94 (2XL), 103 (3XL) or any multiple of 9 + 4
Work the same stitch pattern as the Back Panel, following Rows 1–9 and the established pattern repeat, until you reach the designated final row for your size.
- Size S: Row 29
- Size M and L: Row 30
- Sizes XL and 2XL: Row 32
- Sizes 3XL: Row 34
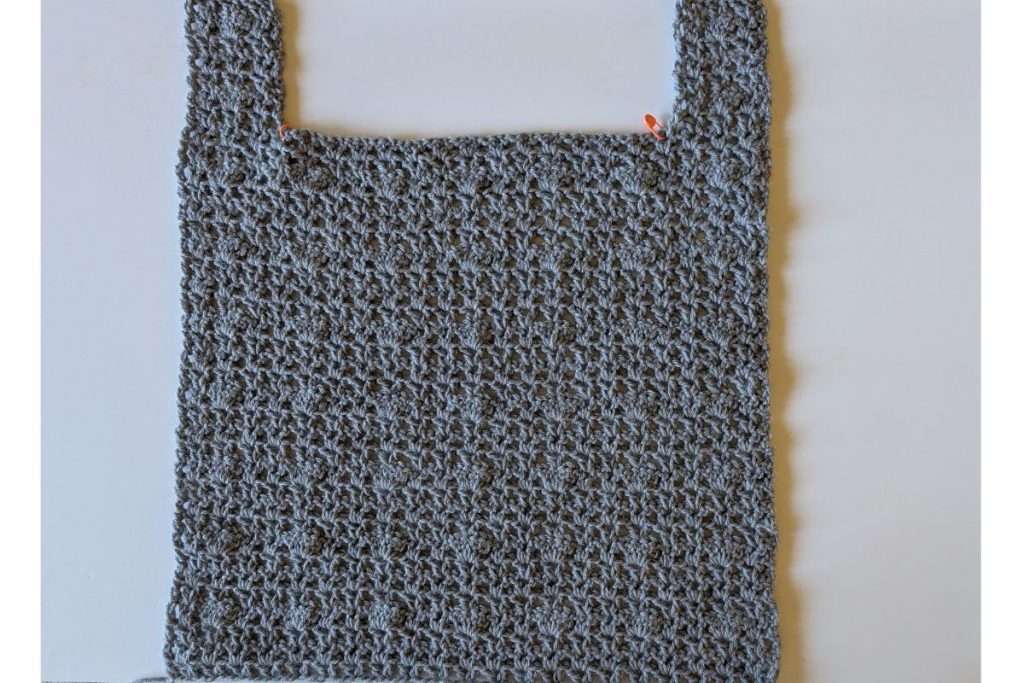
Do not fasten off if continuing directly into the straps.
The remaining rows are used to create the straps.
The straps are worked as continuations of the Front Panel. With the right side facing, place stitch markers to indicate where the straps will begin.
Size S
Left Strap
With the right side of the Front Panel facing you, place a stitch marker in the 4th ch-1 space formed by the (dc, ch 1, dc) stitch pattern counted starting from the corner.
Row 30: Ch 3, turn, sk 1 st, (dc, ch 1, dc) in the next st. *Sk 2 sts, (dc, ch 1, dc) in the next st. Rep from * one more time. Sk 2 sts, dc in the marked st.
Row 31: Ch 3, turn, sk 1 st, (dc, ch 1, dc) in the next st. *Sk 2 sts, (dc, ch 1, dc) in the next st. Rep from * one more time. Sk 1 st, dc in the last st.
Row 32: Ch 3, turn, sk 1 st, (dc, ch 1, dc) in the next st. Sk 2 sts, 5 dc in the next st, sk 2 sts, (dc, ch 1, dc) in the next st. Sk 1 st, dc in the last st.
Row 33: Ch 3, turn, sk 1 st, (dc, ch 1, dc) in the next st. *Sk 3 sts, (dc, ch 1, dc) in the next st, sk 3 sts, (dc, ch 1, dc) in the next st. Rep from * one more time. Sk 1 st, dc in the last st.
Rows 34–35: Rep Row 31.
Fasten off.
Right Strap
With the right side of the Front Panel facing you, join yarn in the 4th ch-1 space formed by the (dc, ch 1, dc) stitch pattern counted starting from the corner.
Row 30: Ch 3, sk 2 sts, (dc, ch 1, dc) in the next st. *Sk 2 sts, (dc, ch 1, dc) in the next st. Rep from * one more time. Sk 1 st, dc in the last st.
Row 31: Ch 3, turn, sk 1 st, (dc, ch 1, dc) in the next st. *Sk 2 sts, (dc, ch 1, dc) in the next st. Rep from * one more time. Sk 1 st, dc in the last st.
Row 32: Rep Row 32 of the Left Strap.
Row 33: Rep Row 33 of the Left Strap.
Rows 34–35: Rep Row 31 of the Left Strap.
Fasten off.
Sizes M and L
Left Strap
With the right side of the Front Panel facing you, place a stitch marker in the 4th ch-1 space formed by the (dc, ch 1, dc) stitch pattern counted starting from the corner.
Row 31: Ch 3, turn, sk 1 st, (dc, ch 1, dc) in the next st. *Sk 2 sts, (dc, ch 1, dc) in the next st. Rep from * one more time. Sk 2 sts, dc in the marked st.
Row 32: Ch 3, turn, sk 1 st, (dc, ch 1, dc) in the next st. Sk 2 sts, 5 dc in the next st, sk 2 sts, (dc, ch 1, dc) in the next st. Sk 1 st, dc in the last st.
Row 33: Ch 3, turn, sk 1 st, (dc, ch 1, dc) in the next st. *Sk 3 sts, (dc, ch 1, dc) in the next st, sk 3 sts, (dc, ch 1, dc) in the next st. Rep from * one more time. Sk 1 st, dc in the last st.
Rows 34–35: Ch 3, turn, sk 1 st, (dc, ch 1, dc) in the next st. *Sk 2 sts, (dc, ch 1, dc) in the next st. Rep from * one more time. Sk 1 st, dc in the last st.
Row 36: Rep Row 32.
Row 37: Rep Row 33.
Fasten off.
Right Strap
With the right side of the Front Panel facing you, join yarn in the 4th ch-1 space formed by the (dc, ch 1, dc) stitch pattern counted starting from the corner.
Row 31: Ch 3, sk 2 sts, (dc, ch 1, dc) in the next st. *Sk 2 sts, (dc, ch 1, dc) in the next st. Rep from * one more time. Sk 2 sts, dc in the last st.
Row 32: Rep Row 32 of the Left Strap.
Row 33: Rep Row 33 of the Left Strap.
Rows 34–35: Rep Row 34 of the Left Strap.
Row 36: Rep Row 32 of the Left Strap.
Row 37: Rep Row 33 of the Left Strap.
Fasten off.
Sizes XL and 2XL
Left Strap
With the right side of the Front Panel facing you, place a stitch marker in the 5th ch-1 space formed by the (dc, ch 1, dc) stitch pattern counted starting from the corner.
Row 33: Ch 3, turn, sk 1 st, (dc, ch 1, dc) in the next st. Sk 3 sts, (dc, ch 1, dc) in the next st, sk 3 sts, (dc, ch 1, dc) in the next st, sk 2 sts, (dc, ch 1, dc) in the next st. Sk 2 sts, dc in the marked st.
Rows 34–35: Ch 3, turn, sk 1 st, (dc, ch 1, dc) in the next st. *Sk 2 sts, (dc, ch 1, dc) in the next st. Rep from * two more times. Sk 1 st, dc in the last st.
Row 36: Ch 3, turn, sk 1 st, (dc, ch 1, dc) in the next st. *Sk 2 sts, (dc, ch 1, dc) in the next st. Rep from * one more time. Sk 2 sts, 5 dc in the next st, sk 2 sts, (dc, ch 1, dc) in the next st. Sk 1 st, dc in the last st.
Row 37: Ch 3, turn, sk 1 st, (dc, ch 1, dc) in the next st. Sk 3 sts, (dc, ch 1, dc) in the next st, sk 3 sts, (dc, ch 1, dc) in the next st, sk 2 sts, (dc, ch 1, dc) in the next st. Sk 2 sts, dc in the last st.
Rows 38–39: Rep Row 34.
Fasten off.
Right Strap
With the right side of the Front Panel facing you, join yarn in the 5th ch-1 space formed by the (dc, ch 1, dc) stitch pattern counted starting from the corner.
Row 33: Ch 3, sk 2 sts, (dc, ch 1, dc) in the next st. *Sk 2 sts, (dc, ch 1, dc) in the next st. Rep from * one more time. Sk 3 sts, (dc, ch 1, dc) in the next st, sk 3 sts, (dc, ch 1, dc) in the next st. Sk 1 st, dc in the last st.
Rows 34–35: Ch 3, turn, sk 1 st, (dc, ch 1, dc) in the next st. *Sk 2 sts, (dc, ch 1, dc) in the next st. Rep from * two more times. Sk 1 st, dc in the last st.
Row 36: Ch 3, turn, sk 1 st, (dc, ch 1, dc) in the next st. Sk 2 sts, 5 dc in the next st, sk 2 sts, (dc, ch 1, dc) in the next st, sk 2 sts, (dc, ch 1, dc) in the next st. Sk 1 st, dc in the last st.
Row 37: Rep Row 37 of the Left Strap.
Rows 38–39: Rep Row 34.
Fasten off.
Size 3XL
Left Strap
With the right side of the Front Panel facing you, place a stitch marker in the 6th ch-1 space formed by the (dc, ch 1, dc) stitch pattern counted starting from the corner.
Row 35: Ch 3, turn, sk 1 st, (dc, ch 1, dc) in the next st. *Sk 2 sts, (dc, ch 1, dc) in the next st. Rep from * four more times. Sk 1 st, dc in the marked st.
Row 36: Ch 3, turn, sk 1 st, (dc, ch 1, dc) in the next st. *Sk 2 sts, (dc, ch 1, dc) in the next st. Rep from * two more times. Sk 2 sts, 5 dc in the next st, sk 2 sts, (dc, ch 1, dc) in the next st. Sk 1 st, dc in the last st.
Row 37: Ch 3, turn, sk 1 st, (dc, ch 1, dc) in the next st. Sk 3 sts, (dc, ch 1, dc) in the next st, sk 3 sts, (dc, ch 1, dc) in the next st. *Sk 2 sts, (dc, ch 1, dc) in the next st. Rep from * two more times. Sk 1 st, dc in the last st.
Rows 38–39: Rep Row 35.
Row 40: Rep Row 36.
Row 41: Rep Row 37.
Fasten off.
Right Strap
With the right side of the Front Panel facing you, join yarn in the 6th ch-1 space formed by the (dc, ch 1, dc) stitch pattern counted starting from the corner.
Row 35: Ch 3, sk 2 sts, (dc, ch 1, dc) in the next st. *Sk 2 sts, (dc, ch 1, dc) in the next st. Rep from * four more times. Sk 1 st, dc in the last st.
Row 36: Ch 3, turn, sk 1 st, (dc, ch 1, dc) in the next st. Sk 2 sts, 5 dc in the next st. *Sk 2 sts, (dc, ch 1, dc) in the next st. Rep from * three more times. Sk 1 st, dc in the last st.
Row 37: Ch 3, turn, sk 1 st, (dc, ch 1, dc) in the next st. *Sk 2 sts, (dc, ch 1, dc) in the next st. Rep from * two more times. Sk 3 sts, (dc, ch 1, dc) in the next st, sk 3 sts, (dc, ch 1, dc) in the next st. Sk 1 st, dc in the last st.
Rows 38–39: Rep Row 35.
Row 40: Rep Row 36.
Row 41: Rep Row 37.
Fasten off.
Assembly Instructions for the Zarina Crochet Sweater Tie-Vest
Joining the Panels
Place the Front Panel and Back Panel with the right sides facing each other. The vest should be inside out while you join the seams.
Join the Shoulders
Using a slip stitch seam, join the front and back panels at both shoulders. Leave the neckline opening unworked.
Once both shoulder seams are complete, turn the vest right side out.
Neckline Border
With the right side of the vest facing you, join yarn in any stitch along the neckline.
Round 1: Ch 1, sl st in each st around the neckline. Join with a sl st to the first sl st.
Round 2: Ch 1, sl st in the BLO of each st around. Join with a sl st to the first sl st.
Rounds 3–6: Rep Round 2.
Fasten off.
Bottom Border
Place the vest with the right side facing you.
Join yarn at one corner of the bottom edge.
Row 1: Ch 1, sl st in each st across.
Row 2: Ch 1, turn, sl st in the FLO of each st across.
Rows 3–6: Rep Row 2.
Fasten off.
Side Borders — Left and Right Sides
With the right side of the vest facing you, join yarn at the corner of one side edge.
Row 1: Ch 1, sl st evenly along the side edge.
Row 2: Ch 1, turn, sl st in the FLO of each st across.
Rows 3–6: Rep Row 2.
Fasten off.
Repeat the same instructions along the opposite side edge.
Tie Cords
Make 4 tie cords in total: two on each side of the vest.
Attach yarn at the 34th stitch, counting upward from the bottom edge, on each side of the front and back panels.
Foundation: Ch 1, then sl st 6 times along the panel edge.
Chain 50 or adjust the chain length to your preference.
Row 1: Sl st in the second ch from the hook.
Row 2: Sl st 2 times along the panel edge, then sl st in the FLO of each st across the tie cord.
Row 3: Ch 1, sl st in the FLO of each st across.
Row 4: Rep Row 2.
Row 5: Rep Row 3.
Row 6: Rep Row 2.
Fasten off.
Repeat to make the remaining tie cords.
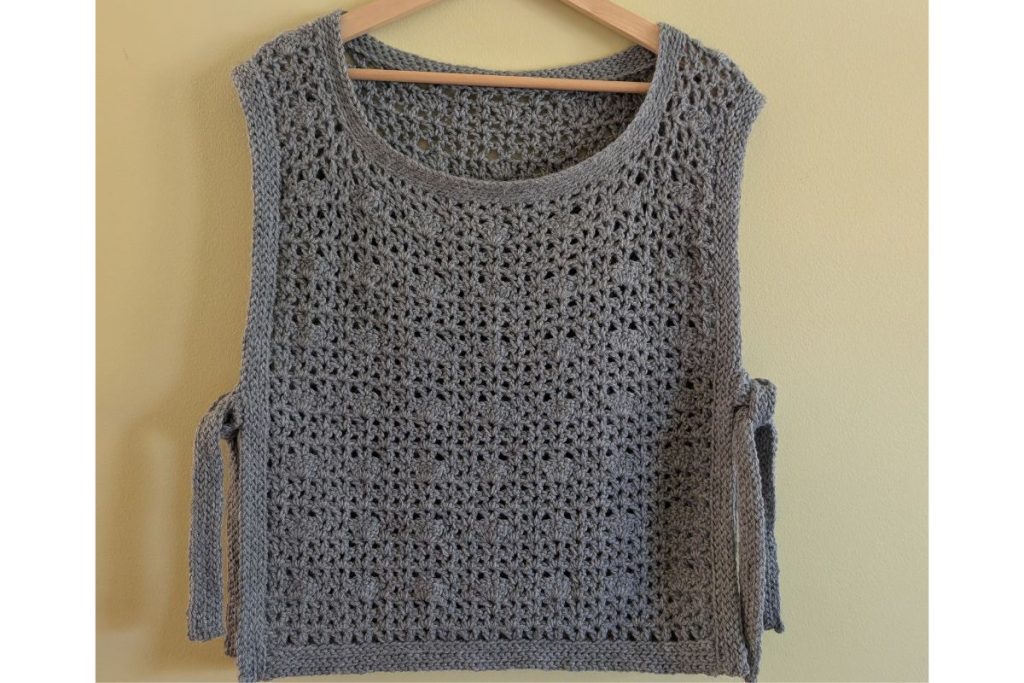
Your Zarina Crochet Sweater Tie-Vest is now complete!
Zarina Crochet Tie-Vest: Video Tutorial
Would you like to crochet along with me? Watch the Zarina Crochet Sweater Tie-Vest video tutorial for a step-by-step visual guide to making this stylish, textured crochet vest. Follow along as you work through the stitch pattern, create the front and back panels, shape the straps, and finish your vest with the slip-stitch borders and adjustable side ties. You can follow the written instructions above while watching the video to help you complete your own Zarina vest.
More Free Crochet Patterns to Try
If you enjoyed making the Zarina Crochet Sweater Tie-Vest, you might also enjoy exploring these other free crochet patterns. Whether you’re looking for another layering piece or a handmade top for your wardrobe, there’s always a new crochet project to try.
- Free Crochet Top Patterns – Discover stylish crochet tops for everyday wear and layering.
- Free Crochet Vest Patterns – Explore more crochet vests to add to your handmade wardrobe.
- More Crochet Clothing Patterns – Find more wearable crochet projects to make for yourself or as gifts.