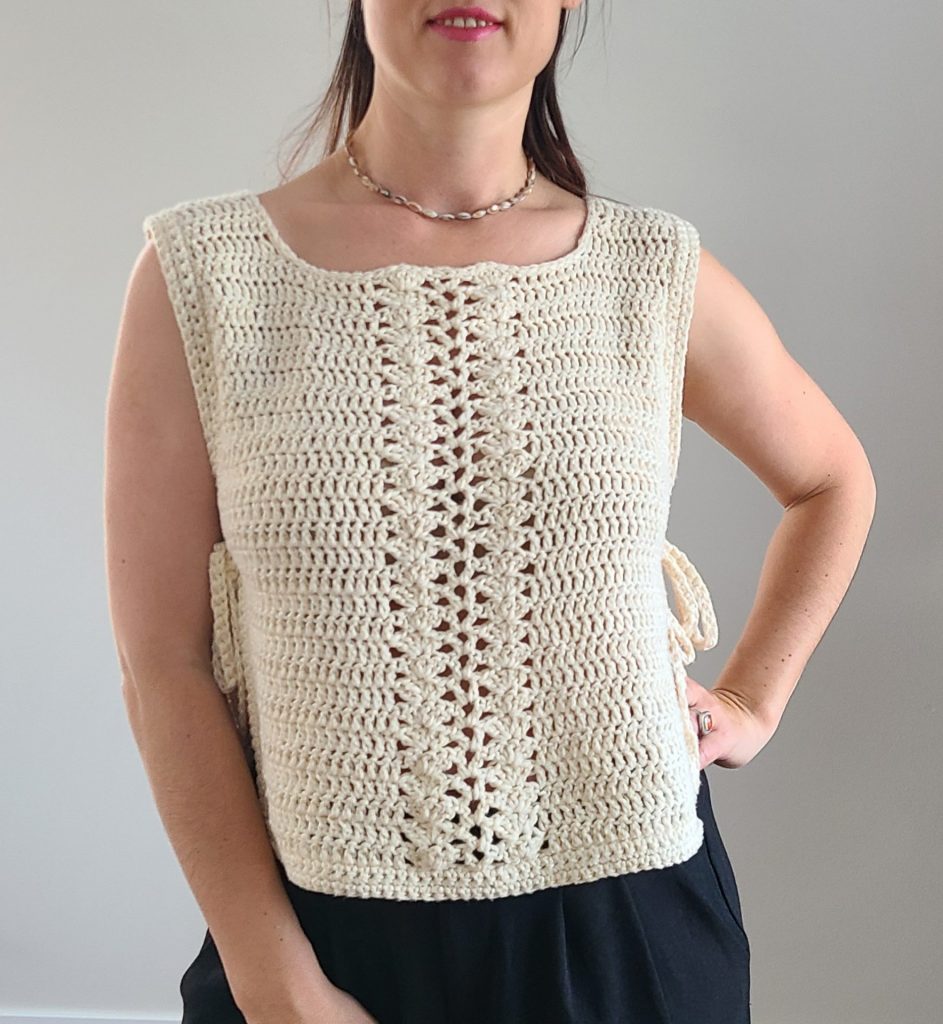
Elevate your wardrobe with this free crochet tie vest pattern! Here you’ll find a detailed crochet tie vest pattern, along with a helpful video tutorial to guide you every step of the way. Get ready to crochet your very own crochet tie vest and elevate your fashion game!
Simple Stitches Meet Elegant Design
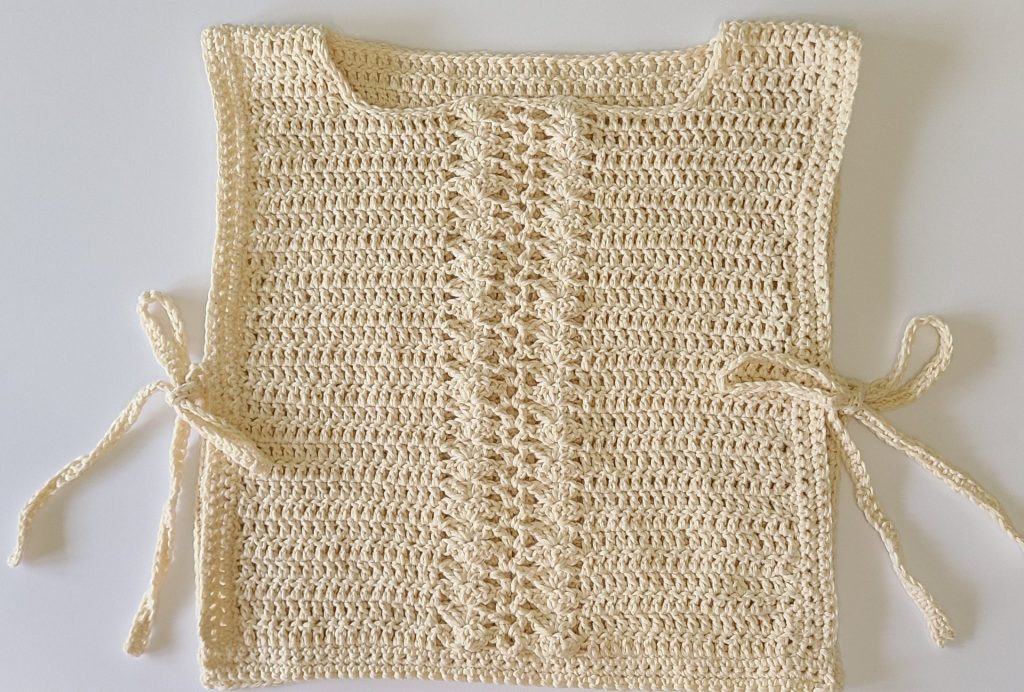
Make this easy and cute crochet tie vest pattern with an easy stitch combinations that embrace the elegance and simplicity. This garment is dense, eliminating the need for additional underlayers This women tie vest is versatile for every season.
Cotton for Comfort
Cotton yarn is ideal for making garments, due to it’s versatility and soft fibers. I chose Loops & Threads cotton yarn for minimal stretch and easy maintenance. This beautiful crochet top will allow breathability on warm summer days and comfort for cooler winter nights. I have also provided the instructions for adjusting the size ranging from small to 3XL. For those who need more visual instruction, I have included a video tutorial to guide you through this free crochet pattern.
This crochet tie vest pattern is perfect for adding a fun and fashionable touch to your wardrobe. Whether you’re making a gift or something for yourself, this women vest pattern will guide you step-by-step to create a beautiful crochet piece.
Solya Crochet Tie Vest Information
Skill Level: Intermediate
Finished Sizes:
| Size | Width (in) | Height (in) |
| S | 16 | 19 |
| M | 17 | 20 |
| L | 19 | 22 |
| XL | 21 | 24 |
| XXL | 22 | 26 |
| 3XL | 24 | 28 |
Materials Needed:
1. Yarn: 2 skeins of Loops & Threads Yarn: Creme Cotton
2. 5 mm hook
3. Scissors
4. Tapestry needle
5. Optional: stitch marker
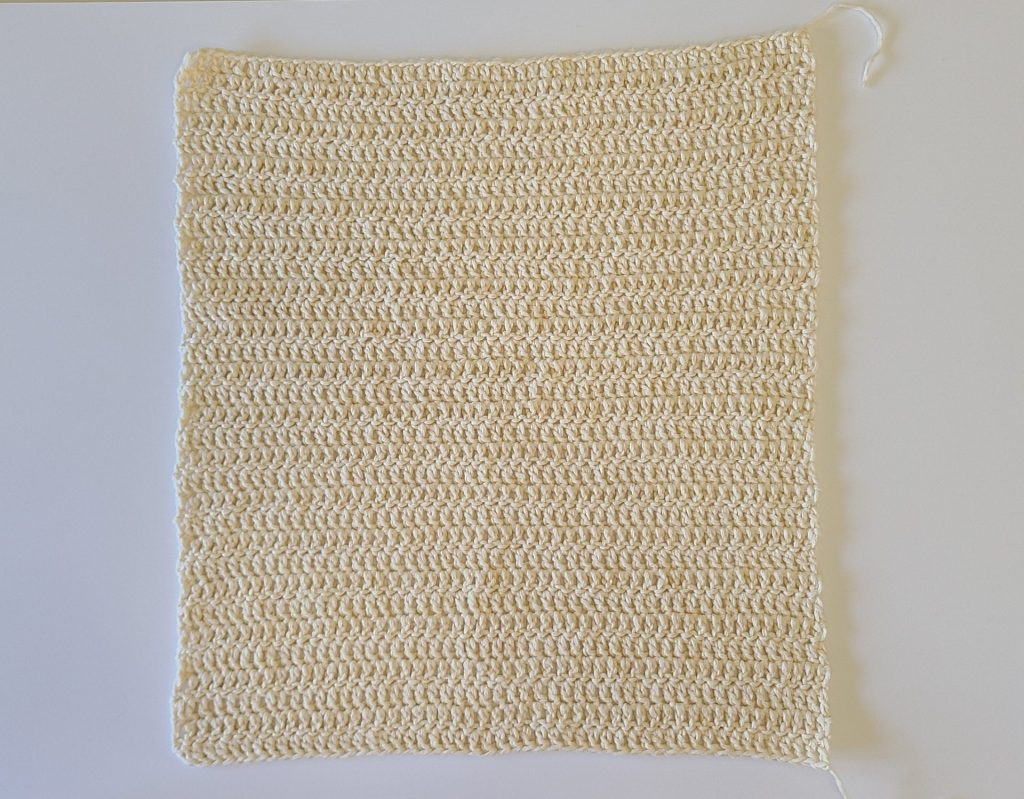
Gauge
13 dc, 7 rows (4×4 inch square)
Pattern Notes for Solya Crochet Tie Vest
For the Front Panel: There is a small difference between Row 1 and Row 2: At the beginning of Row 1, you have to skip 3 stitches before 5dc into next stitch, between [dc, ch 2, dc] and 5dc into next stitch. At the beginning of Row 2, you have to skip 2 stitches before the 5dc and after the second 5dc on the other side of the row.
These are the # of dc you should have in both sides for front panel for all sizes at the 1st row:
Size S: (15 dc – 15 dc)
Size M: (18 dc -18 dc)
Size L: (21dc-21dc)
Size XL: (24dc-24dc)
Size XXL: (27dc-27dc)
3XL: (30dc-30dc)
Stitches Used
US Terms
| ** | Repeat instructions in asterisks define number of times |
| [ ] | Work these instructions in same stitch |
| Ch | Chain |
| Dc | Double Crochet |
| Rep | Repeat |
| Eor | End of the Row |
| Sk | Skip |
| Dec | Decrease |
| Sl St | Slip Stitch |
| Sp | Space |
| St(s) | Stitch(es) |
Solya Crochet Tie Vest: Starting Chains & Sizes
| Size | Back Panel | Front Panels |
| S | 44 + 3 | 44 + 3 |
| M | 50 + 3 | 50 + 3 |
| L | 56 + 3 | 56 + 3 |
| XL | 62 + 3 | 62 + 3 |
| XXL | 68 + 3 | 68 + 3 |
| 3XL | 74 + 3 | 74 + 3 |
How to Get the Free Adds Pattern
If you’re interested in purchasing this crochet top pattern in a downloadable, printable PDF format, it is available for purchase on the shop linked bellow:
CLICK HERE TO PURCHASE THE SOLYA CROCHET TIE VEST PATTERN ON ETSY
Solya Crochet Tie Vest: Video Tutorial
Solya Crochet Tie Vest: The Pattern: Back Panel
( The size made is Medium )
Chain 50+3
Row 1: dc into 4th ch from hook, dc in each st to eor (51 dc)
Row 2: ch 3, turn, dc in each st across
Row 3 to Row 32: Rep Row 2
Size S: to Row 31
Size L: to Row 34
Size XL: to Row 36
Size XXL: to Row 38
Size 3XL: to Row 40
Solya Crochet Tie Vest: Front Panel
The size made is Medium
Chain 50+3
Row 1: dc into 4th ch from hook, dc in the next 16 sts, sk 3, 5dc in the next st, sk 3, [dc, ch 2, dc] into the same st, sk 3, 5dc into the next st, sk 3,dc in the next 18 sts.
Row 2: ch 3, turn, dc in the next 17 st, sk 2, 5dc into the next st (that is the middle of the 5dc from previous row), sk 3, [dc, ch 2, dc] into the next ch2sp from previous row, sk3, 5dc into the next st, sk2, dc in the next 18 sts.
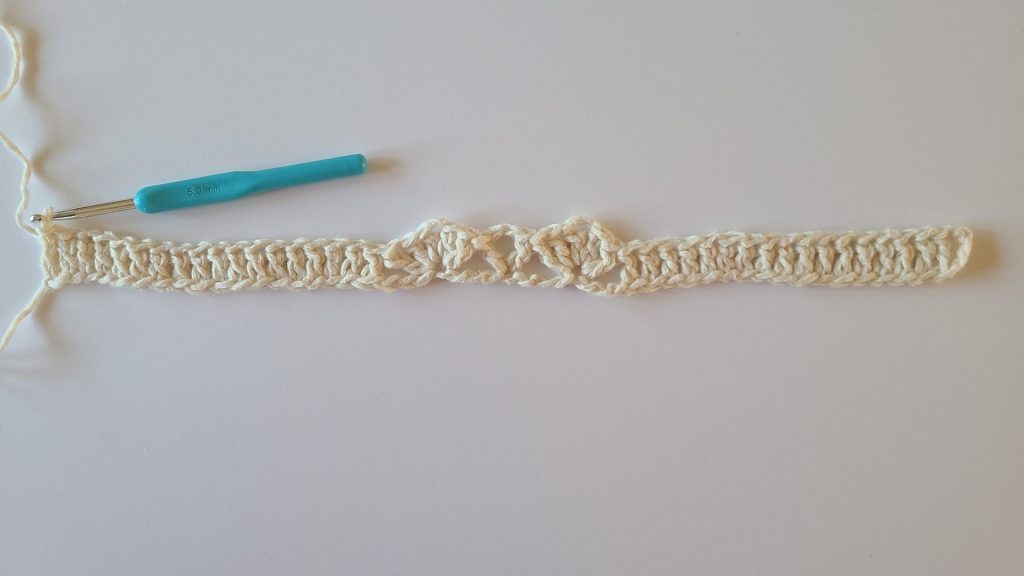
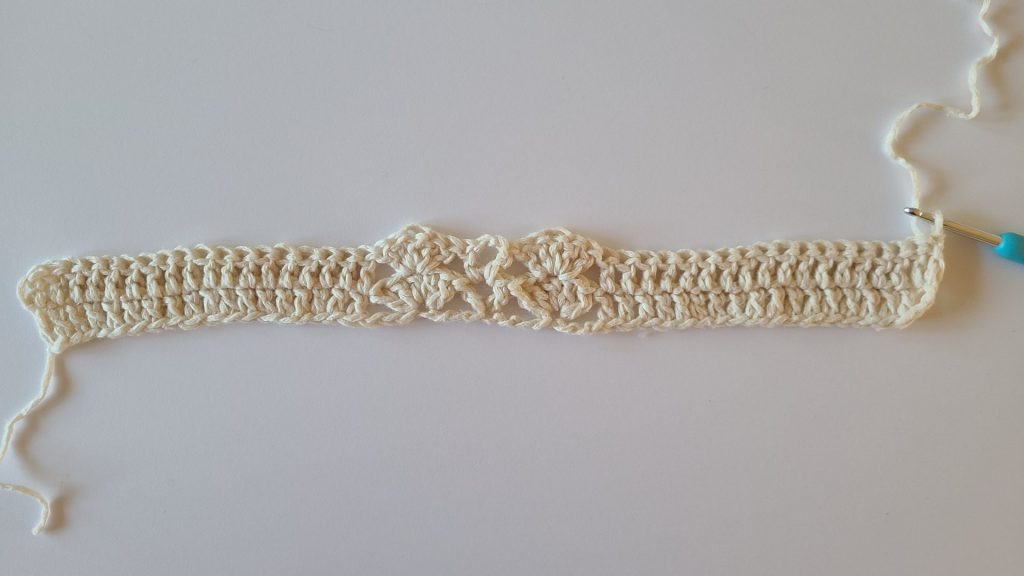
Row 3 to Row 27: Rep Row 2
Solya Crochet Tie Vest: Other Sizes
Size S: Rep Row 2 by Row26;
Size L: Rep Row 2 by Row29;
Size XL: Rep Row 2 by Row31;
Size XXL: Rep Row 2 by Row 33;
Size 3XL: Rep Row 2 by Row 35
From Row 28 there is a small difference between the left and right side of the front panel.
Front Right Side Panel
Row 28: ch 3, turn, dc in the next 8 sts, dc dec into the next 2 sts.
Row 29: ch 3, turn, dc dec into the next 2 sts, dc in the next 8 sts.
Row 30: ch 3, turn, dc in the next 8 sts.
Row 31 and Row 32: Rep Row 30.
Front Left Side Panel
Row 28: Attach yarn, ch3, dc dec into the next 2sts, dc into the next 8sts.
Row 29: ch 3, turn, dc into the next 8 sts, dc dec in the next 2 sts.
Row 30: ch 3, turn, dc in the next 8 sts.
Row 31 and Row 32: Rep Row 30.
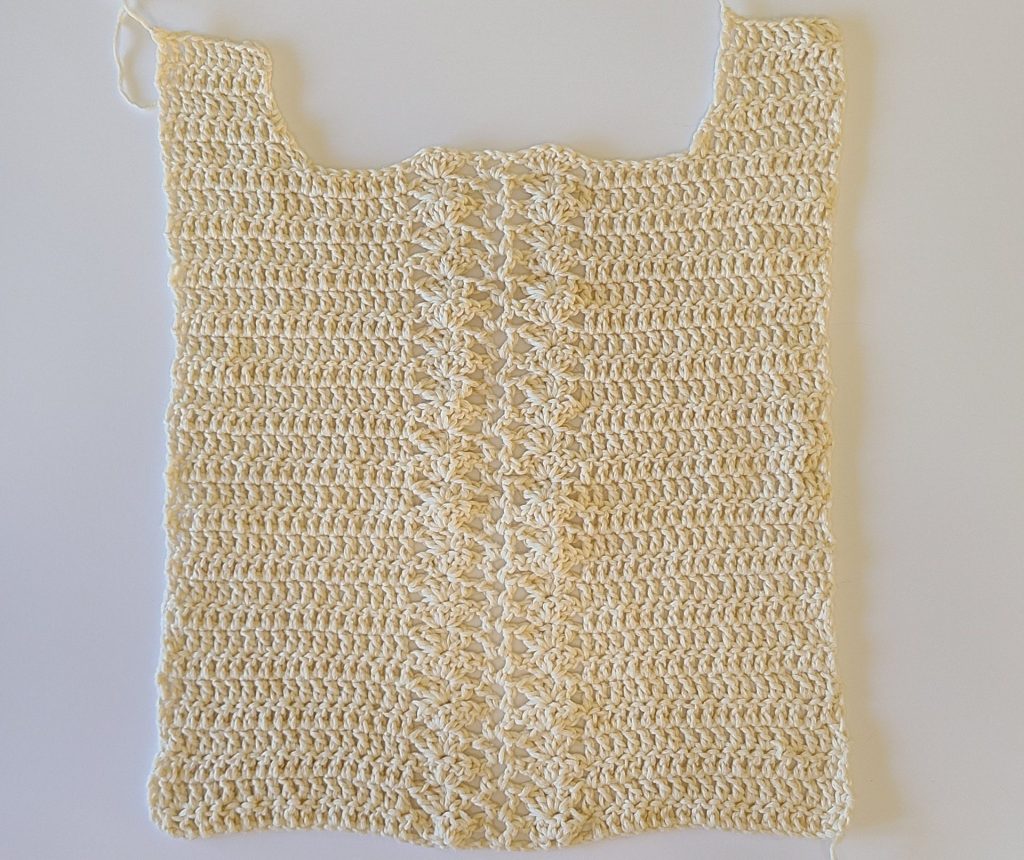
Solya Crochet Tie Vest: Assembly
Lay both pieces together with the wrong sides facing up.
Sew on both sides of the shoulders
Solya Crochet Tie Vest: Borders on the Sides
Attach yarn in any place.
Row 1: Ch 1, sl st in each st all the way along the left side first.
Row 2: Ch 1, sc in each st all the way around until the bottom.
Row 3: Rep Row 2
Solya Crochet Tie Vest: Border on the bottom
Attach yarn in the corner.
(Both panels)
Row 1: Ch 1, sl st in each st all the way along the first panel.
Row 2: Ch 1, sc in each st all the along.
Row 3: Rep Row 2